Discover Android apps, tips, and tools for education. Enhance learning and productivity with strategies tailored for Android devices.

Windows 10 embraces its movie-making roots, bringing storytelling to life with a new app Windows Story Remix that takes the place of the old favorite Moviemaker. Although not due out until later this year, Windows Story Remix boasts some features that should get educators excited. Let’s do a quick review of three exciting features.
Feature #1: Cloud-Based Creativity
The new program has students start online using the mobile device of their choice (Android, iOS, and Windows) and then save their work to the cloud. Images and video from all of those devices gets mixed into their creation. That means that if a student makes a story on an iPad, they will be able to finish it on their Windows 10 device later on.
Feature #2: 3D Virtual Designs and Digital Ink
With Paint 3D, a re-designed Paint program, students can create designs and then import those into Windows Story Remix. They can take objects and pin them to scenes. Those pinned objects can also follow throughout a scene. Students can also import content from Remix 3D, an online warehouse of user-generated 3D designs, and they can take advantage of digital ink to write text directly on their creations, dropping in 3D graphics and adding special effects.

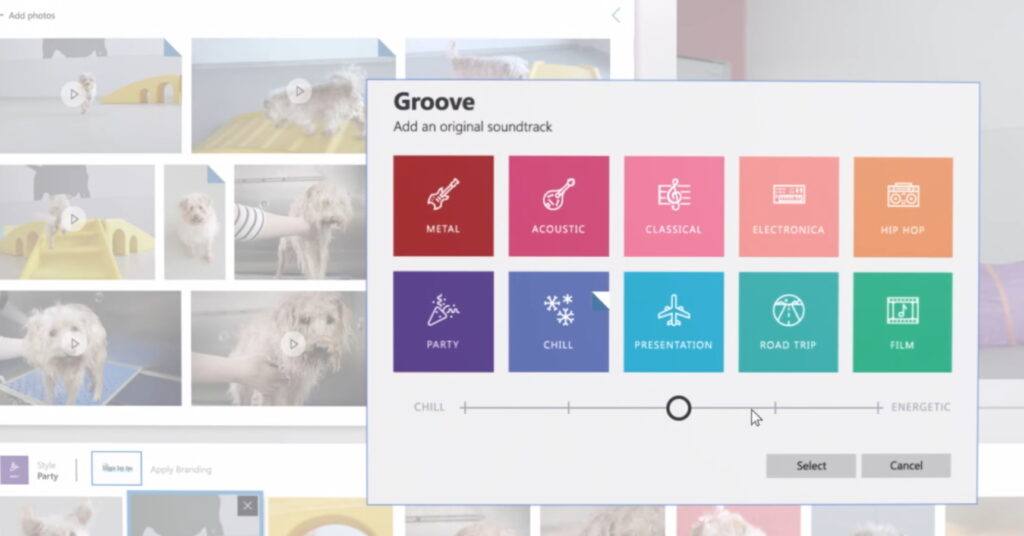
Feature #3: Add a Soundtrack
Adding soundtracks to a video is easy with Windows Story Remix, allowing students to pull royalty-free content from a variety of places:
Watch the Video
To get a grasp of the possibilities of this new software, check out this video. Then start planning how you’ll have your students don their filmmaking hats and tell their own stories!

")

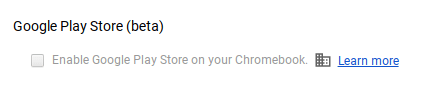 that the option to access the Google Play Store on your Chromebook is enabled in the dashboard. You can check your Chromebook by going to Settings. Scroll down until you see the Google Play Store (beta) section. If the option is greyed out, then you’ll need to bake a batch of cookies to take to the domain administrator and ask if they can enable the feature. (Giving cookies increases the chances of having this feature enabled by 64 percent.) If you log in with your personal Google account on the Chromebook, you’ll notice that it is already enabled. But you do NOT want to use your personal account with your students and other teachers. For safety reasons, you always want to use your district account, even if that means bribing the domain administrator or waiting a few days for it to be enabled.
 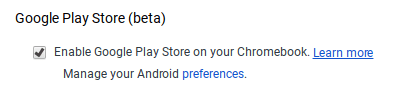 Once the option to enable is made available, you’ll be able to enable it in Settings and manage Android preferences (similar to if you were setting Android preferences on an Android phone or tablet).
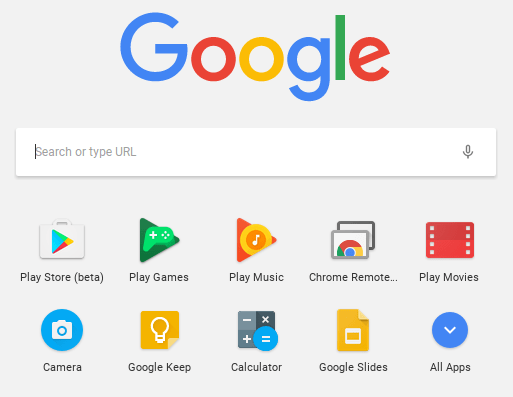 Yippee! You have it enabled. So where it it? Click on the Launcher icon which, by default, is the icon on the bottom left on the shelf. You will now see the Play Store (beta) icon. This beta Play Store is currently a stipped down version of the Play Store you would see if you accessed it through the browser. And yes, you will need to use the beta Play Store to install Android apps. When accessing the store via the browser, your Chromebook will not be an option in the dropdown list of compatible devices. Once you click on the beta store, you will recognize the various categories to help you narrow down what type of app you are looking for. If the developers have not completely finished updating the app in question, it may be available as a beta version. When I spot checked several of the Android apps I have on my phone, almost all were available and ready in the Play Store. You might even find that some app developers have made their product available as a Chrome app (that you install via the Web Store) and an Android app (that you install via the beta Play Store). Either way, once installed, they will appear in your launcher window.
 Autodesk SketchBook – Whether it is illustrating, diagramming, or sketchnoting, you’ll find this to be a simple app to use. When done, save the image to your Chromebook.
 Trello – More than just a to-do list app, Trello can help you keep track of projects. You can work alone or collaboratively with classmates to keep track of project-based learning activities.
 Trading Cards – This isn’t your traditional trading card maker. Templates provided include fictional person, real person, fictional place, real place, object, event, and vocabulary. Once you enter information on the front and back of the card, you can share it as a photo to your photo gallery.
 Pic Collage – Share your message with pictures! Pic Collage lets you start by selecting your photos and then adding them to a grid with templates (start with a themed background) or freestyle (begin with a blank slate and add to it). You can also easily add text and search for photos on the internet to add to your collage.
 Diamante Poem – This type of poem is in the shape of a diamond. Each line uses specific types of words (adjectives, -ing words, etc.). What makes it especially nice is that it doesn’t have to rhyme. This app has some examples to illustrate how to write a diamante poem, and it leads you through creating your poem step by step. When you’re finished, you can save the poem as an image to your photo gallery.
  Acrostic Poem – Think of a word and then write a word or phrase for each letter in the word. This app will lead you through creating an acrostic poem and even helps you brainstorm words. Acrostic poems are often used when students write their name vertically and then write out adjectives going across that describe them, but the uses are endless.
  Haiku Poem – This app makes writing this Japanese-style poetry super simple. Walking you through the steps of brainstorming words and phrases and making note of the syllables, you’ll find that constructing one is easy and can be very profound.
  Poems By Heart from Penguin Classics – This well-crafted app introduces students to a wide variety of poetry. Even without the premium downloads, the free ones supplied each come with audio that highlights the lines as the poem is read with inflection. Students can record themselves reading the poem and even earn poetry points by memorizing them.
  POETRY from The Poetry Foundation – Let students encounter a wide variety of poetry in this app. They can discover titles by spinning the category wheels (emotions and events) or by searching for a specific author in the index. Poems that have audio are indicated with a small speaker icon, great for extra support for struggling readers/writers as well as students who may benefit from hearing it read aloud.