Transforming teaching, learning and leadership through the strategic application of technology has been Miguel Guhlin’s motto. Learn more about his work online at blog.tcea.org, and mguhlin.org. Catch him on Mastodon at @mguhlin@zirk.us
Areas of interest flow from his experiences as a district technology administrator, regional education specialist, and classroom educator in bilingual/ESL situations. Learn more about his credentials online at mguhlin.org.
Want your art creations to sparkle? You may find yourself reaching for an AI digital art tool to create content. But which should you reach for? AI art tools are at a premium. For educators on a tight budget, paying $10-$30 a month for access is too much. Even for those who want to “freshen up” their digital newsletters, the cost may be too high. Let’s take a quick look at a few solutions that are free to start out using. But first, let’s take a look at how to create a prompt.
Update: This blog entry now includes how to generate amazing art with Canva’s Magic Studio and AI Apps. Scroll down to see more. If you have Canva for Education or a Pro account, you may NOT need some of the other AI Creator tools listed, except for variety.
Crafting an AI Art Prompt
When generating art with AI, having a good prompt is a must. Working to perfect your prompt and including details will ensure that your generated AI art matches what you’re looking for. Some suggestions for prompt writing:
Describe the content of the image
Describe the subject
Add relevant details
Describe the form and style
Define the composition
Additionally, using adjectives and involving other AI tools, like Claude.ai, can aid you in prompt-making. With that in mind, I decided to use a standard prompt to test out several AI art generators. I consulted Claude to help me. Since I like owls, here’s my prompt and the prompt generated by Claude in response:
Screenshot by author, Claude.ai
Test Prompt Text: “An oil painting portrait of a large wise grey hooded owl with intelligent yellow eyes emerging from darkness, covered in an intricate arcane robe embroidered with ancient Norse runes and symbols glowing with power. The owl’s feathers and robe flow abstractly in dramatic volumetric lighting and misty atmosphere, rendered in an abstract expressionist style with thick gestural brushstrokes and paint textures.”
Although still under wraps, you can request Leonardo.ai access. My experience involved a short three-minute wait. Then, I logged in with my Google Workspace for Education account.
Screenshot by author, Leonardo.ai
This beautifully designed website features inspiring images. Some points shared during the welcome guide:
The featured models highlight various image generation styles. Select one and begin creating images with it yourself.
Use text, image prompts, or image-to-image to create new 2D images.
Explore features like Leonardo Alchemy and Prompt Magic v2.
Post-process your images with features that include upscaling, unzooming, and background removal.
Struggling to come up with prompt ideas? Toggle from Image Generation to Prompt Generation.
You can see that Leonardo.ai’s interface is quite rich:
Screenshot by author, Leonardo.ai
From start to finish, the text prompt appeared within two minutes. I turned the images generated into an animated GIF:
Animated GIF of images created by Leonardo AI with a prompt by the author
I loved Leonardo’s AI art creations. You might see these gracing the cover of a class anthology on fantasy writing.
Microsoft Bing’s Image Creator has been my go-to for AI art based on text prompts. It relies on DALL-E to do the heavy lifting. It’s also easy to use, and it’s fast. While previous AI art creators took up to two to three minutes, Bing Image Creator generates in seconds.
This lightning-fast AI art generator offers one image in response to the prompt. You can see they have a simple interface that lets you get started quick:
Screenshot by the author: NightCafe Home Page
Here’s their stunning creation:
But Wait, There are TWO More!
#6 – Canva Magic Studio
If you’ve read about Canva Magic Studio, you know that it can’t be left out of the pack. It offers so much more capabilities for AI-powered art generation that rival all the tools shown above. Let’s take a quick tour of what’s possible.
Canva’s Magic Media, a tool in the Magic Studio and also known as “text to image,” offers the best image generation. You can choose from multiple styles. What’s more, Canva’s Magic Media generates FOUR images to the standard one or two that other apps render. Take a look:
You get over 400 credits that renew monthly, so you can generate a lot of images with Canva’s Magic Media. But it isn’t the only AI-art generator you get access to. Here are a few more creations from DALL*E, Google’s Imagen, and Mojo AI. Of these, Mojo AI provides 75 credits when you register for free, but expends 4 credits to generate two images. Of course, I found Mojo AI’s creations to be the best of the second bunch, but unable to match Canva’s Magic Media.
Here’s a video of the process I went through to generate these (about 8 minutes):
If you haven’t explored LEAP, you definitely need to give a hard look. While it only allows 10 free uses, the images appear realistic, like this one below:
Of course, you can also get an output like this one:
Assessing AI Art
Want to assess AI-generated art? Consider the points these authors make:
Assessing the artness of AI-generated images continues to be a challenge within the realm of image generation. Most existing metrics cannot be used to perform instance-level and reference-free artness evaluation.
Source: Chen, An, Lyu, Luo, Learning to Evaluate the Artness of AI-generated Images via ArXiv
Another important consideration? Copyright. Did you see the ruling from DC District Court Judge Beryl A. Howell? Judge Howell ruled:
United States District Court Judge Beryl A. Howell ruled on Friday that AI-generated artwork can’t be copyrighted, as noted by The Hollywood Reporter. She was presiding over a lawsuit against the US Copyright Office
Copyright law has “never stretched so far” to “protect works generated by new forms of technology operating absent any guiding human hand,” U.S. District Judge Beryl Howell found.
How do you propose to address the use of AI art in your classroom or workplace?
These AI art generators are terrific, and there are even more out there. As you might imagine, these are a boon to any student author looking for a quick cover for a book or publication. You can easily combine images like this with others to get incredible results. These tools are especially attractive to writers who can’t draw well. Which one do you plan to try first?
Featured Image: Owl generated from author’s prompt using Microsoft Bing Image creator
Are you getting started with Canva? It’s an amazing digital creation tool. If you’ve not yet been verified for a free Canva for Education account, I’d highly recommend doing so! Once you’re in and exploring all the amazing features, you might appreciate these productivity hacks I stumbled upon as I got to know Canva. Let’s take a look at a few tricks on everything from editing your uploaded PDFs to masking images.
Did you know?
A few colleagues didn’t know that Canva has an app that works on Windows or Mac computers. Using the Canva app can improve your creation speed. I knew there was an app for smartphones and tablets, but I didn’t know there was one for my desktop. It’s now my favorite way to interact with Canva!
Hack #1: Importing Presentation Templates to Canva
Want to import amazing content from SlidesMania into Canva? Sure, Canva has tons of great templates, but they don’t have everything. SlidesMania, SlideCarnival, and SlidesGo offer a variety of presentation templates you can use within Canva. Didn’t find what you’re looking for? Don’t worry, there are plenty of other sources of templates available online!
With that in mind, from your Canva Projects home page, you can import presentation templates you find elsewhere.
Click Add new in the top right corner.
Select Import from app in the drop-down menu.
Import your saved template.
Screenshot by author, Canva.com
What you may not know is that Canva supports other import formats besides PowerPoint. This is good because exports of PowerPoint files don’t often import well into Canva. You may need a simpler, intermediary format, like an ODP presentation. But the simpler the format, the more likely fancy animations will fail. That’s alright, though, since Canva offers its own magic.
Screenshot by author, Google Slides
Hack #2: Hide, Blur, or Add Effects to Pages
Hiding presentation slides isn’t anything new. You can do it in Microsoft PowerPoint and Google Slides. But if you “skip slide” in Google Slides, the skipped slides are visible if you share the link. In PowerPoint Online, the skip slide will obscure the slide from presentation view. But, you can still print them to PDF to see any slides the author chose to hide. Canva makes it easy to hide presentation slides (called “pages” in Canva), and you can hide many at once!
Click the arrow in the bottom center of the editor to Show pages in your presentation.
Select the page you wish to hide (it will outline in purple) or press and hold control to select multiple pages.
Hover over a page and click the three dots in the top right corner.
Choose the Hide pages option in the menu.
Screenshot by author, Canva.com
A neat feature in Present mode on Canva? You can use Magic Shortcuts to blur content or add effects. To enter Present mode, just click the full screen icon in the bottom right corner of the editor.
Entering Present mode in Canva
You can “hide” content in a presentation by blurring it until you’re ready to discuss it, and you can add special effects like bubbles and confetti! To access this menu in Present mode, click the keyboard icon in the bottom right of the screen.
Screenshot by author, Canva.com
Hack #3: Clean Out Uploaded Items
Want to easily clean out your uploaded items in Canva? Use the Select items tool to choose multiple items.
Click Uploads in the side panel.
Select an image and click the three dots in the top right corner.
Choose Select items in the menu.
Select all items you’d like to delete.
Click the trash can at the bottom of the Uploads pane to send them all to trash.
Screenshot by author, Canva.com
This allows you to keep your uploaded items area tidy. Trashing items from your upload tray does not remove them from any documents you put them into. That means, unless you are planning to use those items again, it’s fine to select and delete them.
And, remember, items stay in the Trash for thirty days. If you need to restore a trashed item, you can always recover it:
Screenshot by author, Canva.com
Hack #4: Edit PDFs with Canva
Wish you could edit a PDF? While one of my favorite tools is PDF Reader by XODO for forms, give Canva a try. You can drag and drop the PDF file into the Canva Projects home area. When you start to drag it over, it will look like this:
Screenshot by author, Canva.com
Then, once Canva has uploaded your PDF file, you can begin editing it right away. What’s amazing is that Canva converts the text in a PDF to become editable, so you’re able to make changes and adjustments.
Here’s a form adapted from a school district’s form available in PDF:
Screenshot by author, adapted from source via Canva.com
All the text in this PDF is edit-friendly. If I need to add content and images or make corrections, I can do that.
Hack #5: Masking Images with Frames
Wish you had an easy way to drop an image or photo into a shape? Canva offers pre-created “frames” you can use. These allow you to mask an image, hiding parts you don’t want people to see. The benefit? You can frame an image into a particular shape, like a cut-out.
To frame an image, first open a Canva project document or make a new one. Then, select Elements in the side panel. You’ll notice a menu at the top of the elements pane. Choose Frames to explore all the options. You’ll find a variety of them to choose from:
Add one of the frames to your document, then import an image or find one in Canva’s Elements. Drag the image into the frame, and it will merge to take the frame’s shape. Double click the image to move it within the frame.
While there are various programs that allow you to do this (Google Slides has a “crop to shape” option), Canva offers a variety of frames. There are more frames available via Mockups in Canva’s Apps area. Watch the video below to see how you could use them, along with Canva’s QR Code generator, to put your QR code or image on anything!
Wouldn’t it be neat to match any image to any shape? Or convert any simple shape to a frame you could use? There are ways, but that will have to wait for another day.
Bonus Hacks!
If you’re a classroom teacher, you can do any of the following:
Check out all the amazing tools at the bottom of the Canva.com website
What Are YOUR Canva Productivity Hacks?
Now that I’ve shared some Canva hacks with you, which ones do you plan to try? Maybe you’ve already discovered some tips and tricks of your own. Share them in the comments so we can all reap the benefits!
Explore TCEA Canva Courses to Ramp Up Your Work!
Check out TCEA’s up to date, self-paced, online course: Canva Specialist!This course will make you an expert in Canva’s new Magic Studio AI tools. You’ll also get updated on all the educational features Canva has to offer. Don’t miss it!
TCEA has a flexible, online Canva Educator course to introduce you to Canva’s powerful toolkit! Learn how to easily and quickly create spectacular resources, even if you’re not a designer or an artist.
Wish you could empower and engage students with strategies that lead to long-term information retention? Outlining and summarizing is a strategy that assists students in learning new material and retaining it. Once students learn to read a text, watch a video, outline, and summarize, they will remember. As a deep learning strategy, outlining and summarizing assists students in connecting ideas. According to researchers, deep learning happens when learners make a conscious and explicit effort. That effort involves connecting “new knowledge to relevant concepts they already have.”
Outlining and Summarizing (d=0.62): This deep learning strategy involves students in identifying ideas. They identify the main ideas and render them in one’s own words. The core skill is being able to differentiate between main and supporting ideas.
Let’s look at several deep learning activities you can complete with your students to boost retention using outlining and summarizing. But first, let’s look at the science behind it.
What Helps Us Remember and Retain
A key idea behind outlining and summarizing involves semantic processing or encoding. That is, translating what we experience through our senses into a meaningful connection. This connection, like a story you tell yourself about an event, aids in memory recall. When you outline, putting ideas into your own words, you are engaging in semantic encoding. Semantic encoding is the process of linking data and information to concepts and meanings. This improves understanding and recall.
But what does “think about it” mean? Many students have no idea. If the goal is to remember information, you have to do something with it. That makes “thinking” a series of repeated actions that ensure long-term information retention. Want to ensure you never forget the code to your memory safe? Take one of these actions:
“Memories are stored in ensembles of neurons called ‘engram cells’, and successful recall of these memories involves the reactivation of these ensembles. The logical extension of this is that forgetting occurs when engram cells cannot be reactivated. The memories themselves are still there, but if the specific ensembles cannot be activated, they can’t be recalled. It’s as if the memories are stored in a safe but you can’t remember the code to unlock it.”
Source: Dr. Tomás Ryan, associate professor, School of Biochemistry & Immunology, & Trinity College Institute of Neuroscience, Trinity College Dublin
Now, let’s dive in to three activities that use outlining and summarizing to aid in retention.
When you create a reverse outline, you are selecting key ideas in a reading selection. Only the sentences with key ideas will end up in your reverse outline. Cut away anything that isn’t relevant to the key sentence in a paragraph. If you can’t find a key sentence, ask yourself, “What is this paragraph about?” Then write a one-sentence summary of it. You can find some digital tools to support you, but one you could take advantage of is ChatGPT. If you have access to ChatGPT, you can ask it to make a reverse outline for you.
Example ChatGPT Prompt: Create a reverse outline of the following passage with Roman numerals, main ideas, and supporting details: Then paste in the text to be outlined.
Author generated compilation of Cornell Notes, 3-2-1, and Jigsaw organizer
You may already be familiar with the Cornell Note-Taking method. The flexibility of the Cornell Notes format makes it one of the most important tools you can share. The Cornell Note-Taking process is straightforward:
Record your notes in your own words. Make an outline, draw a concept map, or a sketch a picture (sketch note).
Reduce your notes. Work on the cue column. Identify keywords and vocabulary. Write questions that trigger recall of ideas or use them to quiz yourself.
Recite and Reflect. Summarize key ideas from the cue section, drawing conclusions.
Review your notes. Spread out your study over several days or weeks rather than cramming them right before an event (e.g. test, quiz, project).
What’s more, there are many templates for Cornell Note-Taking online:
Concept maps like diagrams, mindmaps, and semantic webs can help you seize the chaotic energy of your mind by tapping into your generative power. You seek to reflect the constellations of thought and map them. There are benefits to this thought cartography. In an online compendium of research, the benefits of concept mapping are clear. These strategies have a thought-mapping component that requires students to recall information.
As I create a concept map, an outline, or take notes, I am full of questions that may include:
Should I build my understanding around this main idea?
Is this the main idea? What are the supporting or related concepts?
How do the main idea and the supporting ideas connect to what I already know?
How can I best represent or arrange ideas to reflect what I know and what I am learning?
This self-interrogation is ever-present and appears in all the strategies that involve diagramming and concept mapping. Paste in a text selection (200 or so words) to be turned into a concept map into yEd LIVE. yEd LIVE will use ChatGPT to summarize and create the map. Of course, it is more effective if students make the map and connect it to what they know.
Screenshot by author, yEd LIVE
Screenshot by author, yEd LIVE AI-created map
Want to Learn More?
Want to learn more? Here is an infographic that can help you kick off your exploration.
Summarization and outlining are proven ways to help students retain information and learn deeply. These strategies can be used across a variety of subjects and content areas. Which of these activities will you use in your classroom? Leave us a comment to let us know how it goes.
Looking for science books for your daughter? Want to encourage critical thinking and thinking like a scientist? If so, let’s look at some recommendations from middle school science teachers. I’ll also add a few of my own selections from what I read with my daughter and, looking back, what I might add to the list.
What Is Critical Thinking?
One of my favorite authors is Louis L’Amour. He says in my favorite book of his, The Walking Drum:
“You are your own best teacher. My advice is to question all things. Seek for answers, and when you find what seems to be an answer, question that, too.”
Critical thinking is quite important, and this isn’t a bad way to think of it. Critical thinking is…
a set of skills and habits of mind,
a way to define a problem, identify assumptions, and analyze ideas
also an approach to reasoning in a critical manner
listing different possible causes
creating plausible solutions
evaluating the correctness of each using logical reasoning.
the ability to make creative connections between ideas from different disciplines (source)
Here is a great explanation of how to think like a scientist:
Kindling a Love of Reading
“Open a book, and you’ll never know where you end up.” It paraphrases a quote I read poring through Louis L’Amour’s Western stories. I’d stop at the library and pick up a “two-week” bag of books. In a few days, I’d return them all, finished. Every library I walked into was my church, every bookshelf, a pew. To pass on my love of reading, I would read to my daughter when she was younger. Years have passed, and we’re now both avid readers. Reading with your child is one of the best ways to grow a love of reading! My favorites to read to her at the time were a series of Did You Know? children’s books. Today, you can find a wide variety of Did You Know? science books online. Here are a few to explore:
Introduce your daughter to Halley Harper, Science Girl Extraordinaire series of books. These five books feature a nine year old girl who uses science to solve problems. Topics range from the Laws of Motion to chemistry, fossils, nature, and outer space.
Science Books for Girls
Let’s look at 20+ nonfiction books to explore on the chemistry and physics shelf. These are primarily for middle and high schoolers. Explore them in more depth using the links provided.
So, what will you start with? I hope you’ve found some science book selections from the list that have piqued your interest and sparked some inspiration. Do you have other books to add? Let us know your favorites in the comments.
Are you watching students and colleagues make claims based on potentially unverified information they’ve encountered? How can we balance all the information we receive from various outlets with a solid, decision-making process? Let’s explore some sources you can use to teach middle school students the importance of fact-checking and critical thinking. You’ll also discover an exciting new product, The Silph Booster, guaranteed to solve any child’s school cognition problems.
“We think we follow evidence to a conclusion. In reality, we come to our beliefs in irrational ways, then work backwards to find evidence to rationalize the belief. Pseudoscience is the promotion of a non-scientific theory. It is motivated by wishful thinking, existing beliefs, or identity.”
Melanie Trecek-King
Asking Tough Questions
Teachers and librarians may very well ask tough questions like these:
How should professionals address the issues of fake news, pseudoscience, propaganda, and/or biased research?
What happens when state organizations push biased information?
What are the best ways to use digital tools to support critical thinking today?
What are the requisite critical thinking skills that consumers and creators need?
These are tough questions that educators wrestle with. One possibility is changing how you think of it. Pseudoscience is a “by-product of normal science,” and this video is a bit of an eye-opener on the BENEFITS of pseudoscience.
Defining Fake News and Pseudoscience
Fake news is made-up information that’s given the appearance of real, legitimate news. Pseudoscience is fabricated and made to look like real science information. But both are designed to fool you or make you accept something that’s false as truth (adapted from source). How can we teach about this in grades 5-8? And, how might we even encourage the analysis of the design of pseudoscience? Before we get to that, let’s revisit an old bit of pseudoscience you may be familiar with.
Using Easy-to-Disprove Stories to Teach Critical Thinking
Many start teaching students about fake information using easy-to-disprove stories. For example, the tree octopus site has long served as an example of pseudoscience.
The Pacific Northwest tree octopus is an Internet hoax created in 1998 by Lyle Zapato. This fictitious endangered species of cephalopod was purportedly able to live both on land and in water. It was said to live in the Olympic National Forest and nearby rivers, spawning in water where its eggs are laid. Its major predator was reported to be the Sasquatch. The Pacific Northwest tree octopus website is among a number of sites commonly used in Internet literacy classes in schools, although it was not created for that purpose. (source)
Back in the 1990s, this bit of lore was old. It’s pseudoscience, even if old, that stirs a chuckle or two. I remember sharing it at “Intro to the Internet” workshops for teachers. Back then, it was about encouraging people to look twice, analyzing the website, before trusting what they found. It soon evolved into a funny way to introduce students to silly, fake facts. Finding out what’s actually true or not with more realistic information is a lot harder. Let’s take a look at some other story examples you can use for teaching.
Check out this lesson plan…
Here’s a middle school lesson plan aligned to NGSS standards. Students explore the characteristics of science and pseudoscience.
“You have to disentangle the details. You have to hold up every one independently, and ask, ‘How do we know this detail? Where are all these details coming from? Where did that specific detail come from?”
Eliezar Yudkowsky
Example #1: Saving Critical Cash Crops
Did you know you can harvest spaghetti noodles? Watch this video and consider the story of spaghetti cultivation and harvest.
This is a delightful tale about how spaghetti noodles find their way to your plate. Want a more up-to-date example? Explore how climate change is impacting farming. Heavy rains are jeopardizing this cotton candy farm,blue strawberries, and marshmallow fruit trees. Have students brainstorm solutions to save these cash crops.
“Most people, in fact, will not take trouble in finding out the truth, but are much more inclined to accept the first story they hear.”
Thucydides
Example #2: Sea Monsters and Whales in the Great Lakes
Explore the enchanting yarn of the Nantucket Sea Monster. Or see how many people have observed whales in the Great Lakes.
“Each year we report the movements of the whales on Lake Superior. The reports are sightings sent by residents and visitors along the North Shore of Lake Superior. If you spot whale activity, let us know by filling out the form on the right! We accept photos, too.”
“What can be asserted without evidence can also be dismissed without evidence.
Christopher Hitchens (a.k.a. “Hitchen’s Razor”)
Example #3: Pig Hero Rescues Baby Goat
It’s not every day you see amazing pig rescues. Once you watch this, you realize how powerful a video is to capture just-in-time acts of heroism.
Amazing enough, fake news isn’t a recent affliction. You can watch this video to learn more about fake news in the 18th century. This video features a particularly interesting maternal claim. Watch the video to learn more.
Can you imagine a chicken living without its head? If you aren’t familiar with this bit of lore, you’ll want to check it out.
On September 10, 1945, farmer Lloyd Olsen of Fruita, Colorado, was planning to eat supper with his mother-in-law. He was sent out to the yard by his wife to bring back a chicken. Olsen chose a five-and-a-half-month-old Wyandotte chicken named Mike.
Mike, the chicken was still able to balance on a perch and walk clumsily. He attempted to preen, peck for food, and crow, though with limited success.
We are trying to prove ourselves wrong as quickly as possible, because only in that way can we find progress.
richard feynman
Example #5: Nut Milking
Find out the truth behind that almond, cashew, and pistachio milk you’ve been buying at the store. In this three-minute documentary, you and your students will be startled. You’ll learn what it takes to milk nuts, not unlike cows.
It is morally as bad not to care whether a thing is true or not, so long as it makes you feel good, as it is not to care how you got your money as long as you have got it.
Edmund way teale, circle of the seasons (1950)
A Few Books on the Subject
Want to beef up your knowledge on the subject of fake news and pseudoscience? Check out these books to broaden your perspective and deepen your knowledge. You will also find some more examples of stories you and your students can analyze.
Want more resources? Explore this Wakelet by high school teacher, Julie Drewry. She does a wonderful job wrapping up stories and ideas, some of which I’ve included in this blog entry.
Give Fakey a Try
You will find interesting scenarios, some of which may highlight toxic practices in education and/or work place. Be sure to preview the scenarios to see if they are appropriate for your situation. Play the game.
Mistrust arguments from authority. In science, there are no forbidden questions, no matters too sensitive or delicate to be probed, no sacred truths.
Carl Sagan
Make Up Your Own Fake News and Pseudoscience
Wouldn’t it be a hoot to create your own fake news and pseudoscience for teaching purposes? I know it is because I’ve written fake news articles about family, friends, and colleagues. Although read by a limited audience, I still remember the time I wrote one about a principal. Ahem, well, no need to go into details. If you need some inspiration, clickbait and April Fool’s jokes are great sources for ideas.
To construct your own pseudoscience, Robert T. Carroll has some suggestions. With those for inspiration, I’ve boiled them down to seven steps:
Make big promises about the scientific proof for something that most people fear (e.g. death, pain) or desire (e.g. money, health, long life).
Use a lot of jargon and hedge your promises with words like “may help.”
Reference conspiracies that try to keep the truth from the public.
Claim you have discovered a secret scientists are unaware of.
Make stuff up and include testimonials from famous people with big names.
Charge for your product.
Wear a lab coat and call yourself a doctor.
How could we put these suggestions to good use?
The Silph Booster, Now Available
Want a quick example that takes real news and science but twists it into pseudoscience? Let’s see…did you know about this new booster to your health, the Silph Booster? It’s especially effective given its long history from ancient times. The original plant on which this solution was based was lost. But it has been recently rediscovered!
Ancient silver coin from Cyrene depicting a stalk of silphium (source: Wikipedia) The “miracle” plant Silphium consumed by Ancient Greeks, Romans, and Egyptians, which was thought to have become extinct two thousand years ago, has recently been rediscovered in Turkey by a professor, who thinks he’s found a botanical survivor (source).
Author provided image created with Canva
Are your students having problems getting along in school? Are their grades in core content areas slipping? That may be due to commensal septimedia, a condition recently discovered in grades 5-12. It is the direct result of social media usage and exposure to digital media in schools.
While students may endure it for years without visible effect, it can manifest to bad result. To address it, you will need a powerful herb popular in classical Greek and Roman times. The herb is silphium, and it is now available as a dietary supplement, ingestible as a capsule. Five capsules a day, three at breakfast and two at dinner, will have an immediate salutary effect. Scientists at a prestigious nonprofit education organization have conducted ground-breaking, longitudinal research. The curative impact of the Silph Booster cannot be overstated.
This miracle plant supplement has been kept secret for thousands of years. Fortunately, scientists in the lab at TCEA Science Institute of Technology made a breakthrough that allows us to bring it to you in four easy payments of $35 each for a bottle of 100 capsules. Call 1-800-282-8232 and ask for Chief Researcher, Miguel Guhlin, for details. The Silph Booster is currently only available for youngsters under parental supervision. A stronger formula for K-16 educators is under development. Order now. Government agencies, like the Food and Drug Administration (FDA), want to keep America dumb, so they are fighting to stop production in the United States. For a limited time, you can order the European version of the booster, which features a stronger formula.
Critical Thinking Is Unnatural, Yet Necessary
“We have to keep reminding ourselves that critical thinking is an unnatural act,” says Carroll. And, I can’t disagree. Every time I find myself falling for pseudoscience, or failing to ask tough questions, I sigh. Like reading, critical thinking is something you practice to get better at. Two quick acknowledgments:
Are you looking for short videos to use as bell ringer activities in science class? Or maybe you’re wanting to integrate videos into your lessons? Discover a roundup of video sources you won’t want to miss. But before I introduce those, let’s look at some strategies you can pair with videos to get students thinking.
Strategies to Use with Videos
Add Questions
Use tools like Vibby, EduPuzzle, and PlayPosIt to slice up videos or ask all types of questions. In the case of the latter two tools, you can insert questions into strategic places in the video.
Create Guided Notes
Create guided notes for a video or for your lesson. You can also have students rely on outlining and summarizing strategies such as Cornell Note-taking.
How can you explore this topic? (Source: Visible Thinking)
Concept Mapping
Semantic, word, or concept maps are easy to make with paper and pencil. But today, you can find a variety of digital tools to support semantic map-making. Use yED Live, Bubbl.us, CMAP Cloud Tools, Diagrams.net, Microsoft OneNote, and/or Google Drawing.
EduProtocols
You can also use an EduProtocol to encourage sharing. ArianaK Hern suggests a “Research EduProtocol.” Here are some other EduProtocols to consider:
EduProtocols chart created by the author.
Now, let’s focus on science-related video sources to fuel learning in the science classroom.
Video Source #1: Twig Science Reporter
“Check out Twig Science Reporter. They release science news videos on Thursday featuring three different topics in less than five minutes. My students can’t wait for Friday when I show the video,” says Becky Deehr.
Twig Science Reporter offers free K-8 science video news every week. You can sign up at no cost for video delivery to your email inbox via their website.
You can also check out their YouTube channel, where they feature videos on a wide variety of topics. Subscribe to their shorts, too!
Additionally, they have videos in Spanish/Español. Here’s one:
Do cockroaches, those daring, disgusting disease vectors, have anything at all to offer us? Scientists think so. They compressed American roaches with a hydraulic press, subjecting them to the force of 900 times their body weight. Don’t worry (or do): They survived! How exactly do they do it?
You will find video clips ranging from three to five minutes. The range of videos includes a wealth of amazing topics. And, of course, there’s a YouTube channel. You might also explore PBS NOVA, which offers long videos that you can excerpt for students.
Video Source #3: Scholastic’s StudyJam
Boasting over two hundred “jams” (a.k.a. videos), you can access lots of content through Scholastic’s StudyJam. Most popular jams include topics like:
StudyJams features a science and math section. Specific jams combine videos, an option to sing karaoke, and a self-assessment tool. Here’s one example focused on Plants with Seeds.
These YouTube-hosted videos focus on a variety of science topics. Besides videos, you will find practice questions for the videos. Dr. B Science offers a curated collection of videos. These videos appear on YouTube, so the real benefit is in the curation. Key groupings of curated videos include:
Need a wide range of videos? Explore TED Ed videos for science and technology. They offer a straightforward approach and include lesson ideas. Their process for students follows:
Watch
Think
Dig Deeper
Discuss
Give it a try with this video on the types of meat:
Ted Ed offers their videos via YouTube, so they are accessible on many devices. For those in restricted environments, you might want to read about these simple video tricks.
Bonus: Extra Video Sources
Looking for more science videos? Here are a few other places where you’ll find free and paid science video options.
Underwater Volcanoes. A few videos on underwater volcanoes with lesson materials aligned with NGSS.
AsapScience. A zany source of videos. I’d recommend previewing them to see how they fit in to your lessons.
Exploratorium. Find some free online science videos in the video search area.
So, are you ready to explore these science video resources and incorporate them into your classroom? Which one will you start with, and what strategy will you pair with it? If you have resources you know and love that aren’t on the list, share them with us in the comments.
Wish you had an easy-to-use online whiteboard? With Google moving Jamboard to read-only mode on October 1, 2024, you may be seeking out an alternative. What digital, online whiteboard will you use with your students instead? If you are a “less is more” kind of person, you may be looking for easier tools to use than those suggested by Google (e.g., Figjam, LucidSpark, Miro). Let’s look at one you may want to know more about: Canva Whiteboard.
What is Canva Whiteboard?
The simple-to-use Canva Whiteboard is already a part of the toolset you know and love in Canva. Canva Whiteboard offers a simple solution with powerful components, like built-in timers and more. Once you start using it, you may find yourself thanking Google for pushing you out of the Jamboard nest. Canva offers so many delightful features that are free to verified educators, and its whiteboard tool is a worthy replacement for Jamboard. Let’s walk through some of the Jamboard-compatible features Canva Whiteboard offers. Here’s a quick video overview:
Import Images or Presentations
Save your Google Jamboards as images for an easy upload to Canva Whiteboard. Or, upload any image file you’d like to use (keeping licensing and copyright in mind, of course)!
Here’s one of my favorite activities as a Google Slide, the 3-2-1 activity (3 main ideas/words, 2 supporting details/phrases, and 1 question/quote). You can vary this activity in many ways! I can download it as an image and then upload it to my whiteboard in Canva for students to annotate. You can do this with any image you save or find.
Yes, you can download presentations as PNG or image files and upload them to Canva, but wouldn’t it be great if you didn’t have to? In Canva Whiteboard, you can import a presentation straight from Google Drive, Microsoft OneDrive, or Dropbox and turn it into a whiteboard.
Click the menu icon in the top left corner.
Open Projects.
Click Add New in the top right corner.
Choose Import from app in the drop-down menu.
Choose to import from Google Drive, OneDrive, or Dropbox.
You can change it to a whiteboard in Canva by right-clicking a slide and choosing Expand to Whiteboard in the drop-down menu.
Lock the Background
In Canva, like in Jamboard, you can lock the background. This ensures your students won’t be able to move the background around as they are using the whiteboard. Click the image and select the lock in the toolbar, or right-click the image and select the lock in the drop-down menu.
Lock an image from the Canva toolbar.
Lock an image from the image drop-down menu.
Duplicate a Page
Now that you have your whiteboard slide looking the way you want, you’re ready to duplicate it.
When you present or share your screen, as you’ll see in a bit, these pages will become available as slides. Students can write on these slides with the Draw tools in Canva. And, since you locked the background, that should help keep certain elements unmoveable, as you can see below:
Additionally, you can see students working live in the document. This makes it easier to monitor progress.
Share the Canva Whiteboard Link
Everything ready to go? Now, you can bring students into the equation to add comments and annotations. To share the Canva Whiteboard, use the Share button that appears in the top right corner of the screen.
As you can see in the image above, the “Can Comment” is enabled, but you will want to change that to Edit. Remember, you can also share a presentation in Canva for groups of students to work on!
Note: If whiteboard vandalism is a concern, then you can take a more limited approach. That is, you can share the link to a whiteboard with only that group of students or an individual student.
Share Your Whiteboard as a Template
If you’d like to share your whiteboards as editable templates with other educators, you can do so by clicking Share and then clicking the Template Link option. This makes sharing your whiteboard designs easy. The only catch? To edit the template, you need to have a Canva account. That’s not a bad thing for colleagues since Canva is free for educators and students.
When you click on the icon for the template link, you will see a link to copy:
Canva offers a desktop app that will run on your computer. This means you can work on your computer (e.g. Windows/Mac) with Canva creations outside of your browser. Get the app.
Add Text and Content to a Whiteboard
Once your students have access to Canva Whiteboard via the Share link, they can do so much. I almost wish Canva Whiteboard offered a limited set of tools for their whiteboard or a toggle switch for the tools available to keep choices simple for younger students.
This video gives you a big-picture overview:
Like some of my colleagues, when I heard Jamboard was going away, I worried I wouldn’t find an easy-to-use replacement. Thank goodness Canva’s Whiteboard solution is available and ready to go! Here are a few more Canva Whiteboard videos to get your brain moving in the right direction:
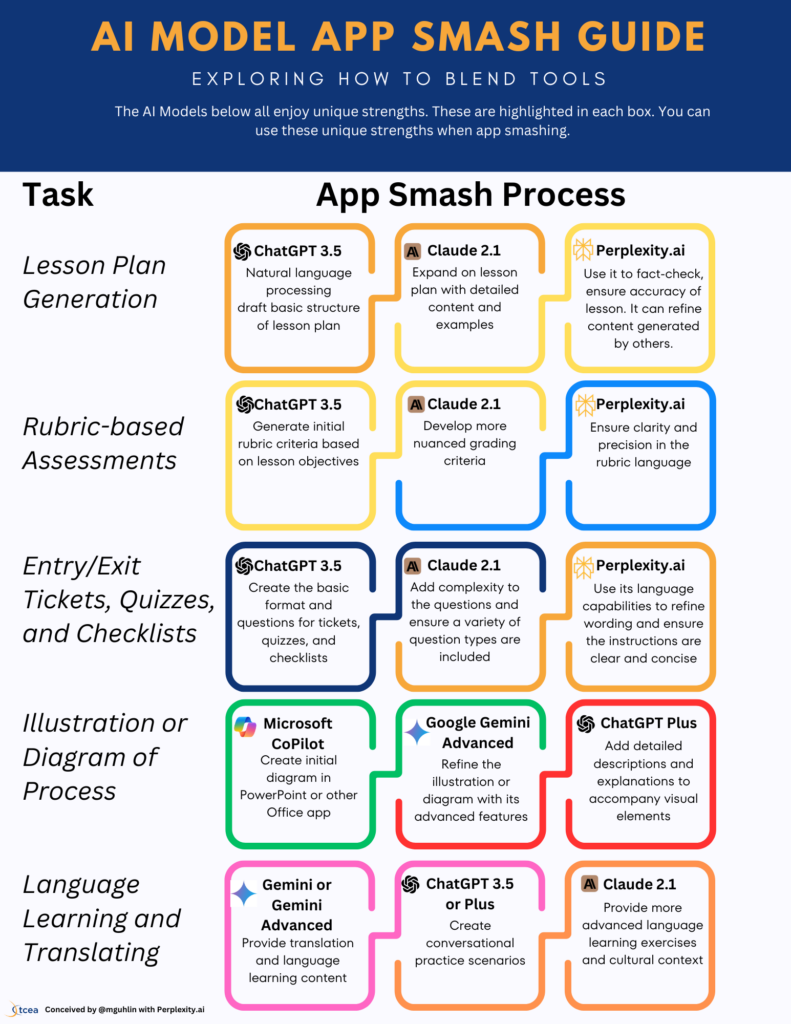
One of the most tedious tasks a teacher endures is lesson plan creation. Some draconian school districts make teachers turn in lesson plans. It’s such a contentious issue that school unions make it a plank in their platform. What if you could turn this tedious task into a fun exploration of the possible? Now, with AI-powered lesson plan generators, that’s easy to do. Let’s explore my top five lesson plan generators.
Did You Know?
Have you read the blog entry, Prompts for Lesson Planning with ChatGPT?Get access to an editable prompt template and a variety of prompts for several content areas.
A Quick Checklist
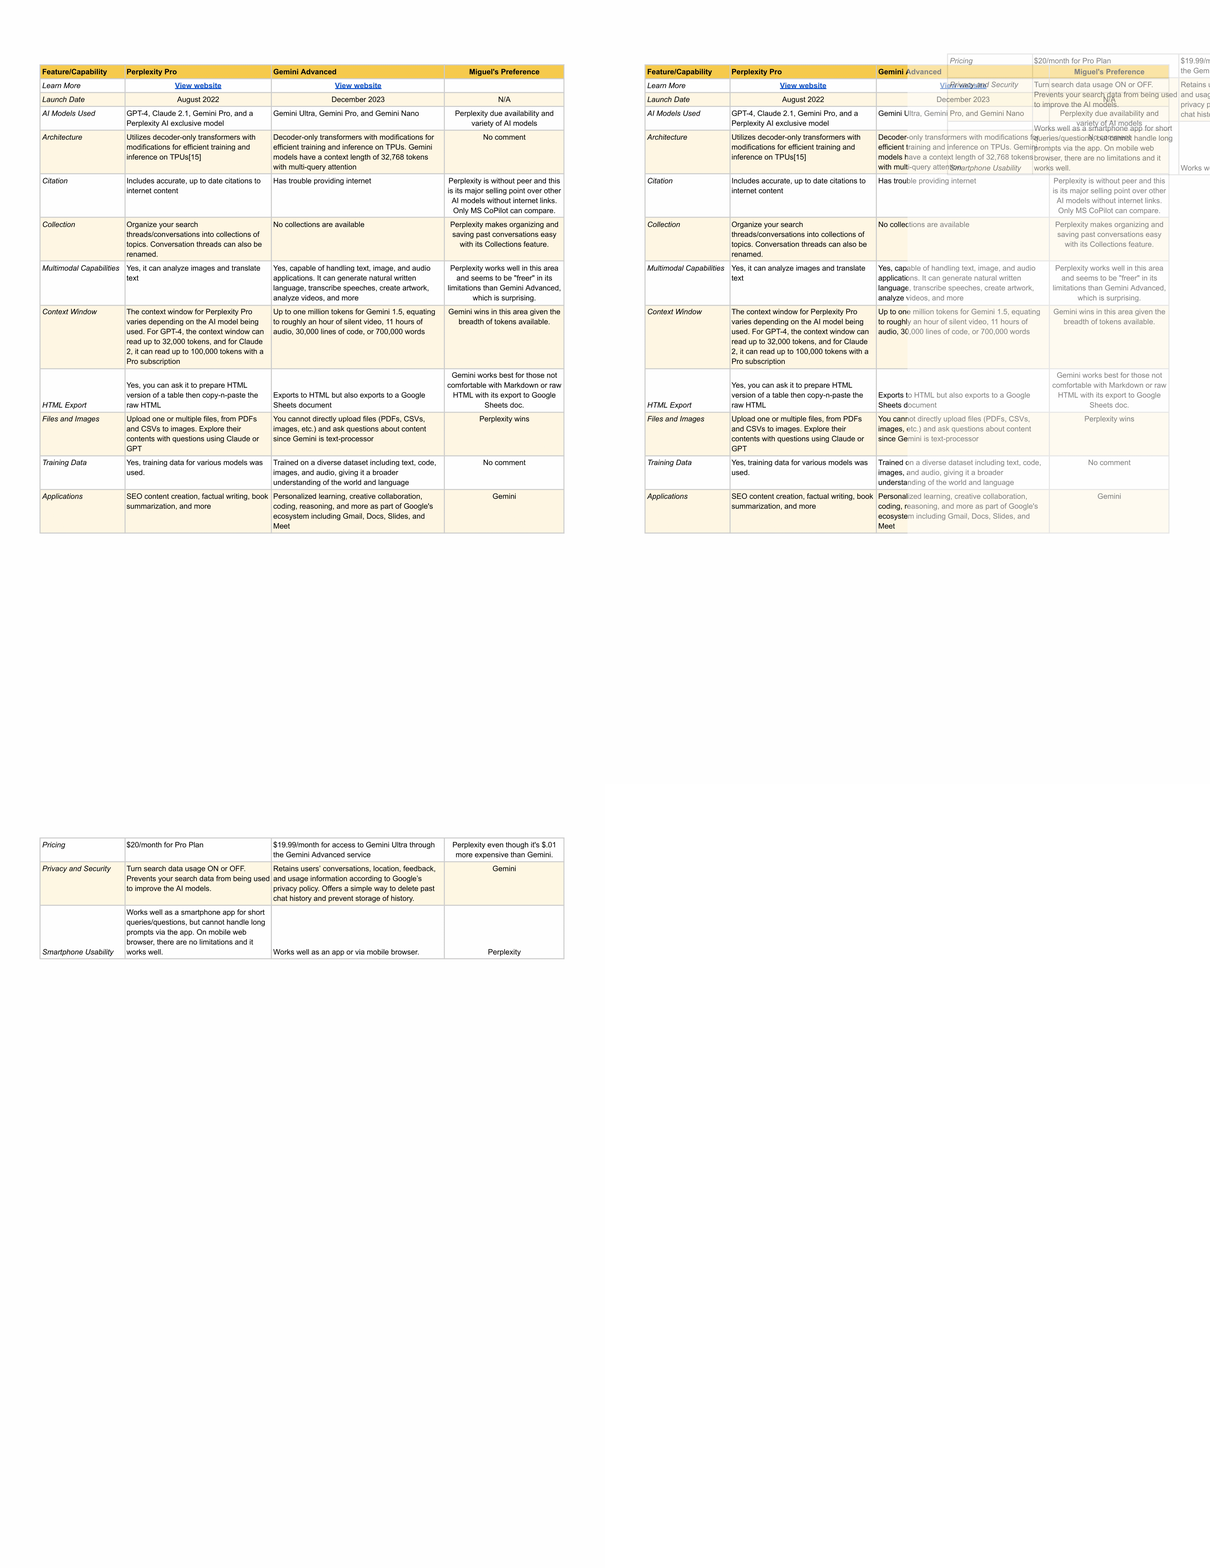
Wish you had a checklist to assess these AI lesson plan generators? Here’s a checklist I came up with that outlines what I’m looking for in these tools. You may be looking for something different, so feel free to customize the checklist for your own use.
No account creation necessary. Who wants to create yet another account?
Single sign-on (SSO). If login is required, will it allow me to sync up to Google or Microsoft?
Copy and paste. Is it easy to copy the lesson plan format to another doc or platform (e.g. Google Docs, MS Word, etc.)?
TEKS alignment. Does this lesson plan document sync with state or national standards?
Lesson plan format. Is the generated lesson plan organized into elements included in traditional lesson formats?
Many lesson plan formats follow Madeline Hunter’s lesson elements. You might expect to see some of these elements in the lesson plans AI tools can generate.
AI Prompt
When possible, I used a prompt similar to the one that appears below to test each of these AI lesson plan generators:
Write a lesson plan for Texas sixth grade classroom that addresses the following TEKS:
The student understands the factors that influence the locations and characteristics of locations of various contemporary societies on maps and/or globes. The student is expected to:
(A) identify and explain the geographic factors responsible for patterns of population in places and regions;
(B) explain ways in which human migration influences the character of places and regions;
(C) identify and locate major physical and human geographic features such as landforms, water bodies, and urban centers of various places and regions; and
(D) identify the location of major world countries for each of the world regions.
The website makes it easy to copy your lesson plan into your device’s clipboard. At that point, you can paste it into a word processor for further editing/revision. The history, civics, and geography subjects are limited to India, so you won’t get US-relevant lessons for those. Science, math, and English are other topics available.
A little bit more robust than the option above, you can see examples for all grade levels (K-12). In order to see the full lesson plan, you must create an account, but you can create an account using a Google login or sign up via email.
As you might expect, ChatGPT does a nice job generating lesson plans. One of the best features of ChatGPT, aside from ease of use, is how it groups activities and offers a time range for each.
For example, a “locating Major Historical and Contemporary Societies” activity takes about 15 minutes. You can see some of the key expectations below:
Locating Major Historical and Contemporary Societies (15 minutes)
Distribute world maps and globes to the students.
Review latitude and longitude and how they are used to determine absolute location.
Teach the students how to locate various major historical and contemporary societies on the maps and globes.
Have the students practice locating and labeling these societies on their own.
This AI works quite well. You can attach up to five files of 100 mb each, including PDF and TXT. When asked to generate a lesson plan, what it came up with actually referenced specific TEKS. Claude divided the lesson plan in these ways:
Lesson Title
TEKS Addressed
Objectives
Materials
Procedures
Assessment
Accommodations
While it could have provided a little more information on assessments, it’s an easy item to follow-up on. I prompted Claude.ai with this:
Come up with two exit ticket sets of questions that address these TEKS:
6.2A – Locate various major historical and contemporary societies on maps and globes using latitude and longitude to determine absolute location
6.2B – Identify and explain geographic factors responsible for patterns of population in places and regions
6.2C – Explain ways human migration influences the character of places and regions
6.2D – Identify and explain factors responsible for the location of economic activities in places and regions
6.2E – Draw sketch maps that illustrate various places and regions
And, it generated the following:
Exit Ticket Set 1
Using latitude and longitude, locate two major societies on a world map. (6.2A)
Explain two geographic factors that lead to population patterns in Asia. (6.2B)
How has migration from rural to urban areas influenced the character of cities? Explain. (6.2C)
What are two factors that determine where manufacturing facilities are located? (6.2D)
Exit Ticket Set 2
Label the following items on a world map: The Sahara Desert, Mount Everest, Rio de Janeiro, Cairo. (6.2A)
How does access to fresh water impact population patterns? Explain. (6.2B)
Give one example of how immigration has shaped the culture of a place or region. (6.2C)
Why are major seaports often located where they are? What geographic factors determine their location? (6.2D)
Draw a simple sketch map of Europe, labeling at least 5 countries. (6.2E)
Again, what I like about this is how Claude labeled the items. It tied each exit ticket question to a specific TEKS.
The AutoClassmate website offers some great AI-powered tools. They describe their service in this way:
The Auto Classmate AI-Powered Lesson Plan Generator will enable you to create a highly-customizable, editable, and unique Lesson Plan to implement in your classroom.
The Lesson Plan Generator allows you to easily align your lesson plan with state standards with the click of a button. Powered by OpenAI’s GPT-4, this lesson planning tool will revolutionize the way you create content for your classroom.
After using our AI Lesson Planning tool, you will also be able to have conversations about your lesson plan with our AI-Powered Instructional Coach Chatbot.
Screenshot by the author: Auto Classmate, Home Page
As you can see, it offers the ability to align lessons to state standards. You can see what the GPT-3.5 version comes up with. The GPT-4 version requires an account, and pricing is $10 a month.
Other Lesson Plan Generators
More lesson plan generators are appearing every single day. Here are a few more teacher-recommended AI lesson plan generators for your consideration.
Please be aware that they may have free trials but could cost money for extended usage.
With Veterans Day coming up on November 11, you might be looking for some great resources to teach US military history and give insight into the lives, work, and sacrifice of our Veterans and to honor their service. Let’s explore seven resources on US military history that cover everything from maps and battlefields to museums, memorials, Veterans, and more.
Teaching History
Wondering how to teach battle geography and history? Check out what educator Runie Aleema suggests. She advises history teachers in the Social Studies Network. Here are her suggestions from the conversation held August 26, 2023. Her remarks were edited and adapted for readability:
Start with a geography lesson with each major battle. One alternative is to begin with the use of new military weapons or strategies. For example, trench warfare in World War I, as well as the evolution of planes in war. Some more tips include:
Split each war into sections
Timeline or map out dates and/or reason(s) for a war
Discuss allies and enemies, including an introduction of major players, like generals
Highlight major battles, including geography
Explore new technologies and/or strategies employed
One great tip she suggests is spotlighting lesser-known people. This is true especially for those who played an instrumental role. Consider viewpoints such as:
African Americans
Women
Indigenous Peoples
Runie Aleema also suggests asking how these viewpoints impact either side of a conflict and what names need to be highlighted. She also includes in her suggestions (among others from contributors appearing below) covering:
The allowance for women into the armed forces
The integration of the military that happened in the 50s after WWII
Research groups such as The Red Tails, 442nd Regiment, Harlem Hellfighters
Other such noteworthy individuals/events often not spoken about
“There are map-based lessons for US History and wars here,” says M. Kate Sutter. The focus is on GeoInquiries for US History. These map-based accounts focus on assisting students in experiencing the past. Here’s what their website says:
Experience the past with this collection. It highlights critical map concepts in American history. This includes the original 13 colonies, expansion, and resettlement. Also covered are the World War I, World War II, and the Cold War.
You can find fifteen-minute activities designed to teach standards-based content. A student login is not required, and the installation of ArcGIS Online is not needed for Level 1 activities, but it is needed to access those in Level 2.
Here’s a breakdown of the various Levels available:
Level 1
13 Colonies (1700s)
The War Before Independence
The Second American Revolution
Westward, Ho!
Underground Railroad
A Nation Divided: The Civil War
Native Americans Land (1819-2015)
Steel and the Birth of a City
World War I
The Dust Bowl
From Compromise to Conflict
A Day that Lived in Infamy (Pearl Harbor)
Operation Overlord
Hot Spots in a Cold War
The Great Exchange
Each of the items in Level 1 offer some instructions for guiding the activity. See an excerpt below from the “Native American lands, 1819-2015” guide:
Screenshot by the author: Research Guide for History GeoInquiry #7
What’s at the heart of these activities is the geoinquiry:
Screenshot by the author of a GeoInquiry
Making geoinquiries of interest makes it easy to apply history to maps. For example, the map below focuses on Native American lands from 1819 to 2015, comparing land areas. You can also see sites of historic battles and trails:
Annotated screenshot by the author of a GeoInquiry
The American Battlefield Trust offers the promise of exploration. You can see military events and engagements. These are occurrences that “shaped America over the course of two centuries,” from the “beginning of the French and Indian War in 1754 to the end of World War II in 1945.”
Screenshot by the author: American Battlefield Trust, Learn Page
You will find a searchable website of educational resources. Popular areas of interest appear as well, including:
Fighting for Freedom: The Role of Black Soldiers in America’s First Century
The Emancipation Proclamation
Women in War
John Brown’s Harpers Ferry Raid
The Gettysburg Address
Battlefield Archaeology
What’s more, there are several historical periods covered. They include:
The Civil War
The Revolutionary War
The War of 1812
A special section for educators is available, and the website has a video library. The video library focuses on the different time periods. Here’s one example from “How We Became America: The Untold Story.” It is a video addressing the lives of the enslaved during the Civil War.
Google Classroom support is available, and you can share videos to Google Classroom and then assign them to students.
3. National Medal of Honor
These are actually two different resources about an important topic, the Medal of Honor.
This site offers a searchable database of resources. If you ever wondered who has received the National Medal of Honor, you can do a quick search by name, service branch (e.g. Army), or conflict.
Screenshot by the author: Military Women’s Memorial, Home Page
“Her Service. Her Story. Her Legacy.” These are the first words you see when visiting the Military Women’s Memorial website. So often, men are the primary focal points of documentaries and histories. But women have had, and continue to have, a powerful role in conflicts.
You can visit the Memorial’s library in person to access a wealth of resources. I found the Military Women’s Memorial Oral History Collection to be more accessible. What a powerful collection to introduce young ladies and men to. You can complement these with children’s books from Military Family Books.
The National WWII Museum offers a variety of tools and resources for educators. Per their website, you will find rich historical exhibits and artifact collections. You can register for free to get access, and, like other resources on this list, professional development opportunities are available.
Students can also explore and gain access to recommended books, websites, research starters, and fact sheets. The Digital Learning Projects section offers insights into how teenagers experienced this time through digital collections and authentic yearbooks from WWII.
Available as a part of the Library of Congress, the Veterans History Project (VHP) offers collections, story maps, and more. The VHP Collections is particularly accessible due to audio and video interviews. With each collection, you get access to helpful research guides:
Research guides provide a curated starting point. Use them to explore the Veterans History Project collections online. Subject experts create research guides that range from deep dives into topical areas. They also highlight collections selected by VHP staff over the years. More curated explorations are available. These appear as Story Maps and through the “Serving: Our Voices” presentations (source).
Their D-Day Journeys offer personal geographies of D-Day Veterans seventy-five years later.
Do you have favorite resources for teaching US Military History? Please share them in the comments. Ready to get started? There’s a lot to process, but these seven US Military History teaching resources will assist you in getting off to a great start.
Safeguarding your data and devices grows more important every day. In July 2023, the Biden-Harris Administration announced a new certification program for smart devices, like your television set. This cybersecurity and labeling program is intended to assist Americans in choosing safer devices. As the Biden-Harris Administration continues to shine a spotlight on cybersecurity focused on the Internet of Things, schools must do the same with their data. That’s why the Texas Education Agency (TEA) approved cybersecurity funding for schools. But more can be done. As we end Cybersecurity Awareness Month, let’s discuss encrypting and protecting data.
The new “U.S. Cyber Trust Mark” program proposed by Federal Communications Commission (FCC) Chairwoman Jessica Rosenworcel would raise the bar for cybersecurity across common devices, including smart refrigerators, smart microwaves, smart televisions, smart climate control systems, smart fitness trackers, and more.
Today, ransomware is the most common way school staff experience data breaches. Phishing is a close second. But unencrypted data does find its way out of trusted hands into identity thieves.
I remember my first experience with a school district data breach. In my large urban school district, one of my coordinator-level staff decided to take work home. He decided that he wanted to spend some time tweaking the data. The deadline for preparing the data approached. Since he was working on the information on his work laptop, he took the laptop home. Less than an hour after arriving home, someone stole the laptop from the trunk of his car. With it, over ten thousand students’ and teachers’ digital records were stolen.
Since the data was not encrypted, the school district had to notify each affected individual. What’s more, the district had to invest in identity theft protection. As you can see, accidental data loss or lost devices account for approximately $1.8 million dollars.
Encryption is a last-ditch effort, a protection that endures, even when other cybersecurity measures fail:
There are no perfect data security measures and security solutions. There is no way to prevent a data breach. However, even if your precautionary cybersecurity measures fail, there is a simple way to render the leaked or stolen data virtually useless to cybercriminals – data encryption.
But what about school districts? For stolen data, school districts should notify affected individuals. They should do so even if there is a cost. For example, seven of the breached districts sent letters via US Mail. Let’s estimate what the total cost would be with the total affected individuals (401,596).
To notify each person, a letter was sent via the US Mail of the data breach. That’s an approximate cost of $76,303.24 ($.19 per item).
Identity theft protection had to be purchased per person. The cost of identity theft protection for one year for 401,596 affected individuals is $28,633,794.
The total cost is about $29 million dollars. And that’s only eight school districts in Texas. Balance that cost with how much thieves can make for each education record (approximately $265 per student record).
How much data isn’t protected?
When responding to a survey, 96% of respondents said they carried one of the following portable storage devices:
USB sticks
Portable hard drives
CDs and DVDs
According to the survey, only 28% of education professionals encrypt sensitive data. Worse, over 39% have lost a portable storage device with sensitive data. This leaves 72% of education professionals not encrypting data. That’s a problem.
How is data stolen?
Let’s look at a few real-world examples:
A central office staff member leaves a copy of the unencrypted data on their USB drive. They take it home with them. When stopping at the store on the way home, it is stolen or falls out of their bag.
A central office PEIMS coordinator emails an Excel spreadsheet (with a password) to a school principal. Since email is a postcard, the data is intercepted and the password cracked.
A food service worker reads her personal email on a point-of-sale computer in the cafeteria. She saves malware on her computer that sends unencrypted data to the cloud, where ransomware developers are waiting to exploit the data.
You send a data file packed with confidential data for staff (social security numbers, health and medical information) to human resources. The data ends up on a personal device (e.g. phone, tablet, computer) that is stolen or accessed inappropriately.
Instructional staff posts content on a website to make it more easily accessible to campus staff. A parent finds his child’s data online.
This happens more than you think. In 2022, it happened to Austin ISD, Mansfield ISD, and Judson ISD. In 2023, it happened to San Benito Consolidated ISD, Plano ISD, Lake Dallas ISD, Pearland ISD, and White Settlement ISD. In most cases, the data stolen included:
Name of individual
Address
Social Security Number Information
Driver’s License number
Government-issued ID number (e.g. passport, state ID card)
Financial Information (e.g. account number, credit or debit card number)
Medical Information
Health Insurance Information
Think of the consequences for individuals. Dealing with potential identity theft can be time-consuming and expensive. I have experienced this myself. In 2011, the Texas Teacher Retirement System (TRS) experienced a data leak. Someone at TRS placed unsecured data on a web server for download. I was one of 3.5 million affected. In a 2018 breach, affected individuals included 1.25 million Texans. These individuals counted on the Texas Employee Retirement System to keep data safe.
School district (and campus) staff have the same responsibility. The tools are free. Why not use them?
Texas Safe Habor
If a stolen USB drive has non-encrypted data, you have to take action to notify the individuals affected. However, if the data is encrypted, under the Texas Safe Harbor statute, you don’t have to say anything. Your school district does not suffer embarrassment and financial liability. Your students and staff do not have to worry about identity theft and bank fraud. That is, the school district isn’t the source of the problem.
Let’s review what “safe harbor” constitutes:
The concept of “Safe Harbor” refers to specific actions, example; encryption of private data, that an individual or an organization can take to show a good-faith effort in complying with the law. This good-faith effort provides a person or organization “Safe Harbor” against prosecution under the law (Grama, 2015, pg.253).
The State of Texas Statute 521.002 states that when an individual’s first name or first initial and last name are combined with other private information (e.g. Social Security Number), the information must be encrypted. The State of Texas Bus. & Com. Code 521.002, 521.053; Ed. Code 37.007(b)(5), and Pen. Code 33.02 all have provisions for personal private data protection, but none of these set a specific encryption standard. According to this law as long as an organization encrypts personal private information as the law specifies, theft of encrypted information would not require a breach notification which fulfills the principle of Safe Harbor (State of Texas Statutes 521.053, 2009).
Image created by the author and shared under CC-BY-SA. Get a copy | View
Tips for Encrypting Data
Now you know you can prevent paying a single cent if you take just one action. Safeguard sensitive data with free, no-cost encryption tools. These tools rely on military-grade AES-256 encryption to protect data. Take a look at some instances when data should be encrypted:
Encrypt all data before placing it on a USB external drive or sending it via email.
Working with sensitive data on your device? Make sure it’s encrypted while “at rest” or not in use. Someone can steal your device, even if it is in a locked file cabinet or office.
Going on the road? Remove confidential data from your mobile device (e.g. smartphone, iPad tablet, Chromebook)
Working at home? Encrypt data, and/or securely delete it when finished.
Use encryption tools that offer AES-256 encryption algorithm. They are available at no cost and work on all your devices.
Here are some simple tools you can use to safeguard your data for personal and/or work use. All these tools offer AES-256 encryption, work in your web browser, and are usable on Chromebooks.
Watch this short video tutorial. It features two of my favorite encryption tools: FileLock.org and Secure Space Encryptor:
In conclusion, there is significant financial and personal risk involved with not encrypting data. With the prevalence of data breaches in school districts and beyond, we must work to encrypt and protect our data to ensure a safer and more secure digital environment for students and staff. Which tools will you be using?