
Discover Android apps, tips, and tools for education. Enhance learning and productivity with strategies tailored for Android devices.
")
“Ninety-two percent of students say that it is easier to use their mobile device to improve their access to information,” says Daniel Adeboye, citing university research. “Not every classroom can get a laptop every day, so [devices like smartphones], even if you have to pair up, become something useful for teachers,” says Ken Halla, a classroom teacher. In this blog entry, let’s explore a few, effective ways to “androidify” learning in your classroom.
Research Insights
Do BYOD devices enhance learning or distract learners? Let’s take a look at one meta-analysis of 110 studies, The effects of integrating mobile devices with teaching and learning on students’ learning performance: A meta-analysis and research synthesis.

Use the Android app PicsArt Photo Studio to create infographics like this one
Mobile devices…
- Support various teaching styles, including lecture-style teaching, convenient information gathering, information sharing, cooperative learning, exploratory learning outside the classroom, and game-based learning.
- Facilitate the development of communication, problem-solving, creativity, and other high-level skills among students.
- Feature individualized interfaces, real-time access to information, context sensitivity, instant communication, and feedback.
In-Classroom Strategies
While the debate rages on the effectiveness of smartphones in the classroom, many educators and students have already taken the plunge. Consider the slide show, Thirty-three ways to use mobile phones in the classroom (PDF) as a starting point.
Effective Mobile Device Use
Daniel Adeboye makes the point that use of technology in classrooms often enhances efficiency, rather than improves learning effectiveness. He suggests several approaches, among them these three:
- Audio recording
- Live polling tools
- Video creation
Some would also add tools that facilitate staying in touch with students, such as Remind.com for “real-time messaging for your school, group, or just a single person.” However, while educators like Ken Halla have compiled excellent lists of educational apps for BYOD, in this blog entry I’d like to make some of my own recommendations.
1- Audio Recording
As a veteran audiophile, my go-to set of recording tools includes the following:
- Voxer.com: While many educators use Voxer to participate in audio-only communities and audio chats, only a few take advantage of it as a recording tool. You can record interviews with others using “My Notes.” Add an iRig Mic to enhance audio quality. You can save the audio as an MP3 file to the cloud. If you prefer to tweet the audio as a link, that option is available. Maximum record time is fifteen minutes.
- HiQ MP3 Recorder: A drop-dead simple audio recorder, HiQ MP3 Recorder (free version) can save to MP3 audio format. You can get the audio off the device quickly, saving to Dropbox, Google Drive, or taking advantage of an app’s built-in WiFi Drive. WiFi Drive allows you to connect via a web browser on a computer (or another mobile device). Once connected, you save a copy of the audio file. This is a real time saver. Unlike Voxer, an account is not required to use HiQ MP3 Recorder. Maximum record time is 10 minutes in the free version.
Audio recordings can be used to monitor and/or assess students’ grasp of a subject or target language.
2- Live Polling Tools
Mobile devices facilitate “instant-feedback functions.” These functions “solve the difficulty of efficiently executing…formative assessment in a class with many students,” say the authors of the meta-analysis cited earlier. Many choices are available.
- Poll Everywhere: Available for several years, this is often the go-to choice for conducting polls.
- VoxVote: This app provides five events for free and allows for unlimited audience voting.
Some other tools include iClicker, Sli.do, and Quick Tap Survey. Add interactivity with tools like Kahoot! and Quizizz.
3- Video Creation
“By 2017, video is predicted to be two-thirds of the world’s mobile data traffic,” point out the authors of this article. Anyone can create a video with a smartphone. However, editing the video to good effect can be challenging on the small device. Just as iOS users enjoy a few tools like iMovie (free), Videocraft ($2.99), Pinnacle Studio ($12.99), or Filmic Pro ($14.99), so do Android users.
Note: Remember that you need to be logged in with a personal Google account, not a G Suite EDU, to access links to apps in the Google Play store. Otherwise you will get an error.
Before jumping into a list of Android video creation and editing tools, it wouldn’t hurt to review the article, Six tips for successful mobile video assignments. Video creation and editing expectations need to be lower than desktop editing. Most “free” tools include watermarks that can only be removed with a monthly or annual subscription. If you need to record your Android screen, use XRecorder. The tools below focus on video editing.
- YouCut – Video Editor & Video Maker, No Watermark: An easy to use video editor that will have you combining pictures, videos, and music (free titles available).
- Filmora Video Editor: From their website, app creators describe it as “A pretty powerful video editor application, which will not stamp a watermark or place a time limit on your clip.” With FilmoraGo, you can make video with music and effects and then share to social media.
- VideoShow Video Editor: This editor with in-app purchases offers simple editing, subtitles, and over a thousand music clips. A companion app, GIFGuru, makes animated GIFs possible. VideoShow allows conversion of the video to MP3 audio. Creating a video for class assignments shouldn’t be too difficult.
- Action Director Video Editor: Action Director offers a variety of options, including editing video, adding music, and more.
Android Authority has a few more choices listed. Try these three first. Kinemaster, ALIVE MovieMaker, and PowerDirector were objectionable for various reasons. Provided video editing is not a class assignment, students can use the Seesaw app to capture student video summaries. The real challenge for video on Android is video rendering time. Not all Android devices are created equal.
Green Screen Tip
On iOS, the DoINK Green Screen app reigns supreme. Green screen can also be done on Android. For video editing, try the paid version of Media Studio. For a one-time charge ($14.95), additional features can be purchased. These features include the green screen effect and audio recording/editing tools. For photos, use PhotoLayers (features in-app ads).
Androidify Learning in Your Classroom
As you work to “androidify” your classroom, remember to have fun. One complaint I often hear about BYOD involves teachers’ lack of familiarity with the right apps. They often do not know how to match apps to an instructional purpose. Consider these apps as a starting point.
Update: This blog entry was updated on 04/01/2020 with new information.

 If you like listening to audiobooks, you’ll enjoy using OverDrive. If your district doesn’t subscribe to it, check and see if your local public library does. If so, you can check out audiobooks from them, as well as through their network of other contributing libraries!
 While grandparents love this app for making collages of their grandkids, students of all ages will find this app easy to use when they have an assignment where they can create collages, annotate over photos, etc.
 Though many of us remember copying down notes in class to study for tests, current students seem to prefer to take photos of the board to capture their notes. This app is so handy for that. Point and aim it at the board, projector, paper, etc.. Once it detects the area, you just snap the photo; it will crop it so only the board is in the photo and deskew the image so it looks like you had prime seating in front of the board when you took the picture. Save as an image on your device or as a PDF or Office format if you have an Office 365 account.
 Sometimes you want your students to record a video to capture their learning. But many devices have a default video recording app that is bare bones. You’ll find Adobe Express to be an easy go-to tool that will help students make great videos without getting bogged down in the technical aspects of videography. Though it is only for iOS currently, it is worth the wait for other operating systems.
 Pushbullet is great if your students find that they need to “push” files or photos from their phone or tablet to their laptop/computer (and vice versa). Pushbullet makes it easy without having to move your file/photo to Google Drive, Microsoft OneDrive, or DropBox first. And, since it is in the cloud, you can access your account from any device to retrieve previously pushed files. This is great if you have students taking photos or videos on their phones, but then need to add them to documents that they are editing on a computer.
 If you want an easy app that allows all of your students to share, then this has to be the best app for that. It’s perfect for having students summarize their content or reflect on their learning. If they are using a phone or tablet, they’ll need to download the app; otherwise, they can use the webcam on their laptop to participate. Though I don’t recommend the paid version of many apps (I remember what it was like when my teacher budget was whatever I had in my pocket), this is definitely one app that is worth the price; consider getting others to join with you and you all can enjoy a discounted price. Even without the additional features in the paid version, this is a super app!

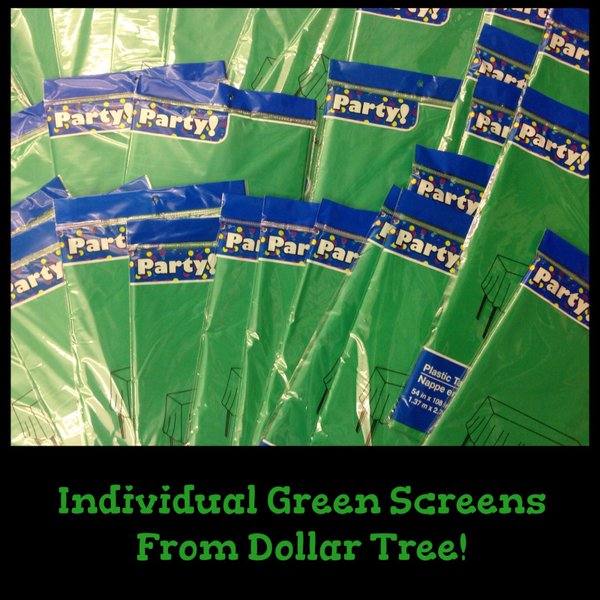 To get started, you will need a screen solution (e.g. the right shade of butcher paper, a $.99 green tablecloth from Dollar Tree, or green cloth) and one of the apps below. If you have an iOS device, the best app on the market is Green Screen by Do Ink, although you can accomplish even more with Touchcast (but some find it a little difficult to understand at first).


")

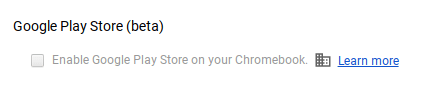 that the option to access the Google Play Store on your Chromebook is enabled in the dashboard. You can check your Chromebook by going to Settings. Scroll down until you see the Google Play Store (beta) section. If the option is greyed out, then you’ll need to bake a batch of cookies to take to the domain administrator and ask if they can enable the feature. (Giving cookies increases the chances of having this feature enabled by 64 percent.) If you log in with your personal Google account on the Chromebook, you’ll notice that it is already enabled. But you do NOT want to use your personal account with your students and other teachers. For safety reasons, you always want to use your district account, even if that means bribing the domain administrator or waiting a few days for it to be enabled.
 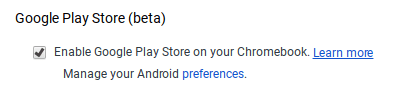 Once the option to enable is made available, you’ll be able to enable it in Settings and manage Android preferences (similar to if you were setting Android preferences on an Android phone or tablet).
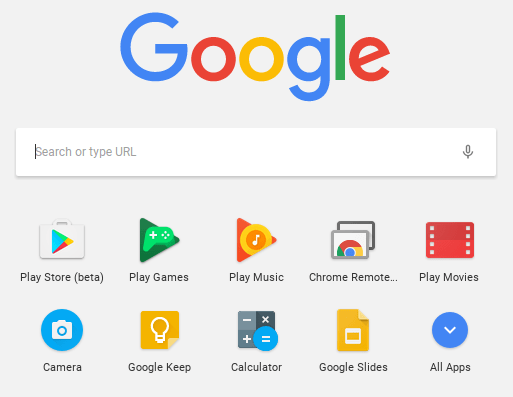 Yippee! You have it enabled. So where it it? Click on the Launcher icon which, by default, is the icon on the bottom left on the shelf. You will now see the Play Store (beta) icon. This beta Play Store is currently a stipped down version of the Play Store you would see if you accessed it through the browser. And yes, you will need to use the beta Play Store to install Android apps. When accessing the store via the browser, your Chromebook will not be an option in the dropdown list of compatible devices. Once you click on the beta store, you will recognize the various categories to help you narrow down what type of app you are looking for. If the developers have not completely finished updating the app in question, it may be available as a beta version. When I spot checked several of the Android apps I have on my phone, almost all were available and ready in the Play Store. You might even find that some app developers have made their product available as a Chrome app (that you install via the Web Store) and an Android app (that you install via the beta Play Store). Either way, once installed, they will appear in your launcher window.
 Autodesk SketchBook – Whether it is illustrating, diagramming, or sketchnoting, you’ll find this to be a simple app to use. When done, save the image to your Chromebook.
 Trello – More than just a to-do list app, Trello can help you keep track of projects. You can work alone or collaboratively with classmates to keep track of project-based learning activities.
 Trading Cards – This isn’t your traditional trading card maker. Templates provided include fictional person, real person, fictional place, real place, object, event, and vocabulary. Once you enter information on the front and back of the card, you can share it as a photo to your photo gallery.
 Pic Collage – Share your message with pictures! Pic Collage lets you start by selecting your photos and then adding them to a grid with templates (start with a themed background) or freestyle (begin with a blank slate and add to it). You can also easily add text and search for photos on the internet to add to your collage.