In the two previous parts of this blog series, you saw how to make a custom GPT accessible to anyone, whether they have a ChatGPT account or not, as a website. In part one of the AI Magic Maker series, you created a custom GPT-based Fun Personality Quiz. In part two, you saw how to turn a custom GPT into a webpage for easy access via the web. In part three, you will learn how to simply vibe code to collect the data entered via the web version of Fun Quiz into a Google Sheet.
In this part, we’ll explore how to save data from the interactive webpage to Google Sheets for later analysis. Saving the data from the interactive webpage to Google Sheets takes this interactive page to a whole new vibe code level since you can now create quizzes and more that save the data.
Wait, How Is This Possible?
The journey from custom GPT requiring individual user accounts to a webpage anyone can access is made possible through the use of free tools. Those tools include:
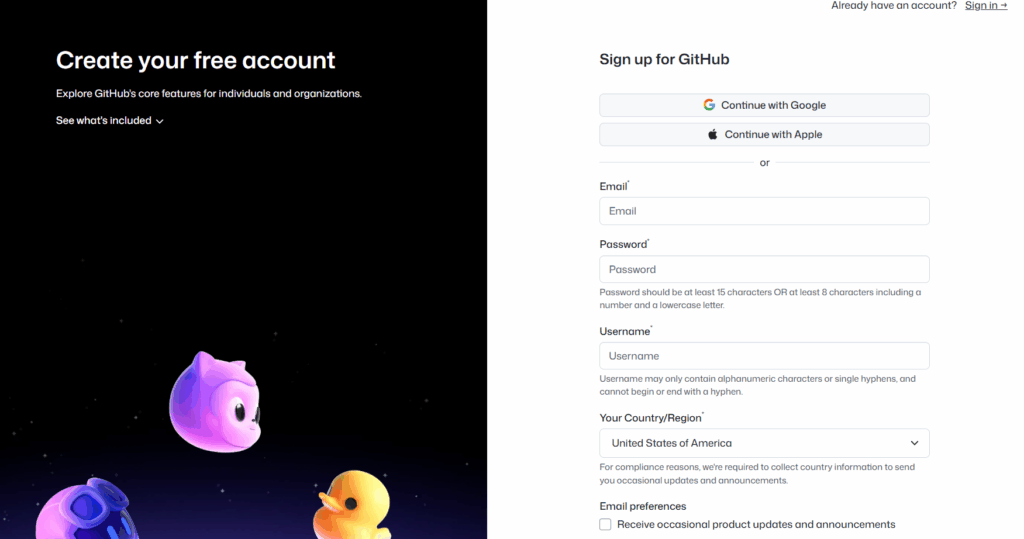
A GitHub account. How to get a free account is explained in part two of the series.
A Google Drive account with Google Sheets. You can do this with the free, or consumer, version of Google Sheets or you can use your Google Workspace for Education/NonProfit account.
Google Apps Script Web App. This is such a game-changer and I suspect you may soon be making your own Web App scripts using Generative AI. It’s the “hidden” lesson in this series.
All these tools are free. Of course, I did rely on a paid Gen AI model (about $20 a month).
Achieving the Impossible
Using Gen AI (for part three, I asked my Claude Pro account for help), I asked for a step by step. Since I’m not a Google Apps script whiz and failed BASIC programming in high school (I hope you appreciate how tough an admission like that would be for a high school student), I can attest to the power of vibe coding to help me achieve this hitherto impossible task.
Yes, with Gen AI at your side, you can leap tall mountains of code. But you first must have a plan.
The Plan
The plan is that you will create a Google Sheet and deploy a Google Apps Script as a Web App (takes approximately five minutes). Then, Gen AI will update the script.js to POST (a specific action, so that’s why it’s capitalized) the result to the Web App URL.
The data logged per quiz submission will be:
Timestamp
Quiz name (e.g., “Smurfs”)
Result character (e.g., “Papa Smurf”)
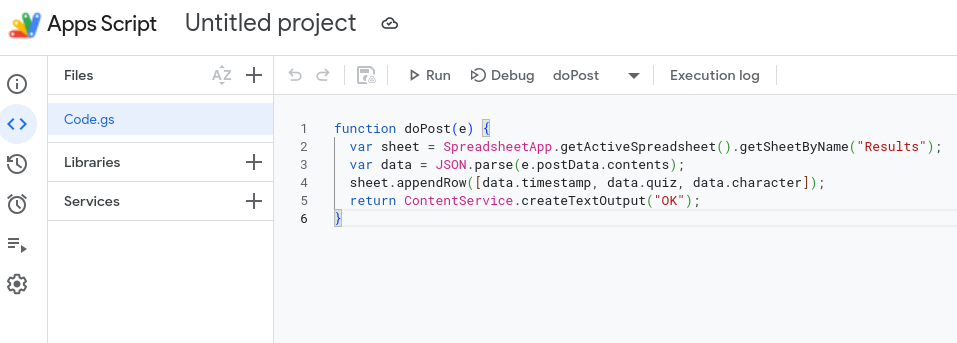
Step 1: Set up Google Sheets + Apps Script
These are the steps I will follow in the video available to you at the end of this blog post. In the meantime, follow these steps:
Create a new Google Sheet.
Name the first sheet tab Results.
Add headers in row 1: Timestamp, Quiz, Character.
Go to Extensions → Apps Script.
Replace all code with this:
function doPost(e) { var sheet = SpreadsheetApp.getActiveSpreadsheet().getSheetByName("Results"); var data = JSON.parse(e.postData.contents); sheet.appendRow([data.timestamp, data.quiz, data.character]); return ContentService.createTextOutput("OK"); }
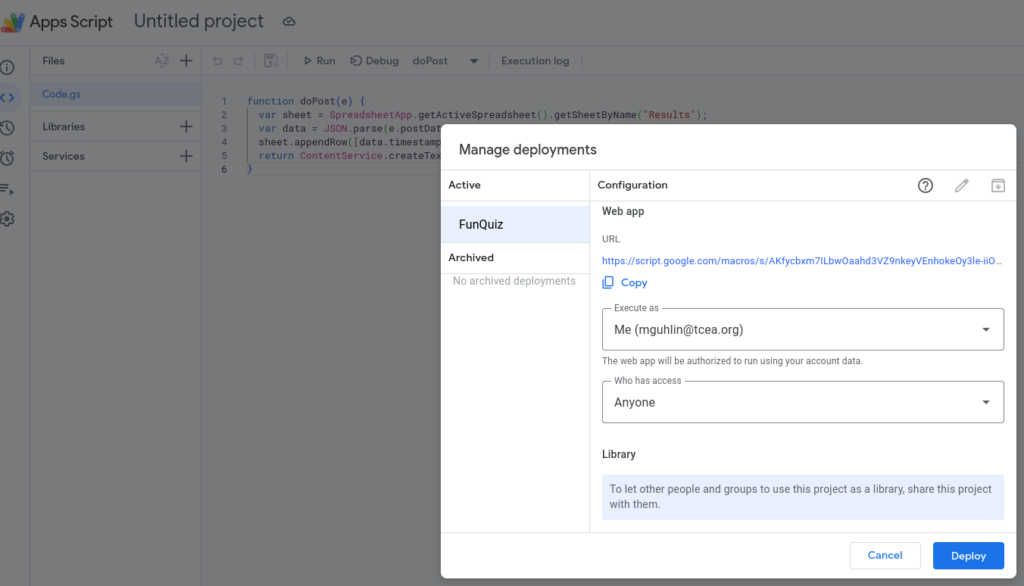
Click Deploy → New deployment
Type: Web app
Execute as: Me
Who has access: Anyone
Copy the Web App URL. You will need it next.
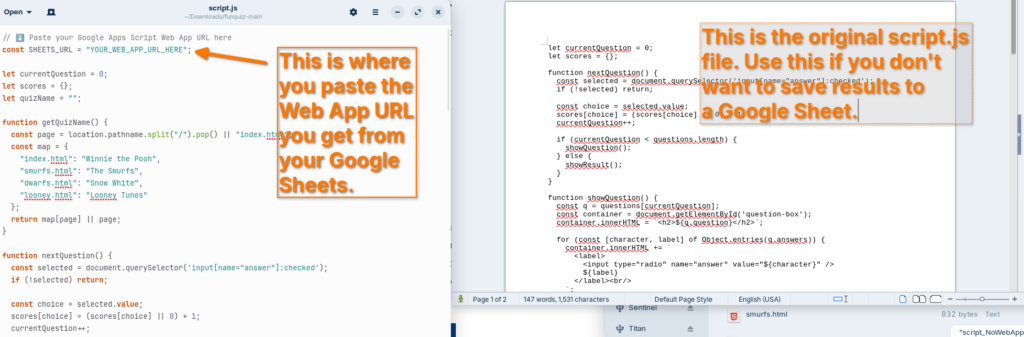
Step 2 — Updated script.js
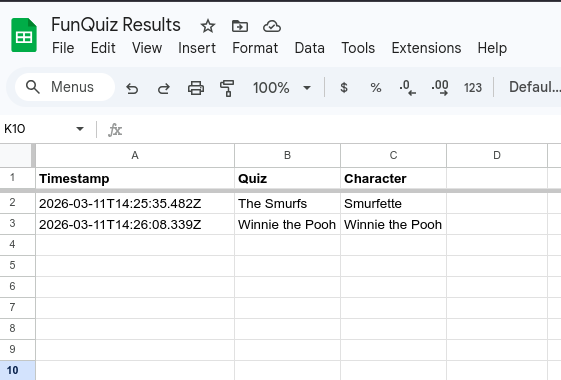
Now that you are ready with the Google Sheets Web App URL, you will need to add it to the script.js file at the top of the file. This will result in rows like the ones in this Google Sheet:
This is the only file you need to replace. All four HTML files already load script.js, so nothing else changes. Once you have your Apps Script Web App URL, replace “YOUR_WEB_APP_URL_HERE” at the top of the file.
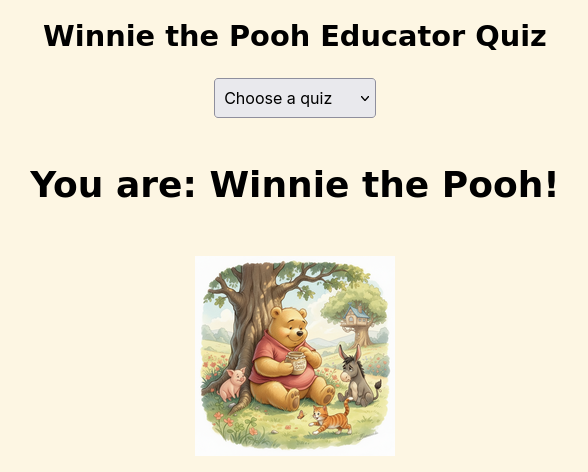
Each completed quiz will log a row like:
Timestamp
Quiz
Character
2026-03-11T14:32:00Z
The Smurfs
Papa Smurf
That’s pretty much all there is to it. Not sure what to do?
Watch the Video
This video walkthrough will get you started. You are also going to get the download file (a compressed zip file linked below the video) with all the web pages and the generic script.js so that you won’t be tempted to simply use mine.
In this video, you get a tour of the process, from start to finish:
You can also download a copy of the entire FunQuiz website from GitHub using the link below:
Remember, if you decide to try this yourself, you will need to update the script.js file to point to YOUR Web App URL, rather than mine.
Since you have both versions of the file, you can compare them:
From left to right: Script.js file that saves results to Google Sheets, script_NoWebAppScript.js that simply runs the quiz and no results are saved. Make sure to rename the “script_NoWebAppScript.js” to “script.js” if that’s what you decide to use.
Wrapping Up
Vibe coding has become so easy, and with free hosting by GitHub or any web server you have access to, you should be able to create web/HTML pages with ease and share them. Here are some potential applications in school environments, even though it may drive technology directors crazy with the need to host teacher-generated HTML pages (but it’s super inexpensive, so why not on an intranet server or off a USB flash drive?).
Here are practical, high-impact ideas organized by who benefits most.
A simple, bare bones example of one of each of the following ideas is available. It took about thirty seconds to make, and that shows. I could have spent more time on it, but this example should give you an idea of what’s possible with minimal time investment.
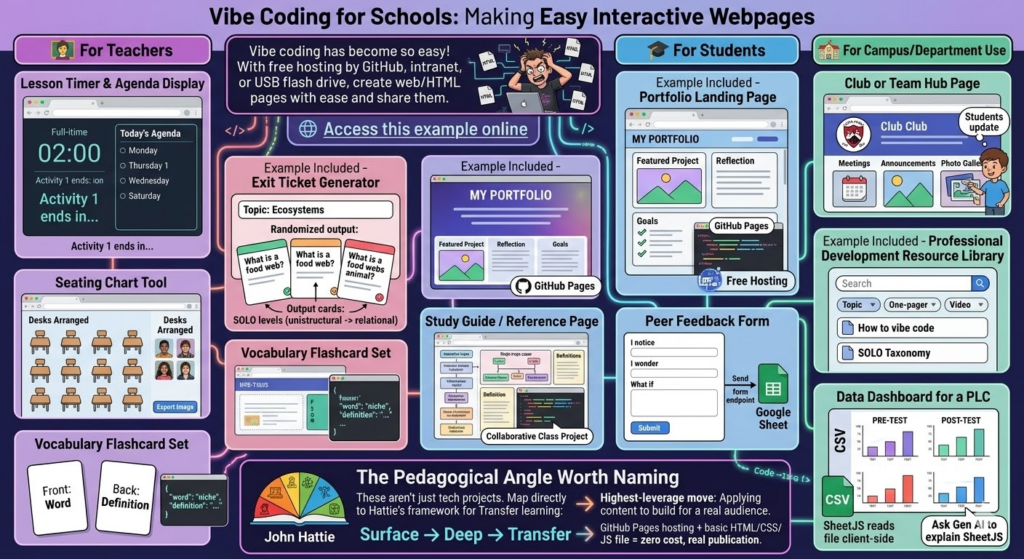
🧑🏫 For Teachers
Lesson Timer and Agenda Display. A full-screen HTML page showing the day’s agenda with a countdown timer per activity. No app needed, just a browser tab.
Exit Ticket Generator (example included). Input a topic, get a randomized exit ticket question. Teachers could build a bank of prompts tied to SOLO levels (unistructural → relational questions).
Seating Chart Tool. Drag-and-drop HTML interface for arranging desks. Exportable as an image. Far lighter than any app.
Vocabulary Flashcard Set. A simple spaced-repetition card flipper built around a unit’s word list. Teacher edits one JSON file to update the deck.
🎓 For Students
Portfolio Landing Page (example included). Students build a personal HTML page showcasing work samples, reflections, and goals. Hosted free on GitHub Pages. Real-world skill, real audience.
Study Guide/Reference Page. A single-page interactive reference sheet for a unit — definitions, diagrams, examples — that students help build as a class project.
Peer Feedback Form. A lightweight HTML form that structures feedback using a protocol (e.g., “I notice/I wonder/What if”). Submissions could go to a Google Sheet via a free form endpoint.
🏫 For Campus/Department Use
Club or Team Hub Page. A simple landing page for a club: meeting times, announcements, photo gallery. Students own and update it.
Professional Development Resource Library(example included). A searchable, filterable page of links, one-pagers, and videos organized by topic. Way faster to update than a LMS page.
Data Dashboard for a PLC. A static HTML page that visualizes pre/post assessment data from a CSV. No backend needed if you use a SheetJS that will read the file client-side. (No, I don’t know what SheetJS is either, but ask Gen AI to explain it to you).
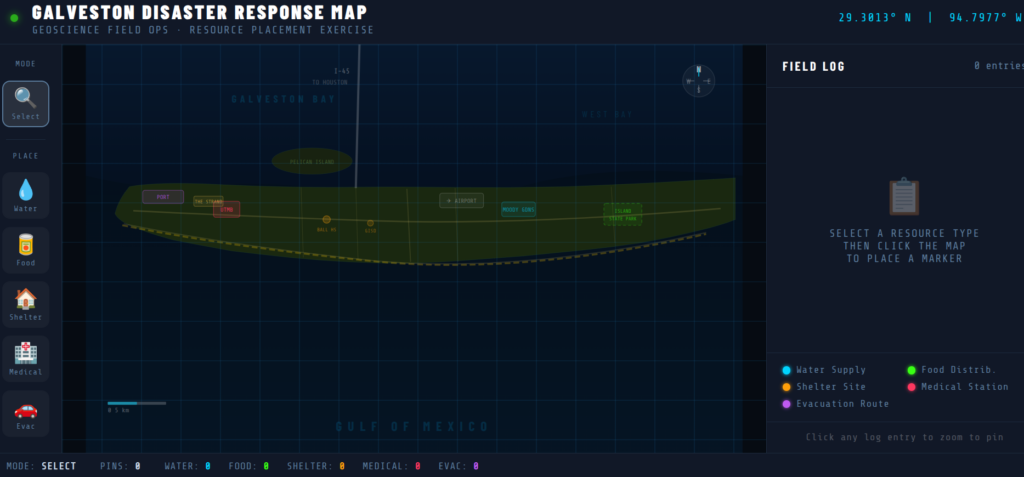
For example, Dr. Aida Guhlincozzi runs a Geosciences camp in Missouri (wouldn’t this be great to have in Texas?). Here are some sample projects that camp participants (all students) could create:
1. Interactive Disaster Response Map. Students place SVG/CSS pins on a campus or regional map, tag each with resource type (water, food, shelter), and add pop-up notes explaining why that location matters. Demonstrates spatial reasoning and GPS concepts.
2. “Before & After” Disaster Slider. A CSS clip-path slider showing satellite imagery or hand-drawn maps before and after a natural disaster. Students write captions explaining the geoscience behind the change.
3. Personal Field Journal. A scrollable, styled “expedition log” with sections for hypothesis, observation, data collected, and reflection. Could include a hand-drawn map image upload area. Demonstrates scientific writing and process documentation.
4. Mini-Data Dashboard. Students input their own GPS coordinates from a field activity into a table that auto-calculates the distance between points. Demonstrates data literacy and real-world math application.
5. “Meet a Geoscientist” Profile Card. A styled bio card students build about a scientist they researched; includes a quote, field of study badge, and “why this matters” section. Great for identity/representation work (ties directly to Guhlincozzi’s story).
6. Decision Tree: What Would You Do?. A branching HTML page presenting a disaster scenario. Each choice leads to a new page/section with consequence text. Students author the branches, not just navigate them.
The Pedagogical Angle Worth Naming
These aren’t just tech projects. Each student item maps directly to Transfer learning in Hattie’s framework. Students applying content knowledge to build something real for a real audience is one of the highest-leverage moves in the Surface → Deep → Transfer progression.
GitHub Pages hosting + a basic HTML/CSS/JS file = zero cost, real publication. Oh, the places we’d go!
Code Reject
Google Gemini 3 Pro coded this page below. It’s amazing, but not quite as good as the Claude Pro generated version included above. Still, for comparison’s sake, it’s worth including below:
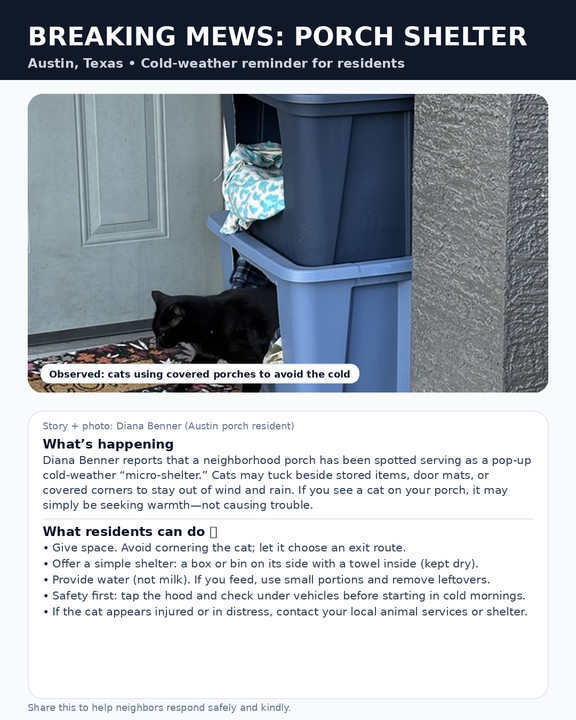
When a pet goes missing (or a “loose dog followed us home”) need facts and next steps. Local news writing is designed to get that job done. Pair that writing style with a phone-friendly flyer and a single image that includes both the photo, key details, and you can get your message across. That is a writing task that can work well for teaching students in grades 5-6, two of my favorite grades, how to write.
This blog entry suggests encouraging students to ground new learning in real life. That means drafting a short news brief, converting it into flyer copy, and then using a Generative AI image generator to create a polished flyer with a headline, facts, and what to do next. The focus is not “AI magic.” The focus is audience, clarity, structure, and verification.
Image generated by author with ChatGPT
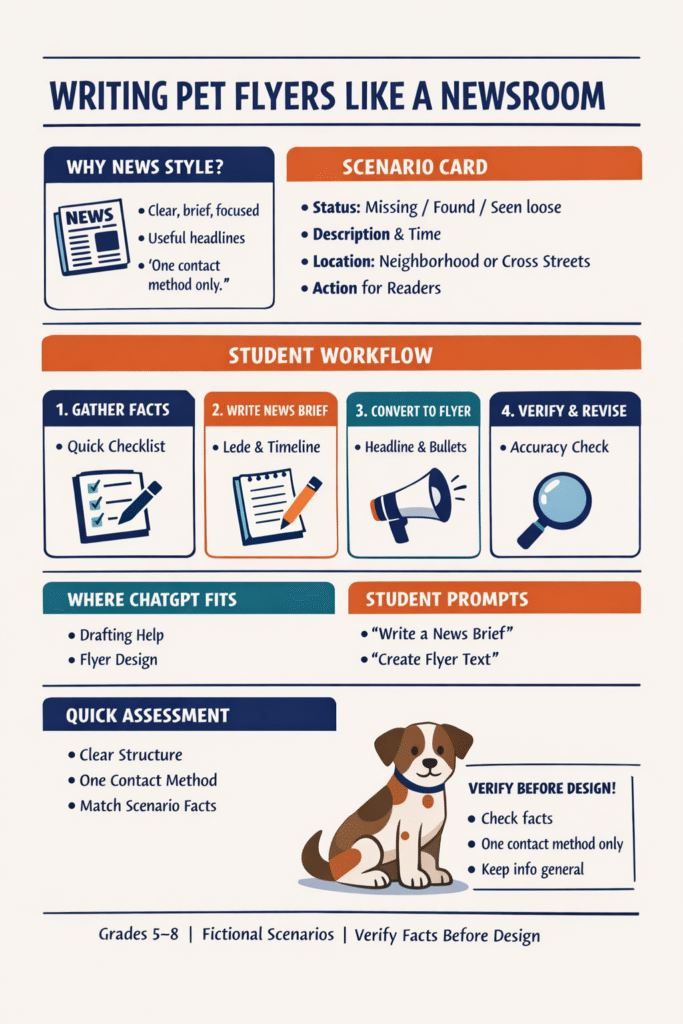
Why News Writing Makes Pet Flyers Better
Too much text, missing time/location, multiple contact methods, or emotional language can cause a message to fail. So teach students news-style writing that fixes that. Require writing to have these components, at minimum:
A headline that names the situation (MISSING / FOUND)
A lede that answers who/what/when/where quickly
A brief timeline (last seen, found, actions taken)
A “What you can do” section with one clear action
The purpose of this type of bare-knuckle writing is to get things done, to get action.
The Classroom Setup
Relying on fictional scenarios enables students to craft compelling stories without risking privacy. You can get groups of students (I like to group mine a la Atwell in four desks) to work on scenarios. Give each group a “scenario card” (missing cat, found dog, loose pet seen near a park). Include a short list of facts they must keep consistent.
Scenario card includes:
Status: Missing / Found / Seen loose
Description: size, color, markings, collar
Time window: “between 4:00–6:00 PM”
Location: neighborhood or cross streets (not an address)
Behavior: skittish/friendly, approaches people or runs
Microchip note: scanned/not scanned (optional)
One contact method: a classroom-safe placeholder (example: “Text the school office”)
One action for readers: “Check cameras,” “Report sightings,” “Share”
A Workflow Students Can Follow
Here are a few steps you can put to good use in the classroom with students:
Step 1: Gather facts (5–8 minutes)
Students complete a simple fact checklist. This is their “source note.”
Step 2: Write the news brief (15 minutes)
Students produce a 150–220 word local-news-style story:
Headline
Lede
Timeline
“What you can do”
You might, along with this step, bring in a few flyers and ask students to critique them. Consider having them craft a rubric to assess what worked and what did not while protecting the private data on the flyers (black marker for redactions). Then, after they have it down, they can take a stab at writing the news brief.
Step 3: Convert to flyer copy (10 minutes)
With their news brief in hand, students then reformat the same information into:
3–6 word headline
5–7 bullet “facts box”
40–70 word summary
One call-to-action + one contact method
You might also rely on the VIVA framework to ensure students have a clear grasp of the facts.
Step 4: Verify and revise (10 minutes)
Before moving on to Gen AI tools, encourage students to do an “accuracy sweep:”
Is MISSING/FOUND unmistakable?
Did we make up anything not on the scenario card?
Is location general (neighborhood/cross streets), not an address?
Is there one contact method only?
Is the tone calm and helpful?
Only after verification do students move to design. Provide some news flyer templates that they can create with hand-drawn images and handwriting. Make it fun.
Where Gen AI fits
Whether you are using Google’s Nano Banana Pro or ChatGPT’s Image Generator, Gen AI tools can help in two useful ways:
Drafting from notes (students still verify)
Generating the flyer image layout (clean typography, scannable design)
The important classroom message: AI can draft and design, but it cannot be trusted to verify. Students must keep control of facts. What’s more, you can also ask students to draft sample prompts to get the visual result they are seeking from the Gen AI tool. This can be managed via Google Docs or similar shared documents. Student groups submit the writing and the teacher uses the Gen AI tool students have chosen to get the result. That result is then shared back with students.
Prompt Set for Writing
Below, please find a few prompt ideas to facilitate writing. Again, I encourage you to have students write the first two drafts, then ask the Gen AI tool to fine tune it, and/or compare their writing with what the Gen AI tool comes up with.
News brief prompt
Write a short local news brief (150–220 words) about this fictional incident. Include a headline, lede, short timeline, and a “What you can do” section. Keep it factual and calm. Do not include exact addresses. Facts: [paste the scenario facts].
Flyer copy prompt
Create flyer text for a fictional missing/found pet. Format it as: (1) headline (3–6 words), (2) 5–7 bullets, (3) 40–70 word summary, (4) one call-to-action with one contact method. Keep it easy to scan on a phone.
Image Generation Prompts
If you want the final product to be an image students can post (or print), have them “pour” the verified flyer text into an image prompt like the one below. Keep the design requirements strict for readability.
Image generation prompt (copy/paste)
Create a clean, phone-friendly flyer infographic. White background, simple grid layout, high contrast, large readable text. Title at top: “[MISSING DOG]” or “[FOUND CAT]” (all caps). Include a “FACTS” box with 5–7 bullets. Include a short “WHAT TO DO” box with 2–3 bullets. Include one contact line at bottom: “TEXT: (xxx) xxx-xxxx”. Use clear sans-serif fonts only. No stylized lettering. No typos. Include a simple, non-photorealistic pet illustration that matches: [describe pet]. Do not include any address. Use only neighborhood/cross streets: [text]. Use calm, professional wording.
If you have a real pet photo, you can use image editing instead of generating a new pet image; but for classroom scenarios, a simple illustration is safer and avoids accidental “look-alike” issues. Consider requiring students to proofread the generated image text. If it contains errors, they must regenerate with corrected text. You can also model branching chats, and if you have access to tools like BoodleBox, consider taking advantage of bot stacking.
A Final Word: Assessment
Since assessment remains an ever-present concern, recall that in the writing workshop, it’s all about the process and steps students have taken to get to this point. It’s not the final product where the assessment happens so much as the significant steps along the journey. Consider grading on each component of these major areas listed below:
Structure: headline/lede/timeline/next steps
Clarity: scannable flyer, short bullets, one action
Accuracy: matches scenario card, no invented details
As a grown-up, I’ve had to put together my own news-style pet flyers. It’s a valuable skill that scales up and teaches authentic purpose-driven writing. The purpose is to get community response for the benefit of saving a life. Students practice informational writing, revision, and media literacy in a format they recognize. The AI piece becomes a controlled design tool, not a shortcut for thinking. This empowers students to learn to write like a newsroom, then publish like a community helper. It’s a powerful skill to learn as journalism fades and Gen AI takes away opportunities to teach that news-style writing can save lives.
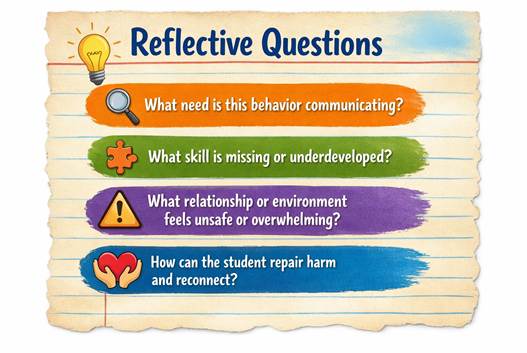
Behavior is communication. When a student shuts down, refuses work, escalates with peers, or disrupts learning, they are often expressing something deeper than defiance: I’m overwhelmed. I don’t feel safe. I don’t know how to say what I need. Behavior is always connected to something.
School counselors work at the intersection of behavior, emotion, and belonging every day. Yet rising caseloads, limited time, and increasing mental health needs make it harder to provide consistent, individualized support. This is where artificial intelligence, used intentionally and ethically, can serve as a powerful support tool. Not as a replacement for counseling, but as a way to amplify counselor capacity, streamline intervention design, and give students more voice.
AI tools such as ChatGPT, SchoolAI, Canva (including Canva Code), Diffit, and MagicSchoolai can help counselors move from a reactive, behavior-focused model to a proactive, belonging-centered approach, without losing the human connection that counseling requires.
Shifting the Lens: From Fixing Behavior to Meeting Needs
Traditional behavior systems often focus on compliance: stopping the behavior, reducing referrals, restoring order. While structure matters, this approach can miss the why behind student actions. A belonging-centered framework asks different questions:
Image Credit: ChatGPT, 2026
AI supports this shift by helping counselors quickly create reflection tools, skill-building resources, and student-centered plans, freeing time for relationship-building and follow-up.
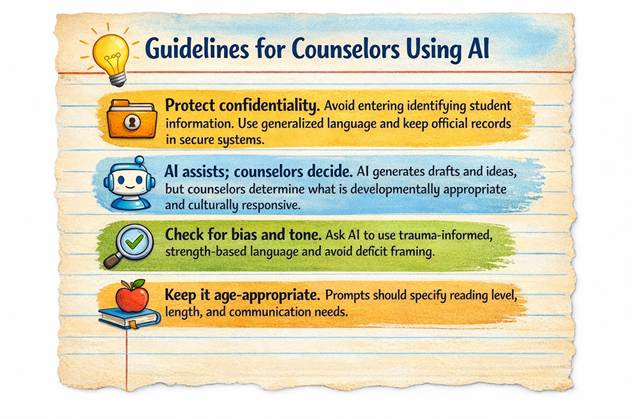
Ethical Guardrails for Using AI in Student Support
Before integrating AI into counseling practice, guardrails are essential:
Image Credit: ChatGPT, 2026
When used thoughtfully, AI becomes a planning partner, and does not play the role of the decision maker.
Behavior Interventions: Turning Incidents into Insight
Counselors often spend valuable time recreating behavior reflections, intervention plans, and staff supports. AI can streamline this work.
ChatGPT can generate non-punitive reflection forms that help students process incidents without shame. Counselors can request multiple formats, sentence starters, checklists, or visual-friendly versions, to meet diverse needs. This allows behavior incidents to become learning moments focused on self-awareness and repair.
MagicSchoolai excels at creating counselor- and teacher-facing resources, such as brief intervention plans, de-escalation scripts, and replacement-skill lessons. These tools support consistency across adults, reducing mixed messages and improving follow-through.
SchoolAI adds another layer by offering structured spaces for students to practice reflection or rehearse responses. For students who struggle to verbalize emotions in the moment, these guided check-ins can provide valuable insight for counselors before the next session.
Goal-Setting Conversations: From “I Don’t Know” to Ownership
Students are often asked to set goals before they have the language or skills to do so. AI can help counselors bridge that gap.
Using ChatGPT, counselors can translate vague goals (“I want to stop getting in trouble”) into small, student-friendly steps. AI can generate multiple goal options, empowering students to choose what feels realistic and meaningful, an important factor in motivation and buy-in.
Canva Code enhances this process by turning goals into visual, interactive tools. Goal ladders, progress trackers, and coping choice boards make abstract goals tangible. These visuals are especially effective for younger students or those with executive functioning challenges.
Diffit supports goal-setting by quickly generating leveled texts and activities tied to missing skills, such as emotional regulation, conflict resolution, or perspective-taking. Counselors can deliver brief, targeted lessons without spending hours searching for materials.
Social-Emotional Check-Ins: Catching Needs Early
Consistent SEL check-ins help counselors identify students who are struggling before behaviors escalate. AI makes this scalable without sacrificing authenticity.
SchoolAI can host routine check-ins that ask students about emotions, stressors, and support needs in a structured, predictable way. Over time, patterns emerge, allowing counselors to intervene proactively.
ChatGPT can generate check-in questions that feel natural rather than clinical, including multiple-choice or indirect prompts for students hesitant to share openly.
Canva Code can be used to design “belonging meters” or weekly wellness check-ins that visually capture how connected students feel to peers and adults. Since belonging strongly predicts behavior, attendance, and engagement, these insights are invaluable.
A Tier 2 Example: AI-Assisted, Counselor-Led Support
Consider a student with frequent classroom disruptions:
Counselor drafts a trauma-informed reflection using ChatGPT.
A short intervention plan and teacher support sheet is created with MagicSchoolai.
The student completes weekly SchoolAI check-ins to identify triggers and coping attempts.
A Canva Code goal ladder helps track progress visually.
Diffit provides a short, leveled lesson on managing conflict.
The counselor meets weekly to adjust supports and strengthen the relationship.
The result is not just reduced behavior incidents, but increased student voice, skill development, and connection.
The Bigger Picture: Belonging as Prevention
AI does not make counseling more human; counselors do. But AI removes barriers: repetitive drafting, resource hunting, and time constraints that pull counselors away from students. When used intentionally, AI supports consistency, responsiveness, and equity in student support.
By shifting from behavior management to belonging-building, schools create environments where students feel seen, supported, and capable of growth. AI, guided by counselor expertise, can help make that shift possible, one conversation, one check-in, and one relationship at a time.
Every spring, a quiet revolution takes place in classrooms, libraries, and community centers across the country. National AI Literacy Day, observed this year on Friday, March 27, 2026, is a nationwide invitation for every learner, educator, and community member to better understand artificial intelligence, how it works, how to use it safely, and how to think critically about its role in our world.
For K–16 educators, this day isn’t just a calendar moment. It’s a mirror.
The Research Is Clear: Educator Readiness Comes First
Brain research consistently tells us that learning is social, contextual, and modeled. Students don’t just absorb information. They watch what their teachers do, trust what their teachers know, and mirror the confidence, curiosity, or anxiety those teachers bring to new topics.
That’s why the most important thing you can do for AI literacy in your school or district isn’t to hand students a chatbot. It’s to become AI literate yourself.
John Hattie’s decades of research on visible learning reinforce this: teacher credibility and subject knowledge are among the highest-leverage factors in student achievement. When it comes to AI, credibility requires fluency. You don’t need to be a data scientist. But you do need to understand what AI is, what it isn’t, and how to use it ethically and effectively.
TCEA’s AI Literacy Framework: A Map for the Journey
Where do you start? TCEA has built a practical, research-aligned starting point: the TCEA AI Literacy Framework.
This framework organizes AI literacy into clear, actionable domains that span foundational understanding, ethical reasoning, practical application, and critical evaluation. Whether you’re a classroom teacher just beginning to explore AI tools or an administrator shaping district policy, the framework gives you a shared language and a progression path.
Think of it as a curriculum map not just for students, but for you.
Key domains include:
Understanding AI: What it is, how it learns, and what its limitations are
Using AI Responsibly: Privacy, bias, transparency, and ethical use
AI in the Classroom: Pedagogically sound integration strategies
Critical Evaluation: Helping students question, verify, and think deeply about AI outputs
Build Your Own Literacy First: TCEA Courses for Educators
The most meaningful National AI Literacy Day activity you can do this March 27 isn’t a student lesson. It’s investing in your own learning.
TCEA’s AI Learning for Educators provides on-demand, self-paced professional development designed specifically for teachers and administrators. These courses are grounded in sound instructional design and connect directly to the TCEA AI Literacy Framework. Topics include:
Foundations of AI for educators
Using AI tools in instructional planning
AI ethics and responsible use in K–12 settings
Practical classroom integration strategies
The pedagogical principle here is straightforward: model what you want students to do. When educators engage in genuine inquiry, take risks with new tools, and reflect on what they’re learning, they become the most powerful AI literacy teachers in any building.
Go Deeper: Virtual AI in Education Conference 2026
If National AI Literacy Day sparks something in you, don’t let the momentum stop there.
Join TCEA for the AI for Educators Conference 2026, a virtual conference designed to take your AI literacy to the next level. Connect with forward-thinking educators, researchers, and practitioners who are navigating the same questions you are: How do I use AI without replacing the human heart of teaching? How do I prepare students for a world where AI is everywhere? How do I lead my school or district through this transformation with confidence?
Whether you attend sessions live or on-demand, you’ll leave with practical strategies, a stronger professional network, and a clearer sense of where you fit in the AI in education story.
What You Can Do Right Now
On or before March 27, 2026:
Explore the TCEA AI Literacy Framework and identify one domain where you feel confident and one where you want to grow.
Enroll in a TCEA AI course at tcea.org/courses and commit to completing at least one module by the end of March.
Share what you’re learning with a colleague, a student, or your professional learning community. Articulation deepens understanding.
Facilitate a short AI conversation with your students or staff on March 27. Ask: What do you think AI is? What are you curious about? What worries you? Then listen.
The Bottom Line
AI literacy isn’t a one-day event. But National AI Literacy Day is a powerful reminder that every journey starts with a single, intentional step.
The students in your care are growing up in an AI-shaped world. They deserve educators who understand that world, can navigate it with integrity, and can guide them to do the same.
That educator is you. TCEA is here to help you get there.
Explore TCEA’s AI resources, frameworks, and professional learning at tcea.org and blog.tcea.org.
You have a stack of IEPs to write, a caseload that keeps growing, and maybe thirty minutes before your next meeting. A colleague mentions she’s been using artificial intelligence to draft goals in seconds. Your first thought isn’t “That sounds efficient.” It’s “Is that even legal?”
It’s a smart question. IEPs contain some of the most sensitive information a school holds: disability diagnoses, medical history, behavioral data, and academic performance. Getting this wrong isn’t just an inconvenience. It’s a potential FERPA violation.
Here’s the good news: you can use AI to write IEPs safely. The risk doesn’t live in the tool. It lives in what you type into it. Once you understand that distinction, everything changes.
The Real Risk Isn’t AI. It’s What You Type.
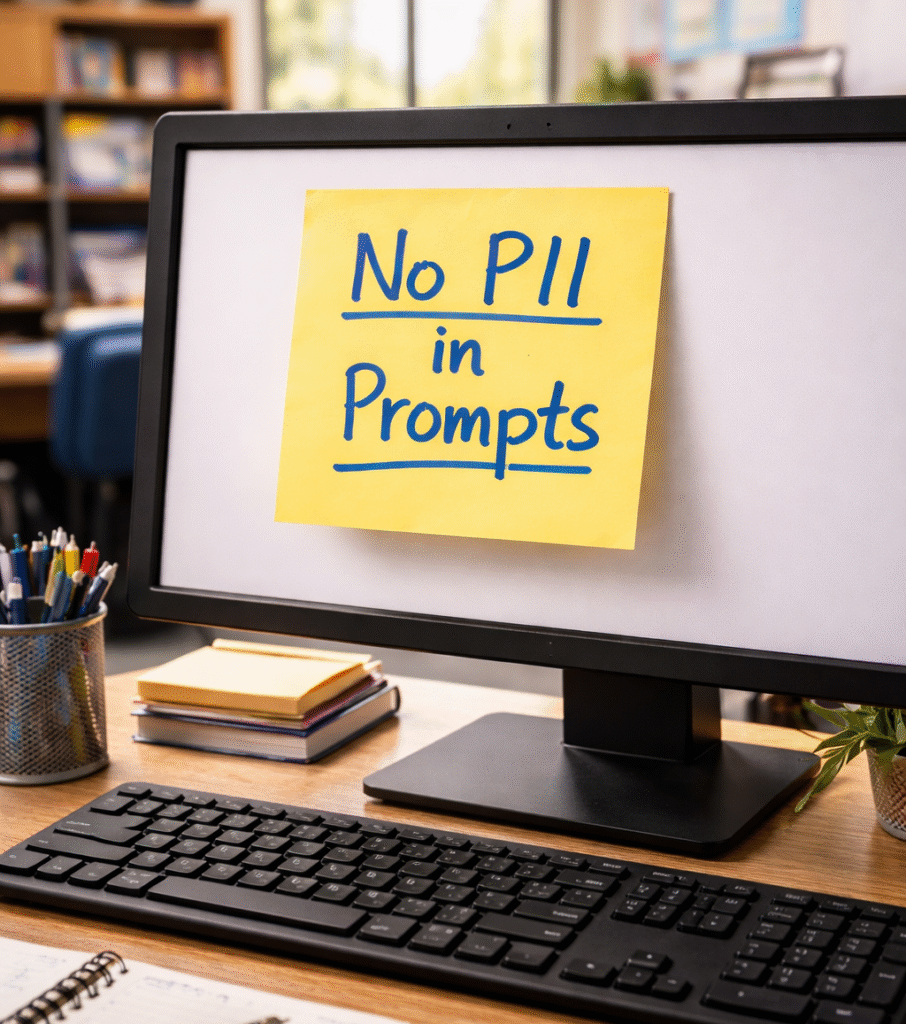
FERPA, the Family Educational Rights and Privacy Act, protects what the law calls personally identifiable information (PII) in student education records. PII includes direct identifiers such as a student’s name or identification number, and indirect identifiers such as a student’s date of birth, or any other information that could be used to distinguish or trace a student’s identity.
When you type a student’s name, ID number, or diagnosis into a general-purpose AI tool that isn’t covered by a district-approved data agreement, you’re potentially disclosing PII to a third party without authorization. That’s the line you don’t want to cross.
About 12 states specifically stress the importance of avoiding inputting PII into AI systems, and roughly 21 states list data security concerns as a focus in their AI guidance for schools. Your district may already have its own policy. Check before you prompt.
The solution isn’t to avoid AI. It’s to anonymize before you type.
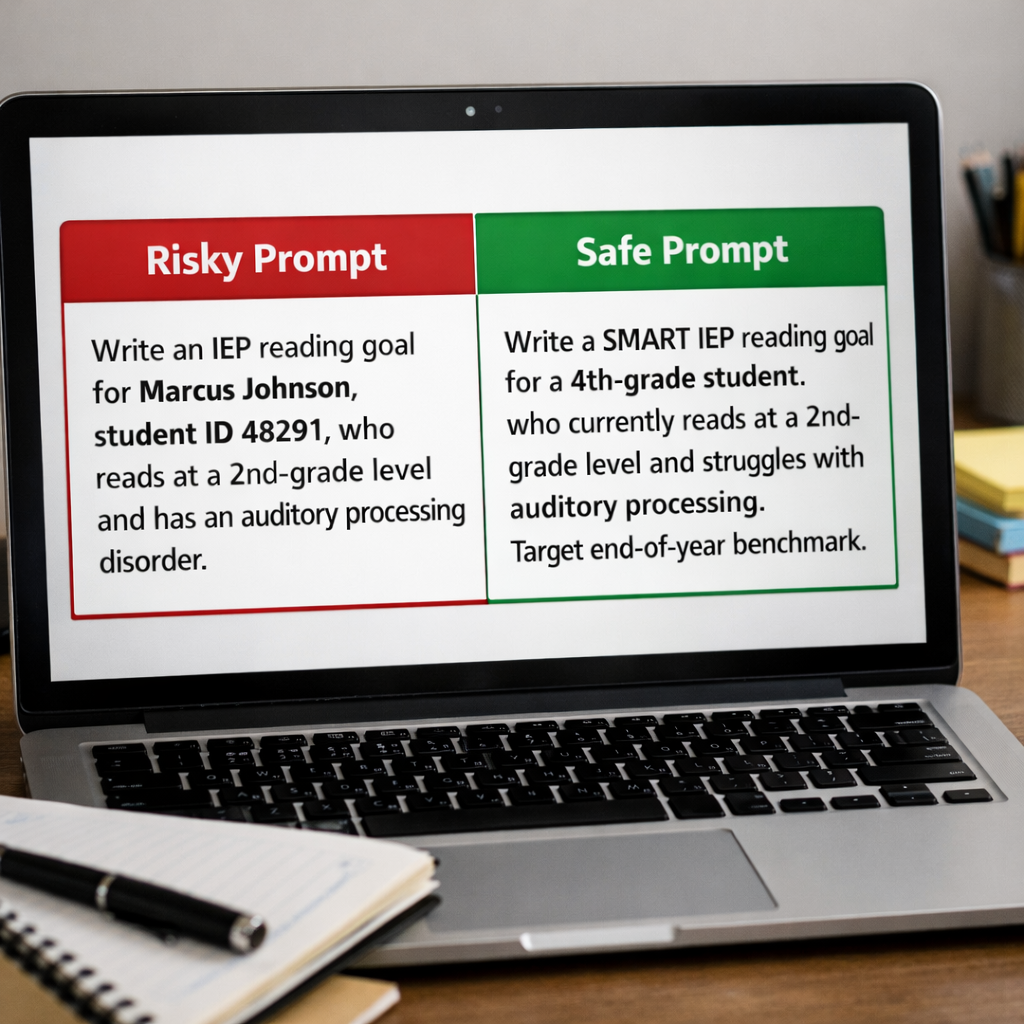
What a Safe AI Prompt Actually Looks Like
Most teachers instinctively know not to type a student’s full name. What many don’t realize is that student ID numbers also count as PII under FERPA, a detail that catches even experienced educators off guard. Here’s what the difference looks like in practice:
Risky prompt:“Write an IEP reading goal for Marcus Johnson, student ID 48291, who reads at a second-grade level and has an auditory processing disorder.”
Safe, anonymized prompt:“Write a SMART IEP reading goal for a fourth-grade student who currently reads at a second-grade level and struggles with auditory processing. Target end-of-year benchmark.”
The second prompt gives the AI everything it needs to produce a strong draft. The student is protected. IEPs require detailed information about students’ disabilities, learning needs, medical history, and academic performance, which makes data privacy a critical concern when using generative AI tools. Stripping out identifiers before you prompt is the single most important habit you can build.
Three Practical AI Tips: No Subscription Required
You don’t need a specialized platform to use AI effectively for IEP drafting. Tools like ChatGPT, Gemini, or Claude can handle this work well when you know how to prompt them.
1. Use the Persona Prompt. General AI tools don’t automatically behave like special education experts. Tell them to. Open your session with something like: “You are a veteran Special Education Coordinator with 20 years of experience writing IDEA-compliant IEPs.” This single line shifts the quality and tone of every response that follows.
2. Build a Prompt Library. Stop rewriting the same instructions from scratch. Keep a simple document with ready-to-paste prompts for each IEP section: PLAAFP, SMART goals, accommodations, and behavior plans. When you’re under time pressure, you open the doc, swap in anonymized student descriptors, and paste. Two minutes of setup saves 20 minutes of drafting. Scroll down to access the link to the AI Prompt Bank for Special Education Teachers which includes an excellent set of prompts to get you started.
3. Use the Reverse Outline for Quality Checks. Already have a draft that feels off but you can’t pinpoint why? Paste it into an AI tool and ask: “Does this goal meet SMART criteria? Suggest two ways to make the measurement more specific.” This turns the AI into an editor, not just a generator, and it’s one of the most underused moves in the workflow.
The IEP Architect: Set It Once, Use It Every Time
The most powerful efficiency move isn’t a single prompt. It’s a system prompt. Paste the text below into the “Custom Instructions,” “System Instructions,” or the very first message of any AI chat. From that point forward, the AI will follow these rules automatically, including the privacy guardrails.
"You are an expert Special Education Consultant specializing in IDEA-compliant IEP development. Your rules: Write SMART goals only, with specific mastery criteria. Use a strength-based tone. Write so clearly that a teacher who has never met the student could implement the plan immediately. Never ask for or use real names, birthdates, or IDs. Refer to the subject as 'the student' or 'Student A.' When I provide data, draft the requested IEP section and suggest one executive functioning tip related to the goal. Acknowledge this role by saying: 'IEP Architect ready. What data are we working on today?'"
Once it responds that it’s ready, drop in your messy, anonymized notes. Three sentences of raw observation become a professional multi-paragraph draft, because the AI is already operating inside your standards, not its defaults.
The Rule to Post Above Your Desk
Before you hit send on any AI prompt, ask yourself one question: Could someone use what I just typed to identify a specific student? If the answer is “yes,” or even “maybe,” rewrite it. No name, no ID, no birthdate, no combination of details specific enough to point to one child.
AI is a draft-builder. You are still the professional of record.
Key Takeaways
FERPA’s risk with AI isn’t the tool. It’s unprotected PII in your prompts.
Student ID numbers count as PII and must be removed, not just names
Anonymized prompts give AI everything it needs to produce strong IEP drafts.
A persona prompt, a prompt library, and the reverse outline technique work in any free AI tool.
The IEP Architect system prompt builds privacy guardrails into every session automatically.
Always check your district’s AI policy before using any tool with student-related content.
Special education teachers are already doing the hardest, most human part of IEP writing: observing students, building relationships, and advocating for what each child actually needs. AI can handle the blank page. You handle everything that matters.
Ready to put this into practice? Download the AI Prompt Bank for Special Education Teachers, a free resource with 25+ ready-to-use, privacy-safe prompts covering IEP writing, parent communication, behavior plans, progress monitoring, differentiation, and supporting general ed teachers.
Have a prompt that’s been a game-changer in your work? Share it in the comments. The best ideas in special education have always traveled teacher to teacher. This is no different.
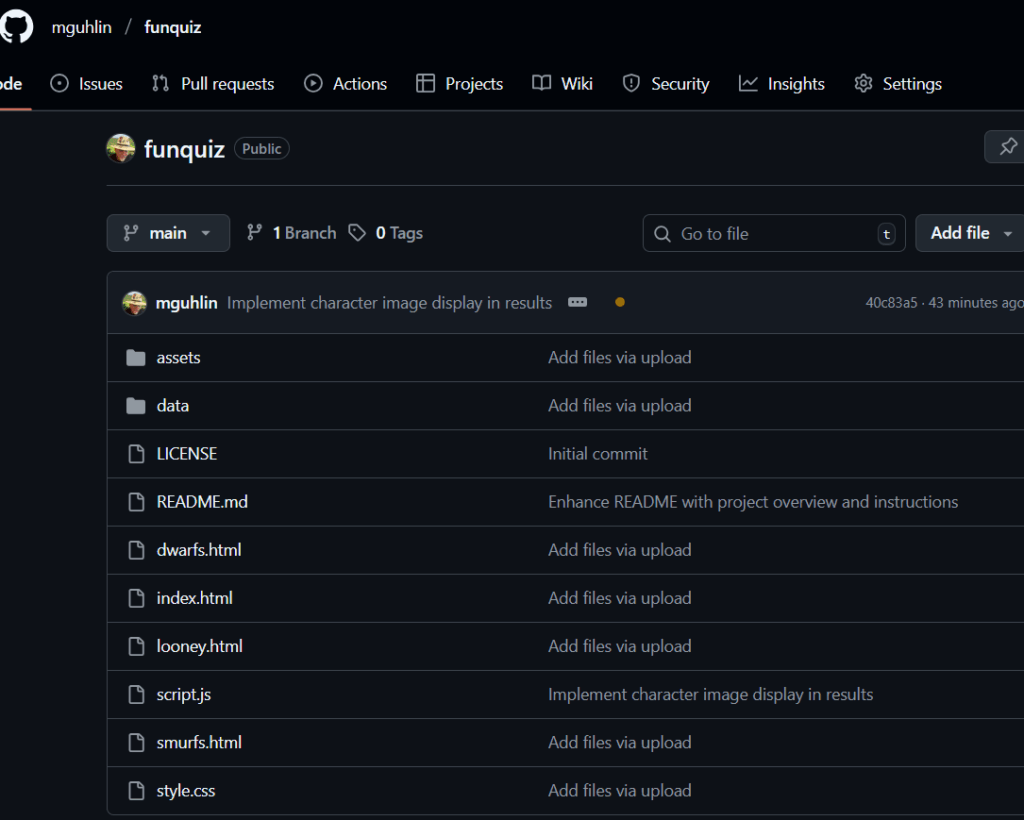
How do you make a custom GPT accessible to anyone, whether they have a ChatGPT account or not? You turn it into a website! In part one of the AI Magic Maker series, you created a custom GPT-based Fun, Personality Quiz. The only problem is that this personality quiz lives inside a Custom GPT. If you did not have access to that GPT, or a free ChatGPT account, you could not use the quiz. Instead of a custom GPT, I wanted a web address or uniform resource locator (URL). In this way, I would be able to drop the link into a slide deck, blog post, or whatever for easy access. A tool I knew little about (i.e. GitHub) made this possible.
GitHub Repository for the website files generated by ChatGPT and the author
Let’s go through the process together. Towards the end, you will find a video that walks you through the GitHub set up as well.
Step 1: Capture the Quiz as a Web Page
First, I asked ChatGPT to help me translate the quiz into a web format. What I am looking for has to include:
A simple page titled “Fun Personality Quiz for Educators.”
The same instructions as the GPT version.
A place to show the quiz image at the top.
Also, I wanted to get an interactive version using HTML and Javascript with buttons, tallies, and the response with the result. To get ready, you will need:
A GitHub account (for hosting your quiz for free )
A GitHub repository (which you will create)
The files you will need (e.g. index.html, style.css, script.js)
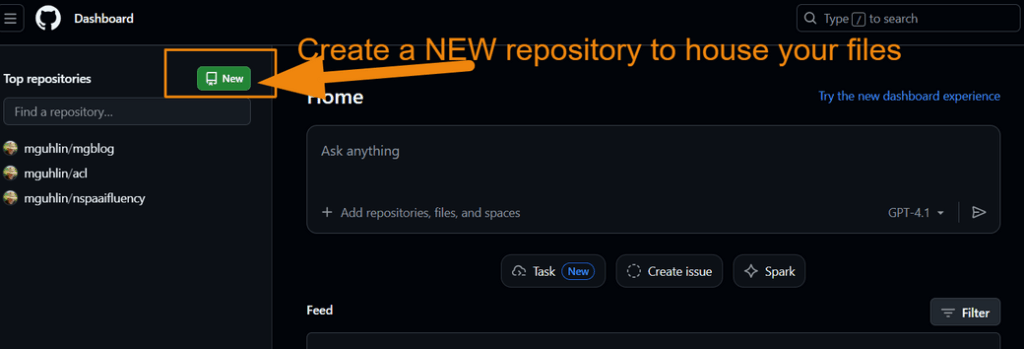
After creating an account using GitHub, you are ready to create a repository. Rather than mix this quiz with other projects, I created a new GitHub repository just for it. Something like:
funquiz
Then, I prompted ChatGPT to create the files I would need with a simple prompt:
I want to turn this personality quiz into a github page that people can fill out online, then get the result right then and there. How would that work?
It then offered a step-by-step for me to follow, and provided the required files (list appears below).
Did You Know?
In part three of this series, you will modify that prompt to get a version that saves the results into a Google Sheet. For now, this is a simple process to put the quiz online.
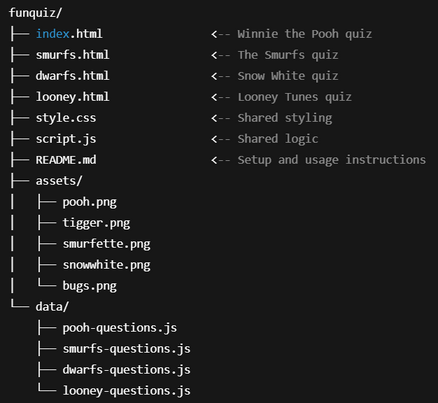
With my new repository, funquiz, you will see the following:
As you can see, this image offers a folder structure for placement of files. I did not include the assets (I’ll do that in part three). Or, to be more exact, I included them but they did not work. I will ask ChatGPT to fix that in the final version.
You can prompt ChatGPT to do the following prompt, which appears below:
Begin prompt
Create a complete GitHub Pages project for "Fun Personality Quizzes for Educators" called `funquiz`.

It should include:
- One HTML page per quiz (Pooh, Smurfs, Dwarfs, Looney Tunes)
- Shared CSS for layout and styling
- Shared JS logic for quiz progression and results
- One question set per quiz in separate JS files under `/data/`
- A dropdown menu to choose a quiz from any page
- An `/assets/` folder with character images or placeholders
- A README.md file explaining how to deploy and customize

Package it all as a downloadable ZIP I can use or upload to GitHub Pages.
End Prompt
Now the quiz exists as a small website folder, ready to publish. Before putting it into the GitHub repository, you can test it on your device. I created a folder to house these files, then uploaded (put) them into the GitHub repository once they had the look I wanted.
Step 3: Turn on GitHub Pages
In the repository:
Go to Settings.
Scroll to Pages (sometimes under “Code and automation”).
Under Build and deployment, set:
Source: Deploy from a branch
Branch: main
Folder: / (root)
4. Save the settings.
GitHub will build the site and generate a public URL, usually in this format:
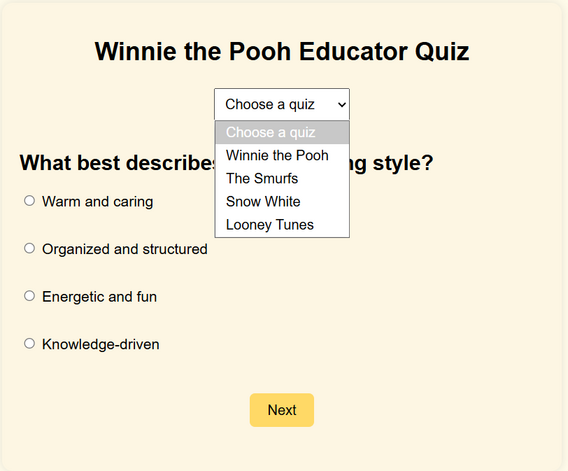
As you can see from the screenshot below, I’m able to pick the quiz I want users to see. I can also upload images so that each quiz has its own custom image. I’ll save that for the final version in part three of this series.
Step 4: Test the Live Quiz
Next, I opened the URL in a browser:
Did the title display correctly?
Did the image load?
Were instructions clear for educators?
If interactive, did clicking answers produce a final result?
Any changes needed went back into index.html or one of the other files. You can watch a short video of the steps I followed below:
Step 5: Share, Embed, and Extend
For the final step, I’m ready to share this with colleagues as a link that will go in a blog post (like this one), or use it in a future workshop. In part three of this series, I will add images, instructions, and save the results of the quiz to a Google Sheet.
The big benefit of all this is that we not only end up with a fun personality quiz, but also, have a process for vibe coding our way from a custom GPT to a website hosted for free online. Of course, GitHub Pages may be blocked by your school district, but that’s another blog entry.
In an era where generative AI can craft a convincing essay on the French Revolution or a lab report on osmosis in seconds, educators are facing an “authenticity crisis.” We’ve all felt it: that nagging doubt when a student’s written voice doesn’t quite match their classroom persona.
While we shouldn’t abandon writing, the traditional “take-home” essay is losing its status as the gold standard of evidence. The solution, however, isn’t necessarily more high-tech surveillance. It’s actually quite “low-tech:” we need to start talking to our students more.
Welcome to the revival of the Viva Voce, Latin for “with the living voice.” Traditionally reserved for PhD defenses, a simplified VIVA Framework is the perfect tool for middle and high school teachers to verify understanding quickly and authentically.
What Is the VIVA Framework?
The VIVA Framework is a structured, two-minute “micro-assessment” designed to confirm that the student who submitted the work is the same student who understands the work.
Recent research (Auckland, 2025) suggests that “Interactive Oral Assessments” (IOAs) are among the most effective ways to see what students truly know. Unlike a test, a VIVA is a dialogue. It’s hard to “prompt-engineer” your way through a live conversation.
The Two-Minute VIVA Framework
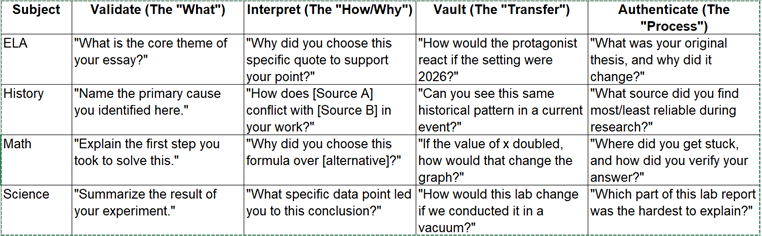
To make this sustainable for a class of 30, the goal isn’t a long interview. It’s a surgical “check-in” using four specific pillars:
V – Validate: Confirm the student knows the basic “what” of their work.
I – Interpret: Ask them to explain the “how” or “why” behind a specific choice.
V – Vault: Have them apply the concept to a new, hypothetical scenario (the “Vault” of knowledge).
A – Authenticate: Discuss the process—what was the hardest part? What did they change?
You don’t need a complex rubric. Keep these four questions on a sticky note or your clipboard during “Work Time” or “Student-Teacher Conferences.”
Phase
Question Prompt
What You’re Looking For
Validate
“In your own words, what is the ‘big idea’ or central thesis of this piece?”
Can they summarize without reading their screen?
Interpret
“You chose [specific detail/source/method] here. Why did you pick that over another option?”
Understanding of intent and selection.
Vault
“If the circumstances changed to [new variable], how would your conclusion change?”
Transfer of knowledge to a new context.
Authenticate
“What was one ‘dead end’ you hit while working on this, and how did you pivot?”
Insight into the human learning process.
Or check out these subject-specific questions below:
What the Research Says
You might worry that oral assessments take too much time, but the data tells a different story:
Integrity without Policing: A 2025 study from the University of South Australia found that replacing some written exams with structured orals reduced academic integrity breaches to nearly zero in targeted subjects.
Better Grade Accuracy: Research published in Frontiers in Education (2025) indicates that students often perceive oral check-ins as more “fair” and accurate reflections of their knowledge than high-stakes tests.
Employability: Beyond “catching AI,” oral exams develop “work-ready” skills: the ability to defend a position, communicate clearly, and think on your feet (University of Auckland, 2025).
Implementation Tip: The “Sampled” VIVA
You don’t have to VIVA every student for every assignment. Try sampled moderation. Tell the class you will randomly select five students to do a two-minute “VIVA check-in” after they submit their digital work. The mere possibility of a conversation encourages students to engage more deeply with the material themselves rather than outsourcing it to a bot.
Pro Tip: Tech-Smarter, Not Harder
A common hurdle for oral assessments is the “Where do I put the grade?” factor. Luckily, you don’t need a heavy gradebook entry for a two-minute chat. Use this streamlined workflow to keep your data organized without the paperwork:
The “VIVA Tracker” Form: Create a simple Google Form or Microsoft Form with three fields: Student Name, Phase (Validate, Interpret, Vault, Authenticate), and a Checkmark for “Demonstrated Mastery.”
Voice-to-Text Feedback: Instead of typing notes while the student talks, use the dictation (microphone) feature in a Google Sheet cell. Briefly summarize their “Vault” answer. This creates a time-stamped record of their verbal mastery that you can refer back to during parent conferences or IEP meetings.
The “Randomizer” Spreadsheet: Use a simple =RANDBETWEEN formula in a spreadsheet to select your “VIVA 5” for the day. Projecting this on the board adds a layer of gamified transparency: students know the “Living Voice” check-in is a standard, fair part of the classroom routine.
Ready to try your first VIVA? Pick one assignment this week and choose three students for a two-minute “desk-side chat” using the template above. You might be surprised at how much more you learn about their thinking than a “Turnitin” score could ever tell you.
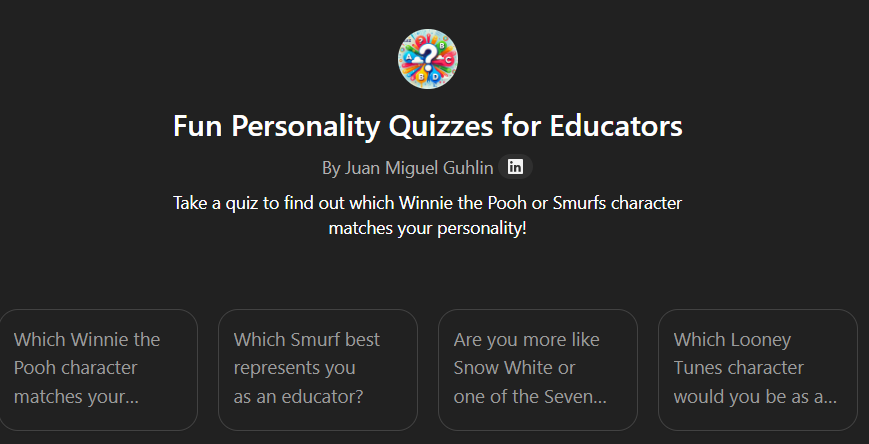
Are you looking for something lighter than a rubric or pre/post test, but still useful in PD sessions? Perhaps you want to vibe code your way to a standalone icebreaker personality quiz you can use with your students? That’s how I started. I wanted a fun, low-stakes icebreaker, a way for educators to reflect on their teaching style. Of course, I also wanted to test out another vibe coding solution, using Gen AI to develop a website, interactive personality quiz. In this two part blog entry, I’ll share how to build a custom GPT and then how to turn it into a standalone website. You might start with a personality quiz, then graduate to an online entry/exit ticket or icebreaker.
In this part, we’ll explore first how to create a custom GPT. Then, in part two, we’ll turn it into an interactive webpage you can host for free on GitHub. Finally, in part three, I’ll share how you can save the data from the interactive webpage to Google Sheets.
Creating an Engaging, Fun Personality Quiz
One of my favorite personality quizzes online is, “Which character are you?” You have probably taken a few of these on Facebook. What bothers me about those quizzes is the collection of personal data. A question in my mind was, “How could I design a privacy-safe, fun personality quiz for teachers?”
Winnie the Pooh seemed the best place to start. I love the characters of the 100-acre wood, and my family often identifies with Pooh and characters. Are you a Tigger or an Eeyore? Maybe you are Owl or Roo?
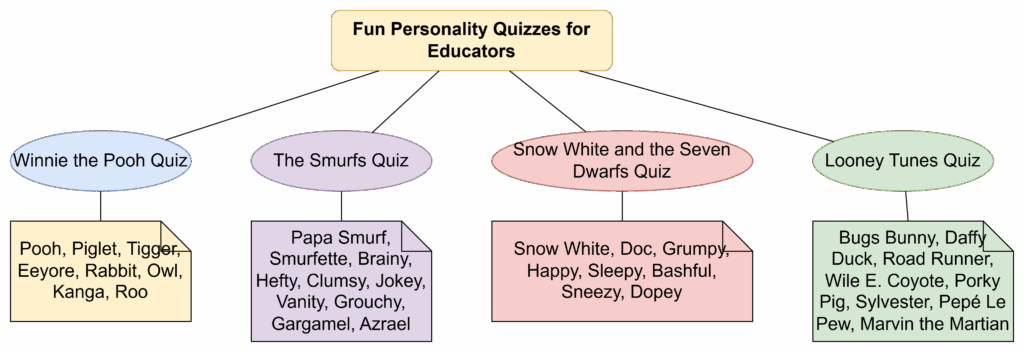
By popular demand from my work colleagues, I also wanted the quiz to sort educators into characters they were familiar with. So, in addition to Winnie the Pooh, they wanted:
The Smurfs
Snow White and the Seven Dwarfs
Looney Tunes
Each quiz would end with a playful answer: “You’re Tigger as a teacher,” or “You’re Brainy Smurf in the classroom.” The results included a short description of what that character is like as a teacher.
Starting with the Problem, Not the Tool
While I wish I could say I began with the end in mind, I had only a vague idea. I started a conversation with ChatGPT and the adjustments came over time. After working with colleagues, I had to add different universes (e.g. Smurfs, Looney Tunes) because I had different colleagues ask, “Could you please make an assessment for Looney Tunes or Smurfs, etc.?” The first one I started with included Winnie the Pooh characters. At the end, I ended up with several additional considerations:
Each quiz uses a single universe (Pooh, Smurfs, Snow White, or Looney Tunes).
Each quiz has exactly five multiple-choice questions.
Questions appear one at a time.
The quiz waits for the user’s answer before moving on.
At the end, the GPT assigns one character based on the most frequent trait pattern.
The result explains what kind of teacher that character would be.
Again, these developed over time via an interactive conversation with ChatGPT. Then, I asked ChatGPT to give me the custom instructions for the GPT. At that point, I had something to work with.
Want to try this out on your own? If you have a paid account for an AI chatbot (such as BoodleBox Unlimited, ChatGPT Plus/Teams/Education/Enterprise, Google Gemini Gem, Claude Project/Artifact), you can use the custom instructions in this Google Doc to get started. Simply save the instructions as a text file or markdown content with a filename extension of TXT. The filename and extension would be instructions.txt.
Designing the Quiz Flow with ChatGPT
Next, I focused on behavior, not characters. I asked ChatGPT to sketch the flow of a single quiz from start to finish. The prompt looked something like this:
Help me design a personality quiz flow for educators.
Five questions, multiple choice.
Ask questions one at a time.
Wait for an answer before showing the next question.
At the end, analyze answers and assign a single character type.
Make it easy to convert into Custom GPT instructions later.
ChatGPT responded with a simple sequence:
Greet the user and explain the quiz theme.
Ask Question 1 with answer options A–D.
Wait for an answer.
Record the trait associated with that option.
Repeat for Questions 2–5.
Tally which trait pattern appears most.
Map that pattern to a character.
Present the result with a short, teacher-focused description.
This became the framework for every quiz, no matter the universe.
Building the Character Library
As I mentioned earlier, some of my colleagues wanted to know which Smurf or Looney Tunes character they would be. The chatbot provided the descriptions of each character. Of course, the magic is that this would happen no matter what universe they are in:
Winnie the Pooh: Kind, gentle, loyal. As a teacher: Warm, welcoming, always encouraging.
Piglet: Timid, anxious, brave when it counts. As a teacher: Patient, supportive, nurturing confidence.
Tigger: Energetic, optimistic, adventurous. As a teacher: Fun, engaging, brings excitement to learning.
Rabbit: Organized, responsible, a bit fussy. As a teacher: Structured, caring, focused on progress.
I repeated the process for:
The Smurfs (Papa Smurf, Smurfette, Brainy, Hefty, etc.)
Snow White and the Seven Dwarfs (Snow White, Doc, Grumpy, Happy, etc.)
Looney Tunes (Bugs, Daffy, Road Runner, Wile E. Coyote, etc.)
Each question’s options pointed to the traits of one or more characters. At the end of five questions, the most frequently tapped trait pattern determined the result. Describing this takes longer than the actual amount of time spent asking the Gen AI chatbot to do this.
Turning the Model into Custom GPT Instructions
Once the Project worked well, I asked it to give me the custom instructions (a.k.a. system prompt) for the Custom GPT.
Take our quiz flow and character descriptions and turn them into Custom GPT instructions.
The GPT should offer a menu of quiz themes (Pooh, Smurfs, Snow White, Looney Tunes).
Once the user chooses one, it should explain the quiz and start with Question 1.
It must not skip ahead. Wait for each answer.
After five questions, it should assign a character and explain what kind of teacher that character would be.
Always keep the tone warm and educator-friendly.
Display this image at the start:.
Again, with some interactive back-and-forth with the chatbot, ChatGPT generated a set of “rules.” Those rules included:
How to greet users
How to present the image
How to guide quiz selection
How to enforce the one-question-at-a-time rule
How to tally responses and deliver a result
This became the backbone of my Custom GPT, ensuring a reliable response each time. You can see the custom instructions here that I relied on.
Testing, Tuning, and Making It Teacher-Friendly
The last step was trial and error. I found volunteers to run through the various iterations and it turned out to be a wild success. People love fun personality quizzes. As I tested it, I saw different ways to improve it, such as:
Simplifying question wording
Balancing answer choices
Softening language for more hesitant audiences
Ensuring the final descriptions felt affirming, not judgmental
At the end, I had a Custom GPT that educators could enjoy in a PD session, department meeting, or just for fun. The quiz is not about labels. It is about language for talking about how we show up in the classroom. It also served as a way to introduce people unfamiliar with Gen AI to a custom GPT.
Pondering Next Steps, an Interactive Webpage
The next step became obvious after I tried it with others who lacked a ChatGPT account. How could I move this beyond the OpenAI Custom GPT space? Doing so would allow anyone to take the personality quiz via a simple link, no ChatGPT account required. What’s more, I’d be able to create similar assessments that could avoid OpenAI’s strictures of adult learners only. In part two of AI Maker Magic, you will see how to use vibe coding to turn this quiz into an interactive webpage.
If you’re looking for a tool to help students think critically, make connections, or to spark their curiosity, Google’s Learn Everything experiment is worth a look. This interactive resource from Google Arts & Culture explores knowledge webs that grow in real time based on your interests. It’s an open invitation to ask questions and learn everything, just like the name says.
About Learn Everything
Learn Everything is an experimental learning experience powered by Google Gemini. To get started:
Take a photo of an everyday object nearby, such as a plant, coffee cup, burger, or pet, using your device’s camera.
Enter a topic or concept you want to explore.
Choose your audience: Beginner, Intermediate, or Advanced.
Click Explain.
Using your photo as a visual metaphor, an explanation of that topic is generated. The tool also generates follow-up questions and branching concepts. In addition, you can ask follow-up questions or dive into related topics for deeper exploration once the initial explanation appears.
I took a picture of a ladybug rock I had sitting on my desk. Then I asked Learn Everything to tell me about the colors of ladybugs.
Classroom Ideas
Build Background Knowledge Before introducing a new unit, let students explore the topic and its connections. They’ll come to class with context and questions.
Curiosity Journals/Bell Ringers Give students 10–15 minutes to explore a topic related to the day’s lesson. Then, ask them to write down five things they learned and one question they still have. This is great for bell ringers or early finishers.
Research Have students snap a photo or select a starting topic and follow the knowledge web to develop a research question they want to pursue.
Vocabulary and Concept Mapping Use the tool to explore academic vocabulary in context. For example, if you’re teaching photosynthesis, see how the tool explains it with metaphors and which related ideas emerge.
Visual Thinking Activities Ask students to take a photo (a classroom object, nature item, or artwork) and use the tool to explore academic concepts through that lens. This is great for cross-curricular connections.
A Few Tips for Teachers
Try it first to see how metaphors and follow-up questions unfold.
Use it on larger screens for group demos or pair activities.
Let students explore topics that matter to them.
Try It
With just a photo, students can unlock a world of ideas, visual metaphors, and smart connections that deepen understanding and drive curiosity. Whether you’re supporting research skills, presenting a new topic, or just giving students space to wonder, this Google experiment is a fresh, AI-powered way to make thinking visible and fun. To explore more Google experiments, like Learn Everything, check out our other TCEA Technotes blogs.
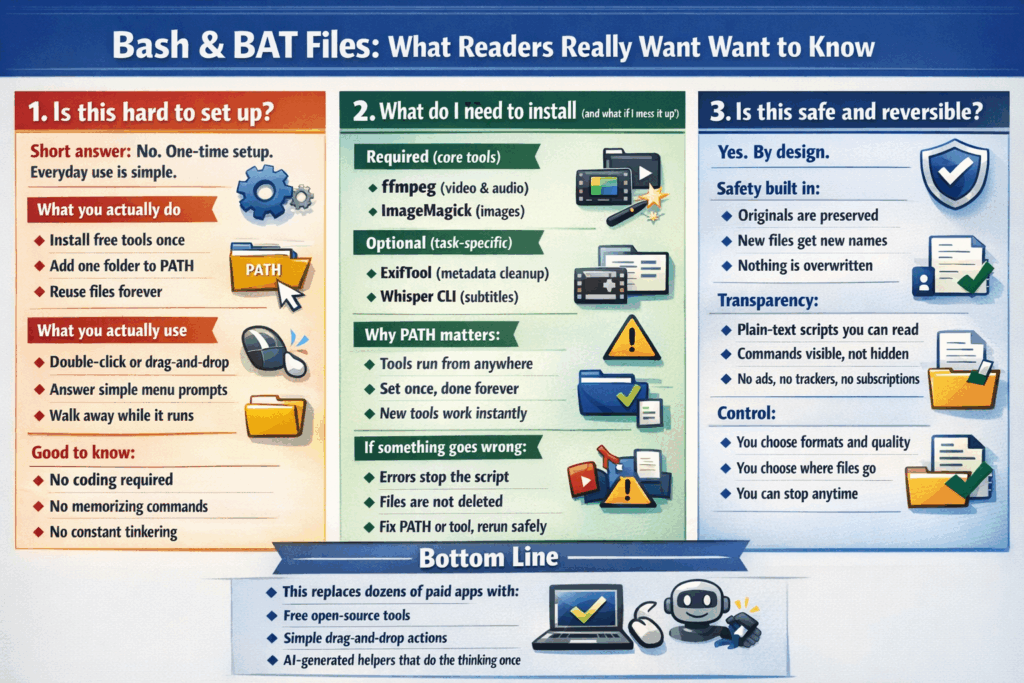
Need to convert an MP4 video file to an MP3 audio file with drag-n-drop? Or, resize and compress an image that’s too big to upload? Need to convert PDFs into a single merged, text file in MarkDown format for easy upload to a Gen AI chatbot? Or, perhaps, you have a series of photos you want to convert into a slideshow? If you use technology with any frequency, you may find yourself struggling to find the right, no-cost apps to get the job done. I can’t tell you how many times I’ve installed a “free” program only to find that there are in-app purchases needed. But there is an easier way.
Generative AI Makes the Command Line Easy
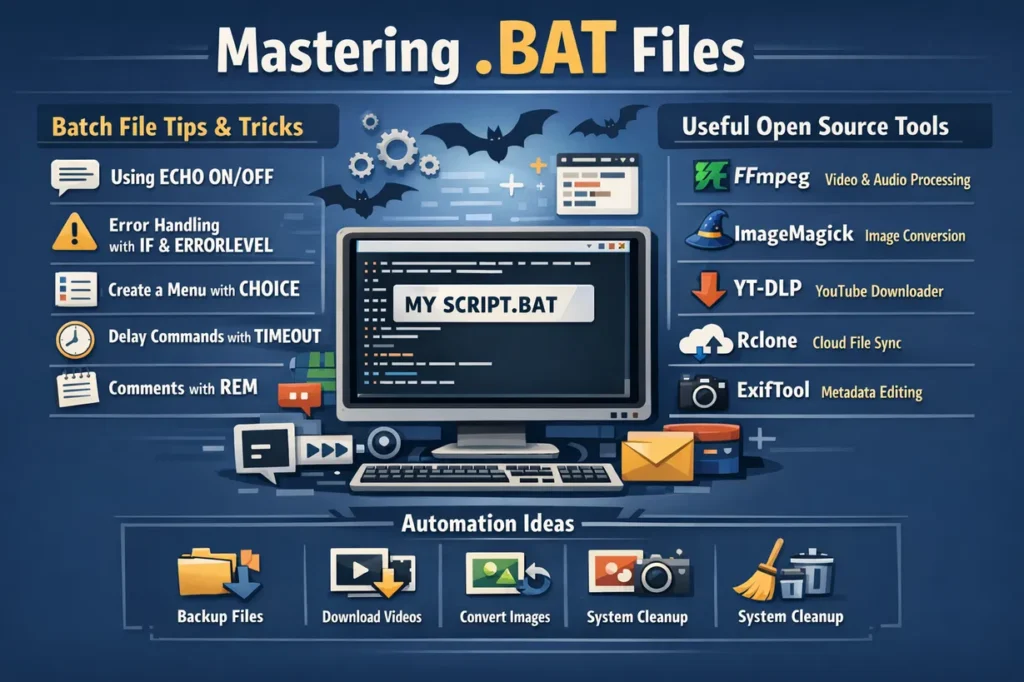
Much of what you pay app creators for is available for free, if only you knew how how to use the command line on Windows (or GNU/Linux and Mac). The problem is, finding the right combination of command line options for a program like FFMPEG or ImageMagick can take a few Google searches and hours of experimentation. I have put in that time, and then, about six months ago, a solution so obvious I mentally kicked myself for not trying it sooner.
Note: While all the examples in this blog entry focus on .bat files, you can easily ask your Gen AI chatbot for a BASH file (filename extension is .sh). Bash files work a little differently on GNU/Linux, and that would necessitate a separate blog entry. This idea works for all sorts of challenges, including moving fonts from Windows to GNU/Linux, as one person found out when I put together this tutorial for them using Gen AI, too. The point is, give it a go.
You already know what the solution is, right? I decided to ask Generative AI to give me the right command line options for shrinking a series of videos. You see, I had recorded a host of my daughter’s wedding videos, and they had gigantic file sizes. While I work with video all the time, babysitting video conversion programs to do the conversion (which takes forever) was not on my dance card. When Perplexity AI gave me the right combination for a bat file, I realized I might be on to something. A half year later, I’m now using AI-authored BAT (Windows) and BASH (Mac and Linux) to do all sorts of tasks.
What’s a BAT/BASH file?
I learned about BAT files in my freshman college class, “An Introduction to MS-DOS.” My professor, back in the late 1980s, had me write BAT files by hand. At that time, the realization that coding was not my thing sank in a little deeper.
BAT/BASH files are like recipes. They are a list of instructions that instruct your computer to do things automatically. Instead of you clicking through menus and typing commands one by one, the script does it all for you. Think of these as a to-do list for the operating system. The .bat file is for the Windows operating system. On Mac and GNU/Linux, the recipe of instructions file is known as a .bash file. They do the same kind of thing, only they use language that each operating system understands.
Some real world examples you can use script files for include:
Automatic back up of files from one folder to another every day (great for backing up that USB drive you carry around with you)
Launching multiple programs at once with a single click
Renaming hundreds of files in seconds instead of one by one (ugh, this is a pain)
Clean up of temporary files
Now, my “Aha!” moment came when working with large video and image files I wanted to share with others. Others do not need the high quality video or image. A smaller, more shrunken version I can fit inside of an email or text message attachment will do just fine.
Sample Prompt for a BAT File: Make Animated GIF from JPGs
“What is the simplest way to create an animated GIF from an existing JPEG/JPG/PNG? The JPG has a character I need to animate. I’m looking for a bat file” (Source)
To that end, I set up a ChatGPT Project (you can do this in BoodleBox, Claude, Copilot, and Gemini, too) that I labeled “Technical.” Then I added some custom instructions to it to guide my work. These custom instructions take the hard work out, and instead, make it easy to drag-n-drop files on top of a .bat file on Windows to get the desired action.
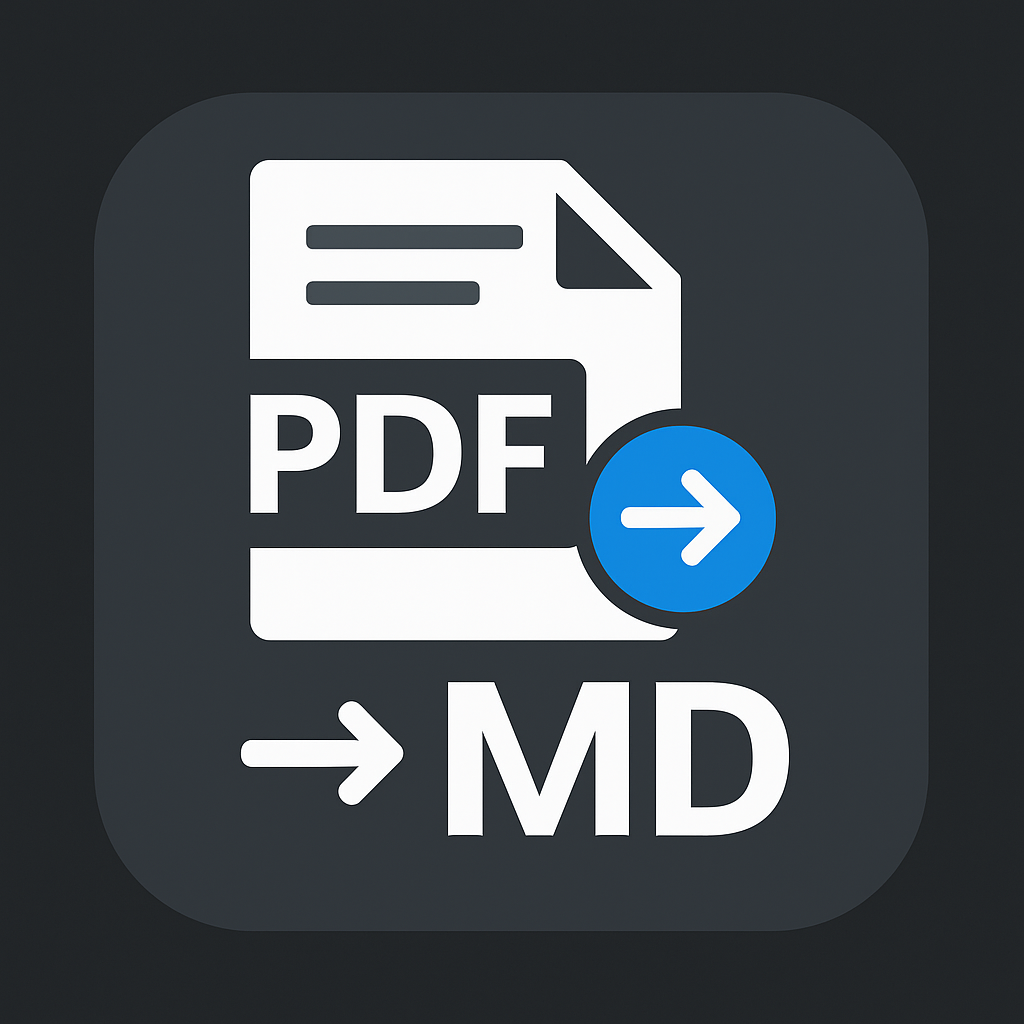
One Example: PDF/Txt/MD to MD File Merge
Problem: Need to merge PDFs, Txt, or Markdown (MD) files into a single file?
There are limits on how many files you can upload to a knowledge bank (e.g. ChatGPT limits you to 25 files for a Project/CustomGPT). Or, perhaps you want to optimize your text files before putting them into a knowledge bank.
It will convert from PDF/Text/Markdown (MD) formatted files to markdown, then merge the MD files into one. This means instead of giving your GenAI twenty-five different PDF documents, you provide only one. This takes up less space AND the Gen AI chatbot processes the text file faster. You can always rename the “merged.md” to “merged.txt” if your AI chatbot of choice can’t handle markdown.Google Gem and BoodleBox Bots can produce markdown files, but won’t accept them as input unless you change the filename extension to txt.
Free Software to Install for Windows
You will need to install some software, all of it free, open source (FOSS). Then, you will need to add this software to the PATH so it can work anywhere you happen to be (such as your Desktop, in some deep directory/folder on your device). Let’s look at both steps now, which you will only need to do once.
Install Software
You will not need all the software I have in my tools folder (more on that in a moment), but you can start with the following software:
Install ffmpeg and ensure ffmpeg.exe is on PATH.
Install ImageMagick and ensure magick.exe is on PATH.
Optional: install ExifTool (exiftool.exe on PATH) for metadata stripping.
Optional: install Whisper CLI (whisper on PATH) for subtitles.
A convenient step by step is available to assist you in installing the software programs above. That will enable you to take advantage of solutions such as the ones detailed below:
Not sure how to add programs to the PATH on Windows 11? Let’s walk through that now.
Add Programs to the PATH
The way I do this is to put all the EXE files for the programs I installed (see list above) and put them into a single folder called “tools.” Then, I put this tools folder at the root level on my computer. You can find the root folder by going to your “My Computer,” double-clicking Windows (C:) and you will see a list of folders. This is where you can create a “tools” folder and/or drag your Tools folder there.
Here’s an excerpt of a video tutorial I made for a colleague. It shows you how to add a folder called “tools” (like the one shown above) to the PATH on Windows 11.
The main benefit of this? I don’t have to keep modifying my “Environment Variables,” that is, adding items to the PATH again and again. Instead, I simply put the new program into the C:\tools folder and it’s ready to go.
How BAT Files Work with Drag-n-Drop
Here are a few of the problems that I’ve asked ChatGPT to create bat files for me for:
Automatic media conversion to MP3/OGG/MP4. This bat file prompts me for the desired output format I want then gives me a smaller file in that format.
Batch image resizing and compression. This bat file relies on ImageMagick, compresses the image file, and then saves it with a new name.
Convert PDFs + text/Markdown into a single merged Markdown document. This bat file takes advantage of Xpdf tools to create a merged text file.
Here’s a demonstration video showing one in action:
Although I have set up various .bat files, for this blog entry, I asked ChatGPT to generate a menu of options file. This addresses a variety of needs you may run into (or at the least, that anyone working with video, images, and PDFs runs into from time to time).
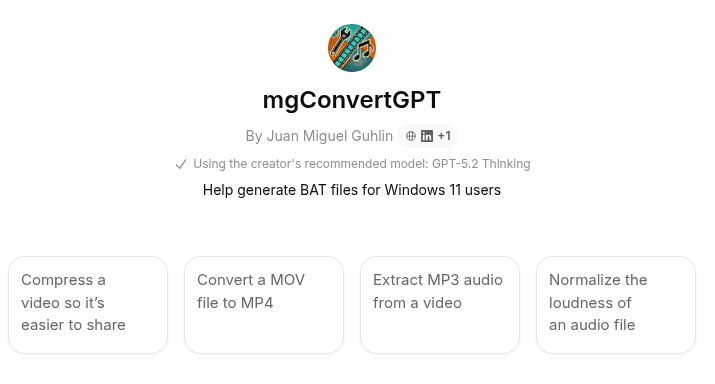
Get the BAT file and custom instructions for mgConvertGPT, a ChatGPT Custom GPT I made that you can simply use. Of course, you can take all the info I have shared and make your own Project or Custom GPT, BoodleBox Bot, or Gemini Gem.
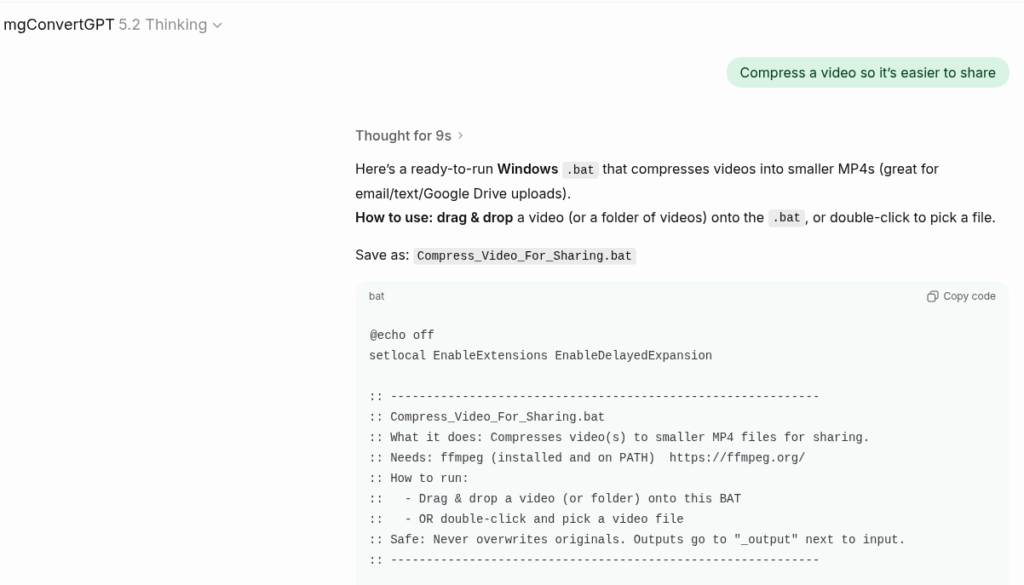
You can ask it to help you create a BAT file, as you can see in the screenshot below:
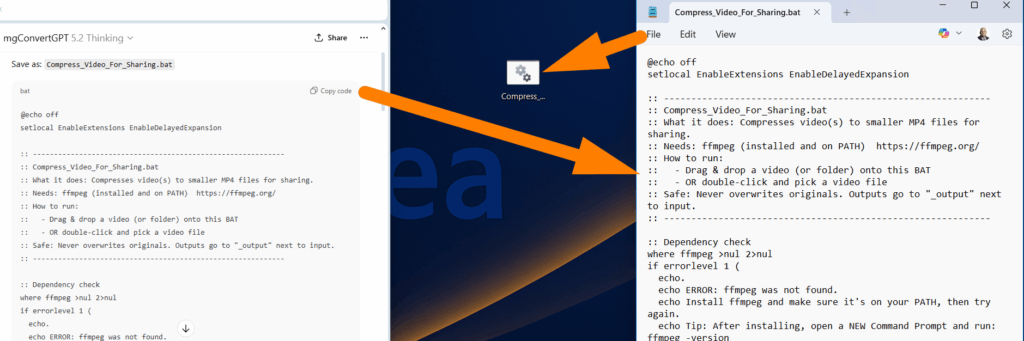
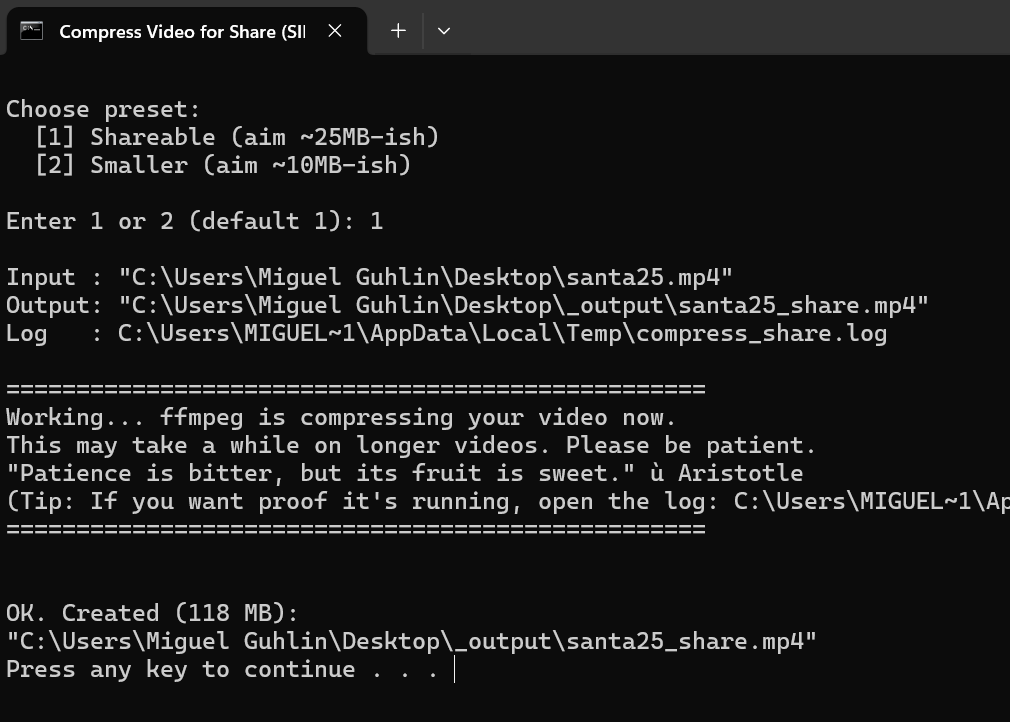
Simply click the “Copy code” button, open Notepad on your Windows computer, then paste in the code. Save it with a filename like “Compress_Video_For_Sharing.bat” into your C:\tools folder. Then, drag-n-drop video files on top of the bat file. You can drag-n-drop a single video file, several, or a folder’s worth.
Here’s what that will look like when you drop a video file on it: