My inbox seems to keep growing. With interesting offers appearing and different websites I come across, I seem to subscribe to a lot of sites. They are great at the moment. But I’ve noticed that, after a while, I’ve moved on to other interests or found more relevant (or fresh) content. My dilemma is that I rarely take the time to declutter my inbox…that is, individually unsubscribe from the emails. Well, today I have declared war on my inbox. I have decided that I’m tired of selecting and deleting emails from sites that continue to share their information with me when I haven’t opened them in several weeks but haven’t unsubscribed because their next email may be a great one. No more!
The CAN-SPAM Act of 2003, and later updated in 2008, requires that companies sending emails as a way of advertising are required to make it easy to opt-out (unsubscribe) of receiving their emails and, once you unsubscribe, they should remove you from their list in a reasonable time frame. You can read a great synopsis of this act in an article by Vertical Response: It’s the Law: 7 Email Marketing Rules You Should Know. Be aware that once they remove you from their list, they may still have your contact information available to sell to other companies.
Keep reading to see different ways I’ve tried to declutter and what has worked for me. Though getting to “inbox zero” is worthy of going out to dinner, I haven’t been able to do that in a while. But at least my decluttering has given me back some time and energy that was spent juggling useless emails that kept coming and begging for attention.
Method 1: Unsubscribe Link
This is the typical method that is used to unsubscribe. But, as you can imagine, it will definitely take a considerable amount of attention and time to go through each email and search for the unsubscribe link. This is the best way to unsubscribe, though it isn’t necessarily the fastest. Plus, some emails that get through don’t provide an unsubscribe link. Hmmm, what’s up with that? Unlike the screenshot below, some emails are more “clever” (for lack of a better word) at following the law by providing a link to unsubscribe, but hiding it in a bunch of text at the bottom of the email or coding the text to be white on a white background, which means it appears to be invisible. Remember, though, that even though you’ve unsubscribed from them, those emails are still in your inbox and need to be deleted. Unsubscribing just means you won’t get future emails from them…unless you choose to get back on their list.

Method 2: Use a Third-Party Tool to Declutter
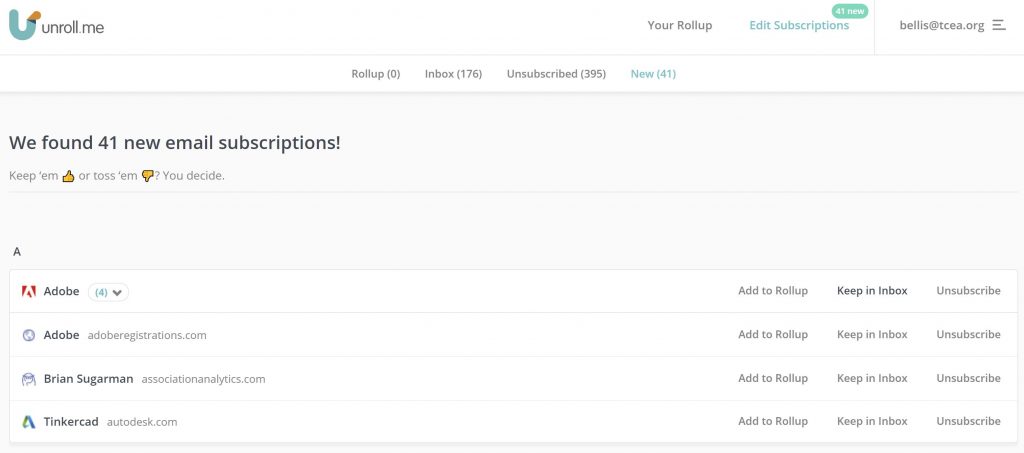
I do find that opening each email to be cumbersome…which is why I put off cleaning up my email. Recently, though, I rediscovered Unroll.me. This free service will scan your email and pull up those that can be unsubscribed. You then have the option for each identified sender to unsubscribe, keep it in your email (leave it alone), or add it to a “Rollup” list…which seems to be equivalent of a daily digest. I don’t make use of the Rollup feature myself, but have found the ease of unsubscribing to be very handy and an efficient way to declutter.
However, as you know, very few things in life are REALLY free, and the same is true for this service. Here is information from Unroll.me regarding their service: “As a means of keeping our service free, Rakuten Intelligence, which owns Unroll.Me, measures e-commerce through a technology that automatically recognizes commercial emails and extracts purchase information from them. Our technology is designed to ignore personal email, which does not help us measure market trends. Rakuten Intelligence strips away personal information, such as your name and address, to build measurement products that provide insights into consumer trends. To see how Rakuten Intelligence uses this data, take a look at the Rakuten Intelligence blog.”
Within about ten minutes, I was able to successfully unsubscribe from over 100 emails. Whew! That’s worth celebrating! Now I can focus more on those other emails that didn’t appear in Unroll.me that are still sending emails to me.
Method 3: Designate as Spam
Some emails you may receive do not have the unsubscribe link available. In this case, you may find it helpful to designate them as spam. They will still be hitting your inbox, but hopefully, your email client will route them directly to the spam folder so they don’t clutter what you are looking at. If you are using Gmail, select the emails you want to designate as spam and then click the Report Spam button (as indicated in the screenshot below). After an item has been in the spam folder for 30 days, Gmail will expunge it. If you are using an email client other than Gmail, you may need to check if spam is automatically deleted or if you have to manually delete it.

Method 4: Create Filters
The fourth and final method I use to get rid of spam is to create a filter to take care of it. There have been times where I have designated a sender as spam, but it occasionally finds itself back in my inbox. Grrr! I am pretty sure that I’ve unsubscribed from some, but continue to get emails and, of course, there are those that make it a game to find how to unsubscribe. That’s when filters become handy. In Gmail, I can create a filter that is triggered when an email arrives from someone on my “bad” list. Their sender email address and/or their subject line can trigger it – depending on how I set it up. Once Gmail has caught it, I have the filter skip the inbox and delete it. That’s kind of the equivalent to what the SPAM feature is supposed to do.
If you want to remove all emails from the sender, begin by copying the sender’s email address; if you want to remove just certain emails that the sender sends, but don’t want to completely unsubscribe, copy the part of the subject line that is always the same…for example, I’m going to filter out a certain email I get from a sender that has a subject line that always starts with “Fwd: Report results.”
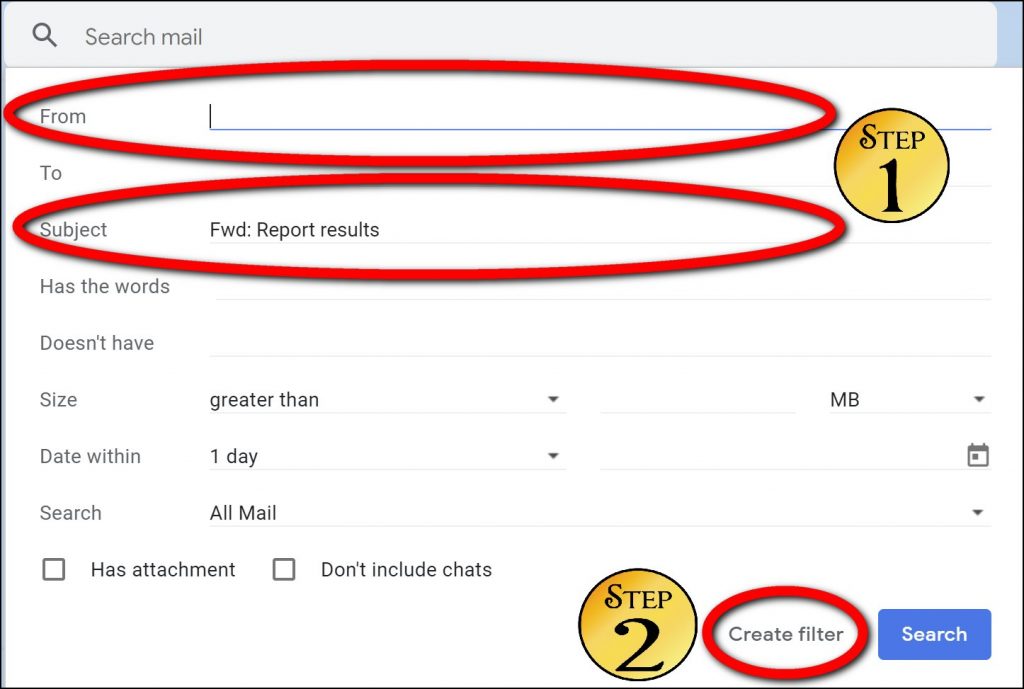
Now, click on the small down arrow on the right side of the search box. This will allow you to search mail as well as quickly create filters. If you copied the sender’s email address, paste it in the from section; as you can see to the right, I pasted the text from the subject line in the subject section. Next, you want to click on Create Filter. You will get a list of emails matching your criteria. Because we are interested in deleting them, we will just select the Delete action. If it has identified emails that match the criteria and you want them deleted, select that action. All that is left to do is to click the blue Create Filter button. Voilà! Now even if those pesky emails continue to arrive even after they’ve been uninvited AND they get by your spam filter, this filter should take care of them.
Let us know how you declutter your inbox. Do you have a different way of getting rid of pesky emails that seem to fill up your inbox and distract you from having enough time on those that matter more? Share with us in the comments. We’d love to hear from you.





 Sign up for one of our Google Certified Educator certifications. You’ll learn about more than Google Meet, as well as earn 12 CPE hours per course. Use these courses to get Google Educator certified.


 While it would have been cool for Google to create a “Teacher-Approved Apps” button, they instead did this:


