

Back in September, 2016, I had just begun working with Microsoft OneNote to setup a Cornell Notes type page in OneNote Desktop (a.k.a. OneNote 2016). Since then, Microsoft has made tremendous updates to its free OneNote app on Windows 10. The popular app, which works on iOS, Android, and Mac, has a different way of getting things done. As a result, my earlier guide to Cornell Notes is now a bit dated. To reflect the new OneNote app on Windows 10, I’ve created a whole new guide. Since OneNote 2016 is still in use in many districts, I’m leaving my earlier step-by-step online.
Learn More About Cornell Note-Taking
Don’t know about Cornell note-taking? I know I hadn’t heard about it until I attended AVID training a score of years ago. Here’s a bit of history about it as an approach that’s been around since the 1940s. Wikipedia shares the following:
The Cornell Notes system (also Cornell note-taking system, Cornell method, or Cornell way) is a note-taking system devised in the 1940s by Walter Pauk, an education professor at Cornell University. Pauk advocated its use in his best-selling book How to Study in College.
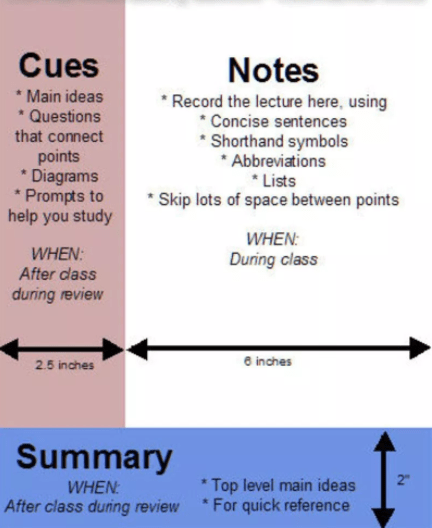
The Cornell method provides a systematic format for condensing and organizing notes. This system of taking notes is important as a high school or college level student. The student divides the paper into two columns: the note-taking column (usually on the right) is twice the size of the questions/key word column (on the left). The student should leave five to seven lines, or about two inches (5 cm), at the bottom of the page. Learn More
Ready to see the Cornell note-taking template in OneNote? Before I show you that, did you know you can customize pages in OneNote, as well as insert tables to help organize your content?
Customizing Pages in the OneNote App
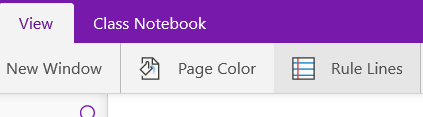
As wonderful as the OneNote app on Windows 10 is, you won’t find templates like you did in OneNote 2016 (a.k.a. OneNote Desktop). The most you will find is the ability to customize the number of ruled lines on a Page. You can do this under the View menu, as shown in the screenshot below:
Note that you can also change the color of a Page. This is, so far, the sum total of Page customization in the OneNote app. OneNote Desktop/2016 templates are just a feature not (yet) present in the app. That raises the question, how can you create your own templates for students?
Creating Your Own Templates for Students
Creating your own Pages in OneNote is easy. To make your own template, you will need to get comfortable with inserting tables. What’s neat is that you can shade different cells in the table to reflect information.
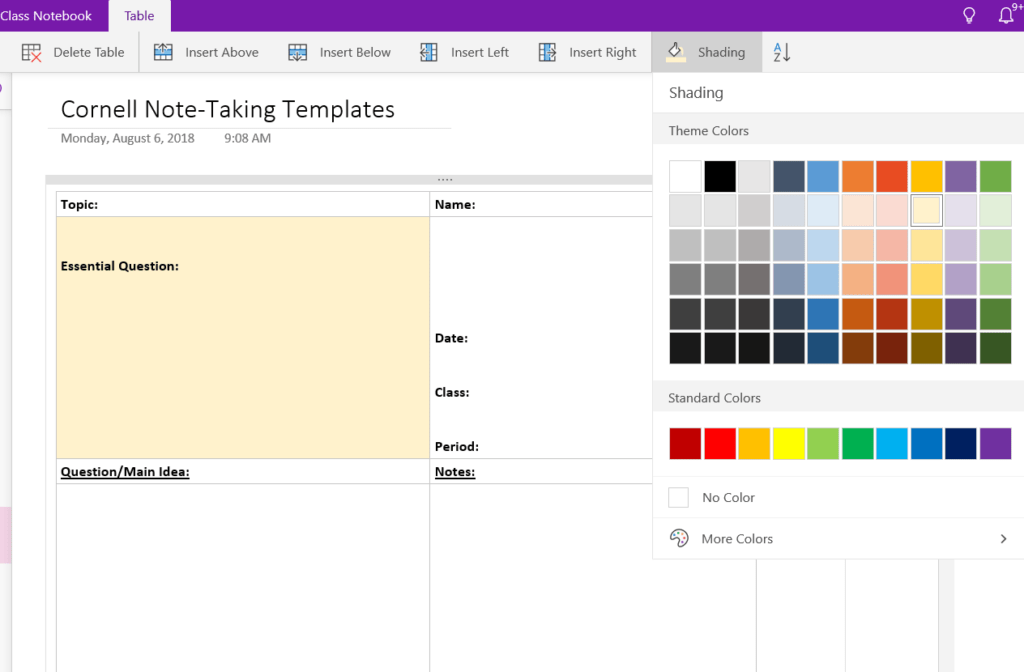
Need Directions? Want to add a shade of color to an individual table cell? Click in the table cell you want to shade, then go to the Table tab in your OneNote navigation bar. Click on Shading, then pick the color you want the cell to be shaded as.
In the OneNote app, you are able to create a page (or copy and paste) with the format of a Cornell Note-Taking page. To accomplish that, you will need to open an existing notebook with the template, then copy and paste the frame that has the template. Once you have customized the template the way you want, you can use OneNote Class Notebook to distribute that page to all students.
You may choose to place the template(s) in your Class Notebook’s Content Library so that students can copy and paste a blank copy. The video in the next section below will take you step-by-step through the process.
Get a Cornell Note-Taking Template or Two
To get you started, I’ve placed a completely editable OneNote notebook with Cornell note-taking templates online for your use. You can navigate to this notebook, then copy and paste the frame of the page from my pages to your OneNote Notebook. Here’s a video that models the process:
That’s pretty much all there is to it! Have questions? Don’t hesitate to leave them as a comment below and I’ll get back to you with an answer.
Did You Know?
Want to share a OneNote notebook with others? Marjolein Hoekstra (@OneNoteC) says “It’s no longer necessary to give people edit rights to a notebook. Place the notebook on OneDrive.live.com (using a free Microsoft account). Follow these steps:
- Share the READ ONLY link to the notebook
- Sign in with a personal Microsoft account. This will make a button available labeled “Open in OneNote”
- Once the notebook is open on the OneNote app, they can copy the Cornell template pages to their own notebook
This approach will NOT work with Office 365 accounts.