

 There are so many different tasks that I do which involve using either Microsoft Word or Google Docs that I have picked up a few tips and tricks over the years to help make using Microsoft Word even faster so I can get to other items on my to-do list. And isn’t that our main goal anyway? As Tim Ferriss, author of The 4-Hour Workweek, said, “Focus on being productive instead of busy.” I was training this past week on Microsoft Office and had that startling realization that there are things I know how to do in Office that I take for granted and just assume that everyone knows the same things and makes use of various tools to speed up their process. So, here is a shortened list I would share with someone if they use Word, but want to be more productive.
Customize Word Options
Word comes with many preferences and options that are available to tweak. To begin, click on FILE →Options. The Word Options dialog box appears with a navigational menu on the left and options to edit on the right. I have found the following changes to be beneficial.
Save Section
 Auto Recovery – Initially set at ten minutes, I dropped mine down to five. Whether I’m on my laptop on the go or plugged in at the office, if something happens and my computer shuts off, the worst case scenario is that I have only lost five minutes of work.
- Embed Fonts in File – If you are like me and enjoy a variety of fonts, then you will want to select this option especially if you share your Word files with others. When enabled this feature embeds your TrueType font within the document so you can edit/view it on a computer as intended, even if that computer doesn’t have the font installed. BTW, my favorite font sites include 1001 Free Fonts and DaFont.
Advanced Section
- CTRL+Click URLs – I found it much simpler to deselect this option. Now, when I click on a URL that is a Word document, it automatically opens in my browser. Otherwise, I have to hold down the CONTROL key and click the link.
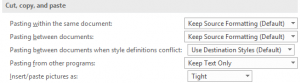 Copying/Pasting – When pasting from other programs, I typically want just the text (not the formatting), so why not set it here? I also have my pictures inserted/pasted as Tight…which is what I would change them to most of the time. The few times I want an image inserted in line with text or in front of text, I can easily change it on the fly using the Wrap Text button on the Format ribbon tab.
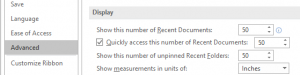 Recent Documents/Folders – It seems like I am always needing to find a Word file that I used a while back. To help make that easier, I increased the preference to show the 50 most recent documents (to quickly access them) and 50 unpinned recent folders.
Helpful Tools
While there are many tools in Word to make use of, here are the ones that help me be more productive when I am in a time crunch.
Home Tab
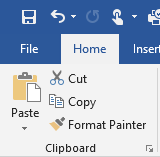 Format Painter – I cannot believe that everyone doesn’t know about the Format Painter tool! Click in the text that contains the format you want to paint somewhere else. Then, click the Format Painter tool once if you are only going to apply it once or double-click it if you want to apply it to multiple pieces of text (or graphics) in your document. If you double-click the tool, then you will need to click it again to turn it off. This tool is especially handy if you have multiple locations where you want to bold, resize, change the font, and the color!
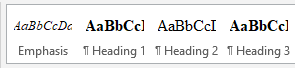 Styles – Instead of being forced to use the styles that are listed across the Home tab ribbon, consider updating them to be what you want. When your cursor is in the text that contains the formatting you want to keep, right-click on the appropriate style and select “Update…to Match Heading.” This is equivalent to boosting the Format Painter tool in that I don’t have to go and find the format in my document to click in and then grab the tool. Updating the styles makes it even easier.
Layout Tab
- Margins – I have noticed that when I start a new document, I typically want 0.5 inch margins all around. So to make it easier, I’ve updated my margins and clicked the “Set as Default” button. You can also specify the orientation, paper size, paper source (if you have a nice printer with multiple trays), and other settings. Setting as default will save the preferences in the normal template that Word uses each time it start a new document.
Favorite Shortcuts
Some folks are mouse people and some folks are shortcut people. I am a shortcut person. I would much rather learn a shortcut if available instead of moving over to use the mouse and then jumping back on the keyboard. So here are a few of my favorite shortcuts.
- CTRL+m – This shortcut will indent the margin by 0.5 inch. And when you are ready to jump back to typing at the original margin, just do SHIFT+CTRL+m. If you are just wanting a hanging indent, then try CTRL+t.
- CTRL+k – This shortcut is handy to use when you are typing a website and it doesn’t automatically convert or you want to add a link to text.
- CTRL+e – Use this shortcut if you want to center align the text you are in. You can also use CTRL+r (right justified) or CTRL+l (left justified) (hitting the CTRL+l again will full justify the text).
- CTRL+] – This shortcut applies to the text where your cursor is (or the selection if additional text is selected) and increases the font size. To decrease font size, just use the neighboring key to the left (CTRL+[).
 ALT+click/drag – We know that you can click and drag to select text. This shortcut is like that only on steroids! While you hold down the ALT key, click and drag to select the columns of text you want to delete. Once selected, just his the delete key or backspace key.
Let me know which feature or shortcut you find most helpful and/or most used. You can tweet to us at @TCEA and @DrBruceEllis. Or, if you need more characters, share via the comment section below. If you would like TCEA to come to your location and train your staff to be more productive with Office products, including Microsoft Office 365, you can drop me an email at bellis@tcea.org with preferred dates and I’ll get back in touch with you regarding details.