

What is Panoform?
Panoform combines real-life drawings with immersive VR (virtual reality) experiences. It’s a revolutionary tool that is still making great experiences for students, and it is a game-changer in classrooms. Panoform allows students to download and print a grid from the website, sketch on the grid, and upload a picture of their grid drawing to the website. Then, they can have a VR experience of their sketches in a virtual reality headset, on their phone/tablet, and even on the computer. For example, it’s a simple and easy way to diagram an organism and use VR tools in the classroom. Did I mention that it’s free? And– no ads!
How Does Panoform Work?
The Panoform system requires a pen and paper, colored markers, and a grid. Panoform is a tool that students can use in their classrooms in their learning process. Using crayons, pencils, and markers, students can create a world and upload it to a website. Students can also cut out pictures and lay them on their paper grid. Once done writing or illustrating with the grid, students take a picture of it. Before uploading to the website, students need to make sure that they crop out anything outside the grid image. Once uploaded, Panoform will wrap the grid into a VR cube– one in which the viewer is placed inside the cube and can look around at the four walls, ceiling, and floor. Items drawn or written on the grid will appear accordingly in the virtual room.
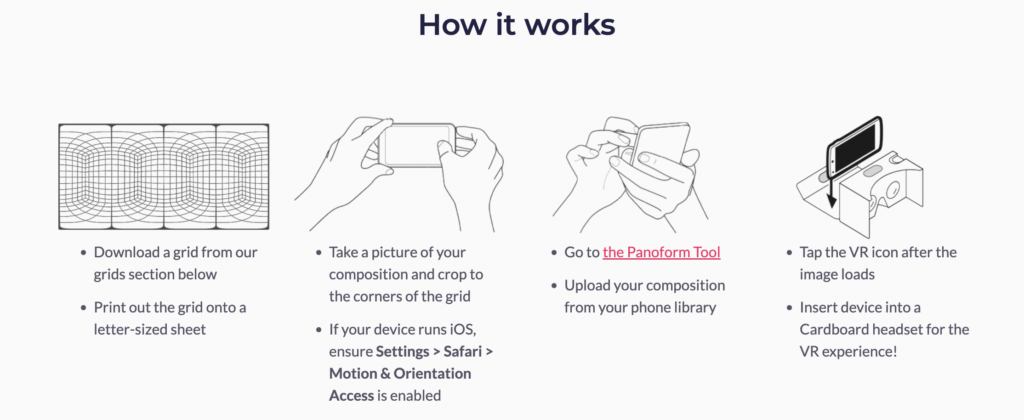
With this tool, students can easily create VR worlds without any programming knowledge, and they can use the VR environment to express their creative talents. They can use their imagination to design! Teachers can also use the VR world to enhance learning experiences. Additionally, the virtual environment is accessible to anyone with an Internet-connected device. All you need is content to put on each of the four virtual “walls.”

Is it Safe for Sharing Student Work?
No student work is stored (or uploaded) to the Panoform cloud. The tool pulls the image from the device but does not store it in their servers, making it super safe for students. Because the work is not uploaded and stored on Panoform’s servers, the viewer will need to have a copy of the image to pull into Panoform. When you want to share content with students or have them share their work with you or others, you’ll need to curate the images in a shared drive or post/link them on your class website. Students can then download them to their devices and upload them into their viewer. They can also store images on their devices to upload directly.
Using Google Slides with a Panoform Grid
You can print out a grid to draw or write on it. But you can also use Google Slides for your layout!
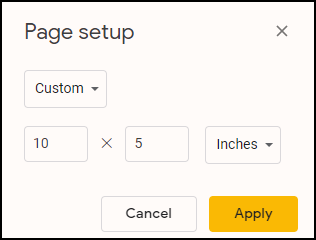
- Open a new Google Slide.
- Go to File, Page Setup, and then set the dimensions to 10 inches across by five inches high. This will make sure the slide deck is the same layout and size as the Panoform grid.
- Now you just need to upload one of the grid images as the slide background. Having the grid background allows you to see where items should be.
- Add clipart, text boxes, icons, and more just like you would when creating a presentation.
- When done, be sure to delete the grid background (unless you don’t mind it being seen).
- Save the slide as an image by clicking on File, Download, and then choosing JPG Image.
You can now use this file to upload to Panoform for your VR world. Instead of creating your own Google Slide for Panoform, feel free to use this template to jumpstart the fun.
Trying Out Virtual Reality
Here are a few images you can download to your device to use for exploring Panoform to get an idea of how it can be used.
- Right-click on the image and choose Save Image As.
- Save the image to your device.
- When you are ready to upload to Panoform, go to https://tool.panoform.com. Click on the Choose an Image button to upload the image.
You can now drag the image around by using your mouse or clicking on the VR headset icon (lower right corner) to transfer the image to be used on a phone.
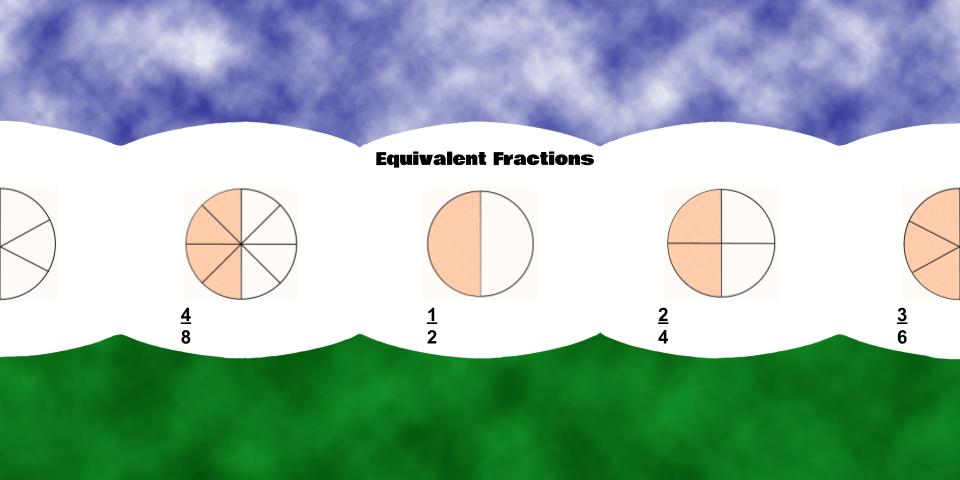
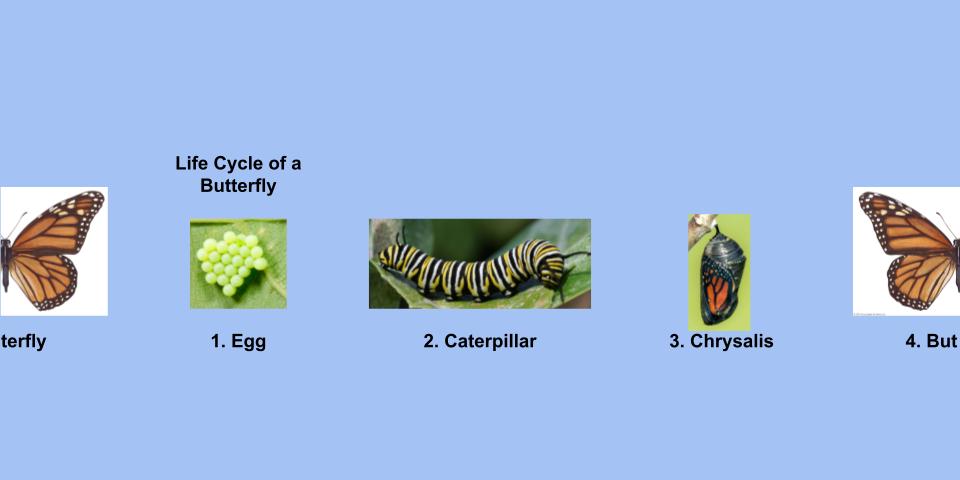
Though these are simple examples, think of concepts or content that could be divided into four parts (because there are four walls in the virtual cube). Each wall could be completely different or show a process being studied.
What concepts will you reinforce with Panoform? Will it be vocabulary (word, definition, used in a sentence, and illustration), world countries (country name, capitol, location on map, and major facts), the steps in solving Algebraic equations, or a summary of Macbeth (Title/author, setting with image, protagonist name with sketch of person, and themes)? Whatever you teach, Panoform can be an interesting way for students to summarize and demonstrate their learning.
2 comments
Ok, this is really cool! I’ve been playing around with it for 5 minutes. It’s so easy to use! I can see kids really wanting to use this. I’m also realizing so many ideas for using this tool for students to show what they know! Thank you for sharing!
So glad you are enjoying it and find it useful. Let us know what you use it for!