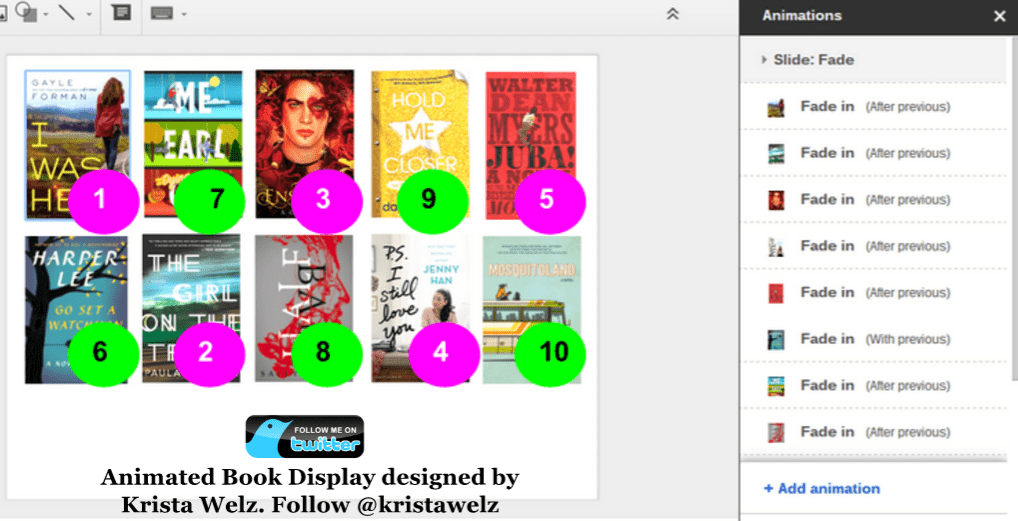
 Krista Welz (@kristawelz) has shared an incredible use of Google Slides to create what she calls, “animated book displays.” This allows you to feature your school library’s new books or a specific genre collection. She has even created a template to go with it. Krista describes it in this way:
Feature your school library’s brand new books or a specific genre collection with this animated book covers display. The display is made on Google Slides – yes, Google Slides. It is a slideshow with preset animations on each book cover.
She offers this template for download; when you click it, you will be given the option to make a copy of it into your own Google Drive (you will want to be signed into your Google account).
Here are her step-by-step instructions with some minor edits.
- Create a new Google Slides file. Set your background to white.
- Create a list of the books you want to display on your animated book covers slideshow. You can type them in a list on Google Docs or use any list-maker method you prefer.
- Create a folder on your desktop titled “book covers.”
- Go to www.goodreads.com and search for a book on your list. Right-click on the book cover image and save it to your desktop folder labeled “book covers.” Repeat this step for every book cover you need to save. Once you have saved all the book covers to your folder, you will start inserting them into the slideshow.
- The animating book covers slideshow is set up with two rows and five columns. You are going to start inserting your book cover photos and arranging them in two rows and five columns. All book covers have to be resized to the same height and location. They need to be consistent and match each other. Once the books are perfectly resized and aligned correctly, you will add the animations to them.
- Now you are going to animate each book cover in a zigzag pattern.
- If you click on the first book cover labeled #1, you are going to add an animation to it by clicking on the Insert menu and choosing Animate. The Animation window pane will pop up on the right of the screen.
- The animation you want to choose is “Fade In – After Previous.”
- Next, choose the book labeled #2, click on Insert, choose Animation, and then set it to “Fade In – After Previous.” You are going to do this for all 10 books.
- There is only one change to the animation that you are going to make. The change occurs on your sixth book. Instead of choosing the animation “After Previous” – you will choose “With Previous.” This change in animation reduces the choppiness, giving it a smoother flow.
Please take note of the animations listed on the right-side of the Google Slides slideshow. You must follow this exactly as it is shown to have a beautiful, flowing animated book display.
Some other points that Krista makes:
- Once you access the slideshow, all you have to do is right-click on each book image on each slide and then choose Replace image.
- You will then select Choose an image and then upload the book cover(s) from your desktop folder of saved book covers. All the animations and slide transitions are already timed for your convenience.


