In the two previous parts of this blog series, you saw how to make a custom GPT accessible to anyone, whether they have a ChatGPT account or not, as a website. In part one of the AI Magic Maker series, you created a custom GPT-based Fun Personality Quiz. In part two, you saw how to turn a custom GPT into a webpage for easy access via the web. In part three, you will learn how to simply vibe code to collect the data entered via the web version of Fun Quiz into a Google Sheet.
In this part, we’ll explore how to save data from the interactive webpage to Google Sheets for later analysis. Saving the data from the interactive webpage to Google Sheets takes this interactive page to a whole new vibe code level since you can now create quizzes and more that save the data.
Wait, How Is This Possible?
The journey from custom GPT requiring individual user accounts to a webpage anyone can access is made possible through the use of free tools. Those tools include:
A GitHub account. How to get a free account is explained in part two of the series.
A Google Drive account with Google Sheets. You can do this with the free, or consumer, version of Google Sheets or you can use your Google Workspace for Education/NonProfit account.
Google Apps Script Web App. This is such a game-changer and I suspect you may soon be making your own Web App scripts using Generative AI. It’s the “hidden” lesson in this series.
All these tools are free. Of course, I did rely on a paid Gen AI model (about $20 a month).
Achieving the Impossible
Using Gen AI (for part three, I asked my Claude Pro account for help), I asked for a step by step. Since I’m not a Google Apps script whiz and failed BASIC programming in high school (I hope you appreciate how tough an admission like that would be for a high school student), I can attest to the power of vibe coding to help me achieve this hitherto impossible task.
Yes, with Gen AI at your side, you can leap tall mountains of code. But you first must have a plan.
The Plan
The plan is that you will create a Google Sheet and deploy a Google Apps Script as a Web App (takes approximately five minutes). Then, Gen AI will update the script.js to POST (a specific action, so that’s why it’s capitalized) the result to the Web App URL.
The data logged per quiz submission will be:
Timestamp
Quiz name (e.g., “Smurfs”)
Result character (e.g., “Papa Smurf”)
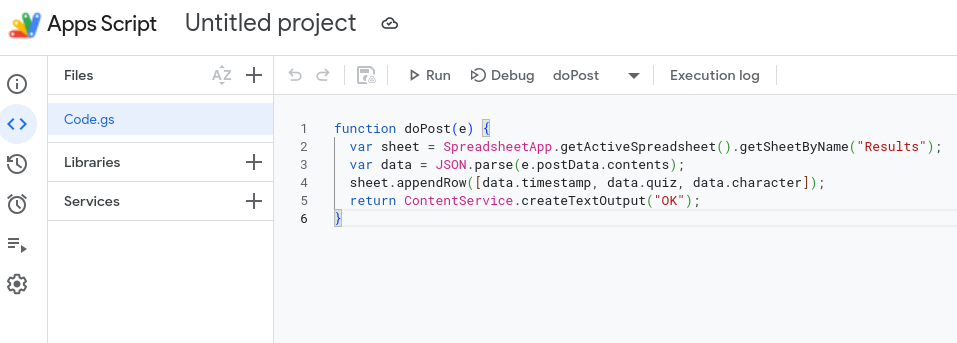
Step 1: Set up Google Sheets + Apps Script
These are the steps I will follow in the video available to you at the end of this blog post. In the meantime, follow these steps:
Create a new Google Sheet.
Name the first sheet tab Results.
Add headers in row 1: Timestamp, Quiz, Character.
Go to Extensions → Apps Script.
Replace all code with this:
function doPost(e) { var sheet = SpreadsheetApp.getActiveSpreadsheet().getSheetByName("Results"); var data = JSON.parse(e.postData.contents); sheet.appendRow([data.timestamp, data.quiz, data.character]); return ContentService.createTextOutput("OK"); }
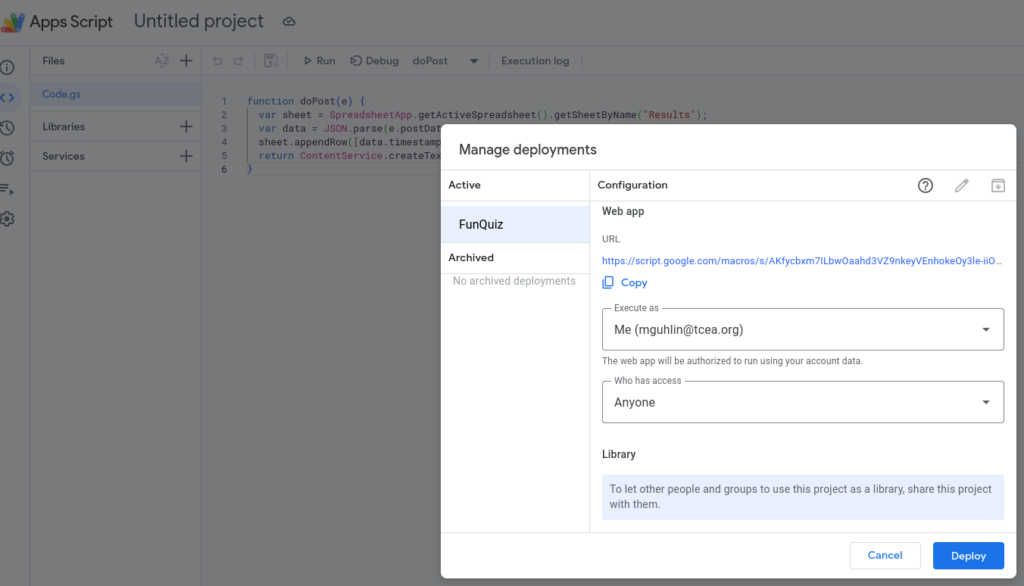
Click Deploy → New deployment
Type: Web app
Execute as: Me
Who has access: Anyone
Copy the Web App URL. You will need it next.
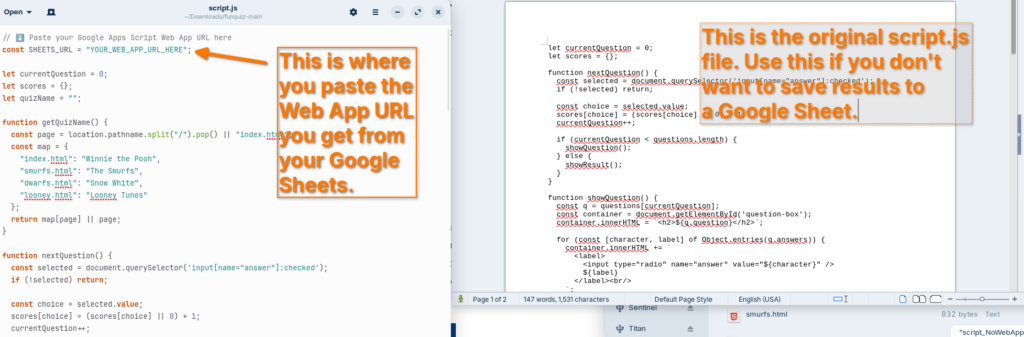
Step 2 — Updated script.js
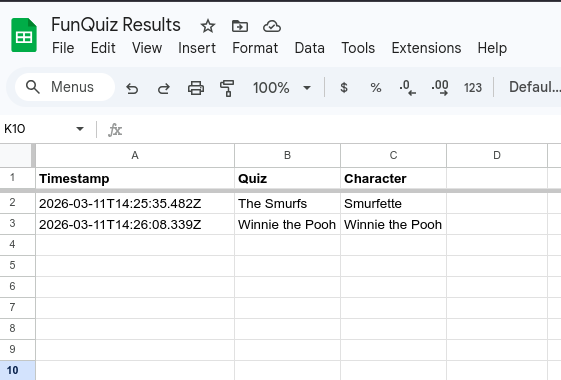
Now that you are ready with the Google Sheets Web App URL, you will need to add it to the script.js file at the top of the file. This will result in rows like the ones in this Google Sheet:
This is the only file you need to replace. All four HTML files already load script.js, so nothing else changes. Once you have your Apps Script Web App URL, replace “YOUR_WEB_APP_URL_HERE” at the top of the file.
Each completed quiz will log a row like:
Timestamp
Quiz
Character
2026-03-11T14:32:00Z
The Smurfs
Papa Smurf
That’s pretty much all there is to it. Not sure what to do?
Watch the Video
This video walkthrough will get you started. You are also going to get the download file (a compressed zip file linked below the video) with all the web pages and the generic script.js so that you won’t be tempted to simply use mine.
In this video, you get a tour of the process, from start to finish:
You can also download a copy of the entire FunQuiz website from GitHub using the link below:
Remember, if you decide to try this yourself, you will need to update the script.js file to point to YOUR Web App URL, rather than mine.
Since you have both versions of the file, you can compare them:
From left to right: Script.js file that saves results to Google Sheets, script_NoWebAppScript.js that simply runs the quiz and no results are saved. Make sure to rename the “script_NoWebAppScript.js” to “script.js” if that’s what you decide to use.
Wrapping Up
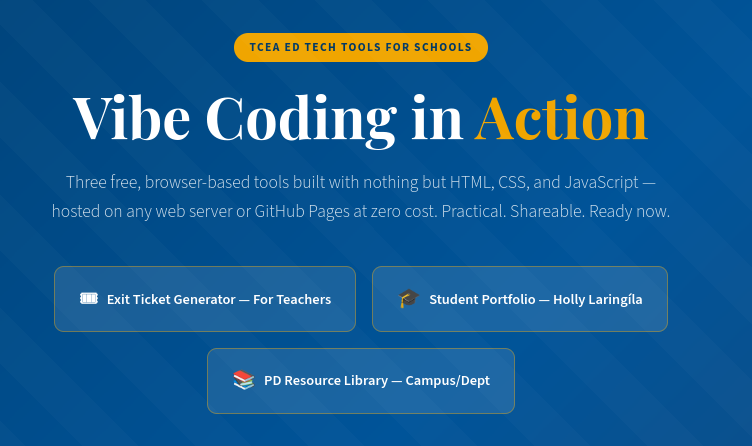
Vibe coding has become so easy, and with free hosting by GitHub or any web server you have access to, you should be able to create web/HTML pages with ease and share them. Here are some potential applications in school environments, even though it may drive technology directors crazy with the need to host teacher-generated HTML pages (but it’s super inexpensive, so why not on an intranet server or off a USB flash drive?).
Here are practical, high-impact ideas organized by who benefits most.
A simple, bare bones example of one of each of the following ideas is available. It took about thirty seconds to make, and that shows. I could have spent more time on it, but this example should give you an idea of what’s possible with minimal time investment.
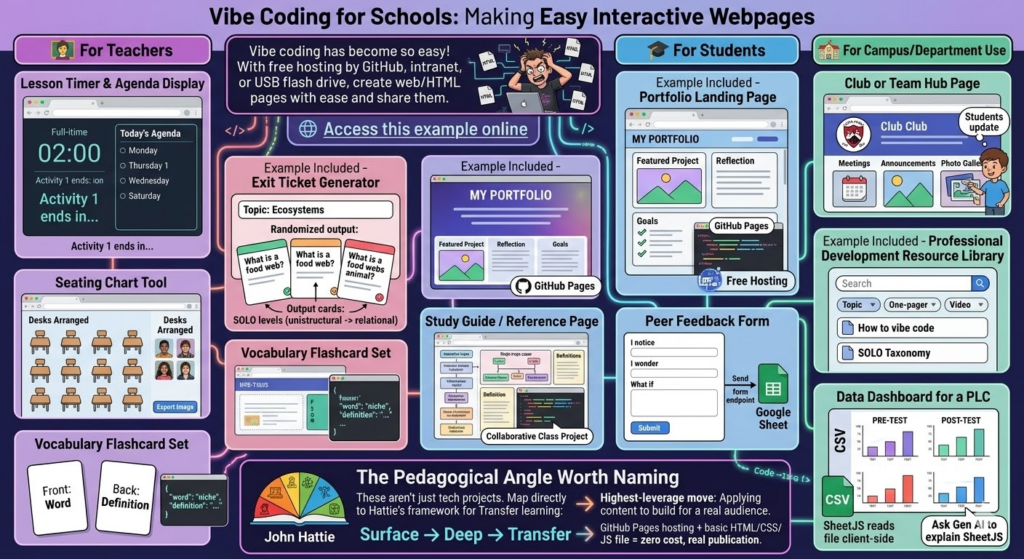
🧑🏫 For Teachers
Lesson Timer and Agenda Display. A full-screen HTML page showing the day’s agenda with a countdown timer per activity. No app needed, just a browser tab.
Exit Ticket Generator (example included). Input a topic, get a randomized exit ticket question. Teachers could build a bank of prompts tied to SOLO levels (unistructural → relational questions).
Seating Chart Tool. Drag-and-drop HTML interface for arranging desks. Exportable as an image. Far lighter than any app.
Vocabulary Flashcard Set. A simple spaced-repetition card flipper built around a unit’s word list. Teacher edits one JSON file to update the deck.
🎓 For Students
Portfolio Landing Page (example included). Students build a personal HTML page showcasing work samples, reflections, and goals. Hosted free on GitHub Pages. Real-world skill, real audience.
Study Guide/Reference Page. A single-page interactive reference sheet for a unit — definitions, diagrams, examples — that students help build as a class project.
Peer Feedback Form. A lightweight HTML form that structures feedback using a protocol (e.g., “I notice/I wonder/What if”). Submissions could go to a Google Sheet via a free form endpoint.
🏫 For Campus/Department Use
Club or Team Hub Page. A simple landing page for a club: meeting times, announcements, photo gallery. Students own and update it.
Professional Development Resource Library(example included). A searchable, filterable page of links, one-pagers, and videos organized by topic. Way faster to update than a LMS page.
Data Dashboard for a PLC. A static HTML page that visualizes pre/post assessment data from a CSV. No backend needed if you use a SheetJS that will read the file client-side. (No, I don’t know what SheetJS is either, but ask Gen AI to explain it to you).
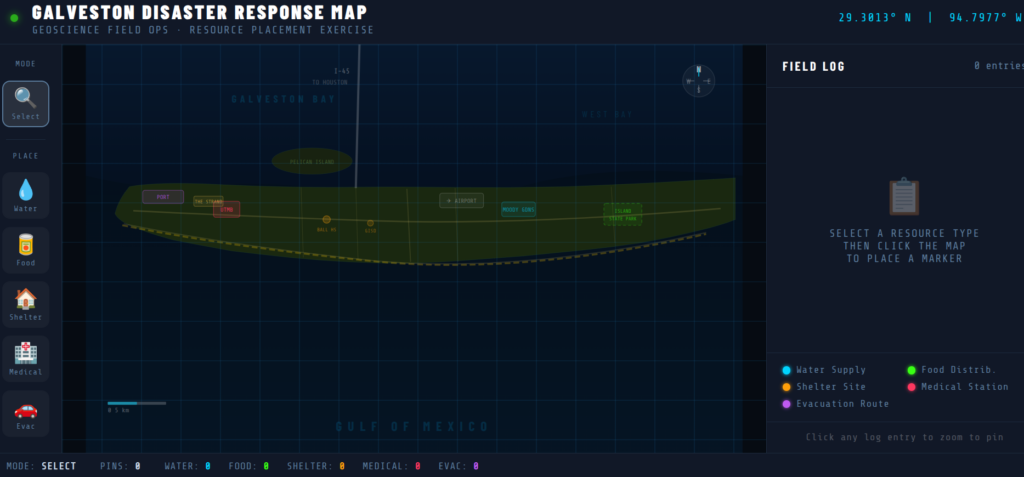
For example, Dr. Aida Guhlincozzi runs a Geosciences camp in Missouri (wouldn’t this be great to have in Texas?). Here are some sample projects that camp participants (all students) could create:
1. Interactive Disaster Response Map. Students place SVG/CSS pins on a campus or regional map, tag each with resource type (water, food, shelter), and add pop-up notes explaining why that location matters. Demonstrates spatial reasoning and GPS concepts.
2. “Before & After” Disaster Slider. A CSS clip-path slider showing satellite imagery or hand-drawn maps before and after a natural disaster. Students write captions explaining the geoscience behind the change.
3. Personal Field Journal. A scrollable, styled “expedition log” with sections for hypothesis, observation, data collected, and reflection. Could include a hand-drawn map image upload area. Demonstrates scientific writing and process documentation.
4. Mini-Data Dashboard. Students input their own GPS coordinates from a field activity into a table that auto-calculates the distance between points. Demonstrates data literacy and real-world math application.
5. “Meet a Geoscientist” Profile Card. A styled bio card students build about a scientist they researched; includes a quote, field of study badge, and “why this matters” section. Great for identity/representation work (ties directly to Guhlincozzi’s story).
6. Decision Tree: What Would You Do?. A branching HTML page presenting a disaster scenario. Each choice leads to a new page/section with consequence text. Students author the branches, not just navigate them.
The Pedagogical Angle Worth Naming
These aren’t just tech projects. Each student item maps directly to Transfer learning in Hattie’s framework. Students applying content knowledge to build something real for a real audience is one of the highest-leverage moves in the Surface → Deep → Transfer progression.
GitHub Pages hosting + a basic HTML/CSS/JS file = zero cost, real publication. Oh, the places we’d go!
Code Reject
Google Gemini 3 Pro coded this page below. It’s amazing, but not quite as good as the Claude Pro generated version included above. Still, for comparison’s sake, it’s worth including below:
How do you make a custom GPT accessible to anyone, whether they have a ChatGPT account or not? You turn it into a website! In part one of the AI Magic Maker series, you created a custom GPT-based Fun, Personality Quiz. The only problem is that this personality quiz lives inside a Custom GPT. If you did not have access to that GPT, or a free ChatGPT account, you could not use the quiz. Instead of a custom GPT, I wanted a web address or uniform resource locator (URL). In this way, I would be able to drop the link into a slide deck, blog post, or whatever for easy access. A tool I knew little about (i.e. GitHub) made this possible.
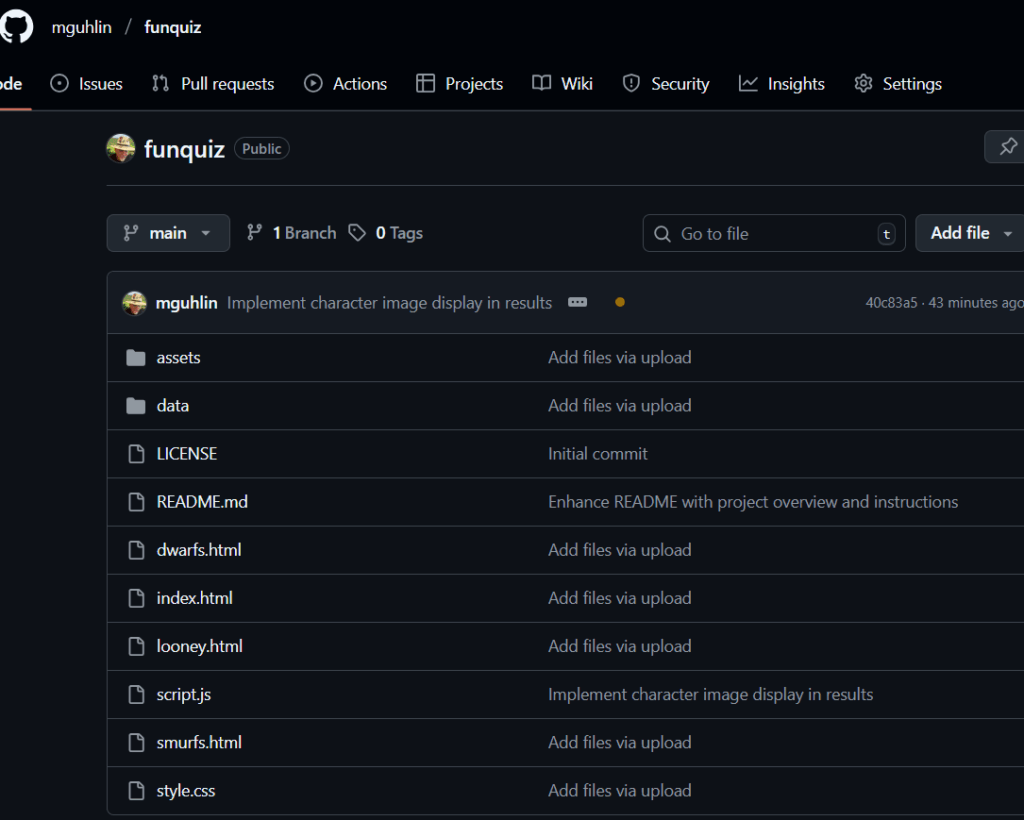
GitHub Repository for the website files generated by ChatGPT and the author
Let’s go through the process together. Towards the end, you will find a video that walks you through the GitHub set up as well.
Step 1: Capture the Quiz as a Web Page
First, I asked ChatGPT to help me translate the quiz into a web format. What I am looking for has to include:
A simple page titled “Fun Personality Quiz for Educators.”
The same instructions as the GPT version.
A place to show the quiz image at the top.
Also, I wanted to get an interactive version using HTML and Javascript with buttons, tallies, and the response with the result. To get ready, you will need:
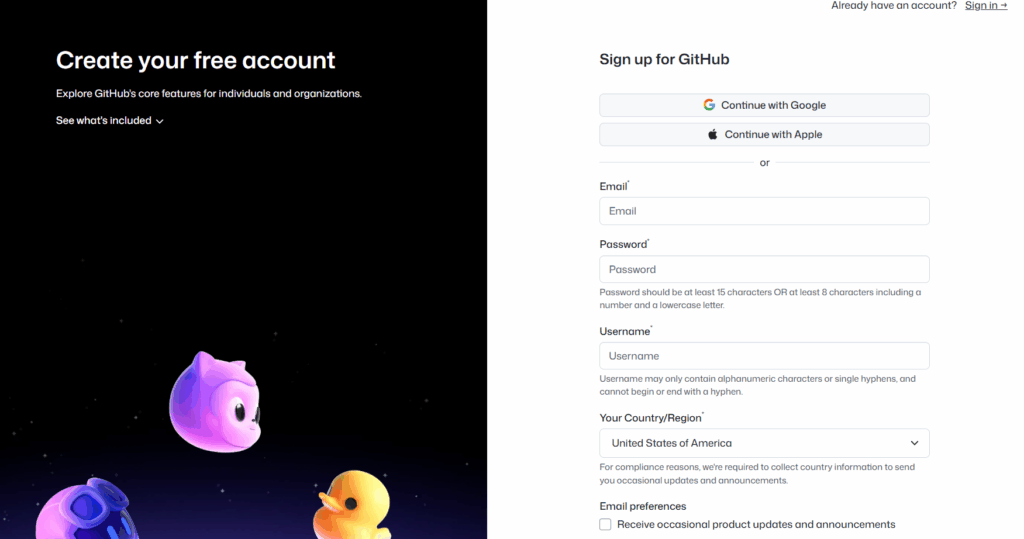
A GitHub account (for hosting your quiz for free )
A GitHub repository (which you will create)
The files you will need (e.g. index.html, style.css, script.js)
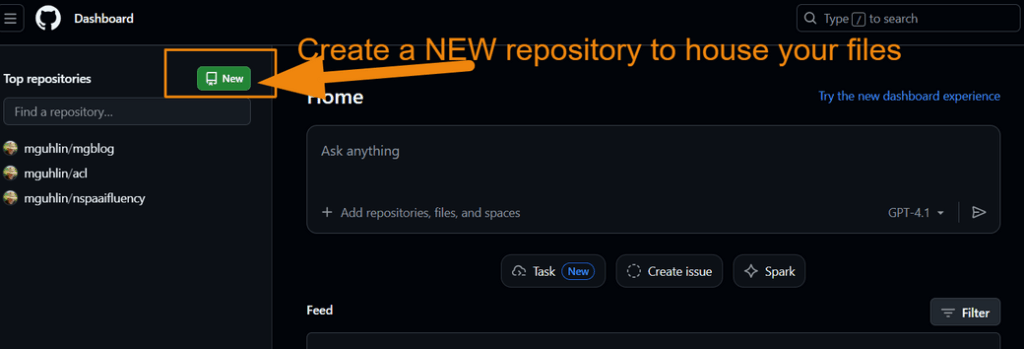
After creating an account using GitHub, you are ready to create a repository. Rather than mix this quiz with other projects, I created a new GitHub repository just for it. Something like:
funquiz
Then, I prompted ChatGPT to create the files I would need with a simple prompt:
I want to turn this personality quiz into a github page that people can fill out online, then get the result right then and there. How would that work?
It then offered a step-by-step for me to follow, and provided the required files (list appears below).
Did You Know?
In part three of this series, you will modify that prompt to get a version that saves the results into a Google Sheet. For now, this is a simple process to put the quiz online.
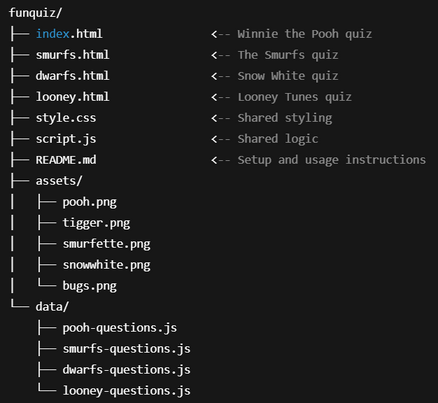
With my new repository, funquiz, you will see the following:
As you can see, this image offers a folder structure for placement of files. I did not include the assets (I’ll do that in part three). Or, to be more exact, I included them but they did not work. I will ask ChatGPT to fix that in the final version.
You can prompt ChatGPT to do the following prompt, which appears below:
Begin prompt
Create a complete GitHub Pages project for "Fun Personality Quizzes for Educators" called `funquiz`.

It should include:
- One HTML page per quiz (Pooh, Smurfs, Dwarfs, Looney Tunes)
- Shared CSS for layout and styling
- Shared JS logic for quiz progression and results
- One question set per quiz in separate JS files under `/data/`
- A dropdown menu to choose a quiz from any page
- An `/assets/` folder with character images or placeholders
- A README.md file explaining how to deploy and customize

Package it all as a downloadable ZIP I can use or upload to GitHub Pages.
End Prompt
Now the quiz exists as a small website folder, ready to publish. Before putting it into the GitHub repository, you can test it on your device. I created a folder to house these files, then uploaded (put) them into the GitHub repository once they had the look I wanted.
Step 3: Turn on GitHub Pages
In the repository:
Go to Settings.
Scroll to Pages (sometimes under “Code and automation”).
Under Build and deployment, set:
Source: Deploy from a branch
Branch: main
Folder: / (root)
4. Save the settings.
GitHub will build the site and generate a public URL, usually in this format:
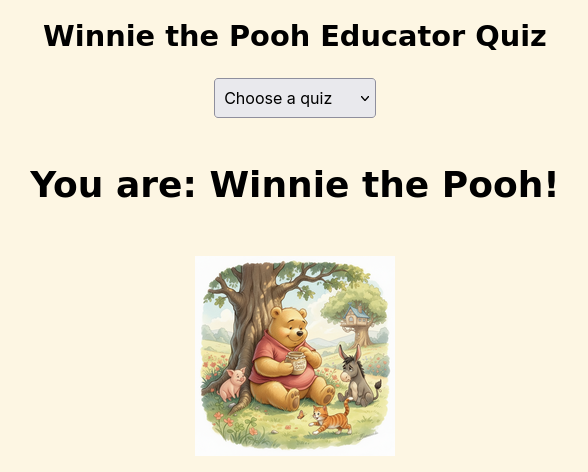
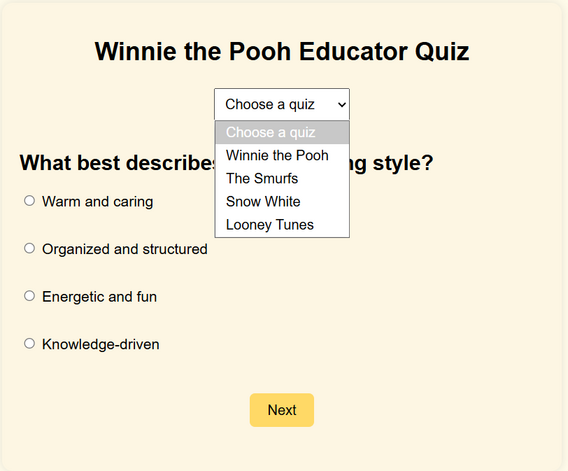
As you can see from the screenshot below, I’m able to pick the quiz I want users to see. I can also upload images so that each quiz has its own custom image. I’ll save that for the final version in part three of this series.
Step 4: Test the Live Quiz
Next, I opened the URL in a browser:
Did the title display correctly?
Did the image load?
Were instructions clear for educators?
If interactive, did clicking answers produce a final result?
Any changes needed went back into index.html or one of the other files. You can watch a short video of the steps I followed below:
Step 5: Share, Embed, and Extend
For the final step, I’m ready to share this with colleagues as a link that will go in a blog post (like this one), or use it in a future workshop. In part three of this series, I will add images, instructions, and save the results of the quiz to a Google Sheet.
The big benefit of all this is that we not only end up with a fun personality quiz, but also, have a process for vibe coding our way from a custom GPT to a website hosted for free online. Of course, GitHub Pages may be blocked by your school district, but that’s another blog entry.