

How many times as a teacher, in any grade level, have you received a proofread writing assignment back from a student with, wait for it…errors? The horror! I think we’ve all been there. A student might spend a lot of time on their writing, but when it comes to proofreading, many will rush, barely take a look, and then hand it in. I’ll admit it, proofreading and editing is probably not the most fun part of the writing process. And I’m an educator turned editor! (Don’t tell my boss.) All kidding aside, it is truly a skill that takes guidance, starting with our youngest learners.
Today I’ll introduce an idea based loosely on something I learned at a Texas Second Grade Teacher Conference. But with all the Googling in the world, I’ve not been able to find the presenter. If it was you, please claim credit in the comments. We will also look at a creative solution for applying this strategy to the online STAAR test (and other online tests).
Adaptability of the Strategy
While I present a basic procedure for using editing marks with elementary students, this strategy can be adapted for any grade level. It can also be used as a support for students who need extra help. Depending on student progress and needs, aspects of the strategy can be dropped or added for students at any time.
Gradual Release of Responsibility
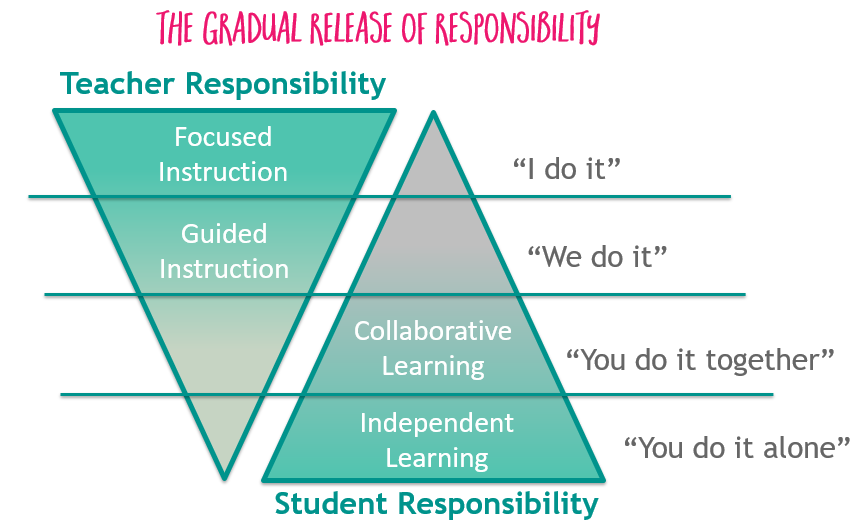
The end goal, of course, is for students to become independent, authentic, and accurate writers. So let’s take a look at a strategy that can support students in learning to edit with a gradual release of responsibility (GRR). With GRR, you start first by modeling. Then, students practice with teacher guidance. Next, they work with each other collaboratively to practice. And finally, they practice independently.
The Instructional Process
Step 1: Model the basic editing procedure in a five to 10-minute mini-lesson.
To start with, in second grade, we only checked for beginning capitals, ending punctuation, and did what we called “dot and say.” These are the foundations of this elementary editing process. It is important for students to understand that they are completing this process to find and correct errors. With that in mind, here is the basic procedure to teach students in the very beginning:
- Put a blue dot under each word as you read it aloud (dot and say).
- As you read, underline the beginning capitals in green three times, and
- Circle the ending punctuation in red.
Using an interactive projector, you can model these three steps for the whole class with a few pre-selected sentences. After students have practiced this with guidance, together, and then on their own, you can restart this process and introduce a new mark based on whatever grammar and language mechanics concept you’re working on.
A Note about “Dot and Say”
“Dot and say” really helps students slow down and re-read their writing to check for errors. If something is incorrect or missing, they will start to notice and draw the appropriate editing mark to correct it. I observed a massive improvement in student attention to editing with just this one step. We started with everyone reading aloud (TIP: noise-canceling headphones are amazing!), and then students moved to silent reading when they were ready.
Step 2: Provide guided practice in small groups using pre-selected texts with errors.
Once you’ve introduced a new editing mark, it’s time to practice using it together in a small group. During small group, you can do a quick review of the newly introduced mark and provide students with a pre-selected text to practice on. An example that includes the errors you’d like students to find will ensure they can practice exactly what you need them to.
Step 3: Partner or pair students for collaborative practice using pre-selected texts with errors.
Once they’ve practiced enough in their small group, they can be strategically paired with other students to practice together. Pre-selecting the text to ensure they look for errors you’ve previously introduced is still best. Once students have practiced, coming back together to check their work is a great way to wrap up their collaborative practice time.
Step 4: Students practice independently, applying marks and editing to their own writing, or a peer’s writing, during writing workshop, and/or at an independent writing center.
I love writing stations. So I incorporated editing practice into my class writing station by providing practice texts for students at various levels, pre-selected by error type. Students also worked independently on editing their own writing or a peer’s writing during our writing workshop. They practiced on their own writing once they were far enough in the writing process to begin editing.
Step 5: Repeat the process by modeling a new editing mark based on a recently introduced grammar or language mechanic concept.
Whether you are teaching the English Language Arts and Reading (ELAR) TEKS, Common Core State Standards, or another set of standards, it adds meaning when editing is connected to the grammar and language mechanics concepts you are teaching. As you move through the year, students can learn new editing marks and look for more types of errors based on their growing knowledge of grammar and mechanics.
Editing Marks
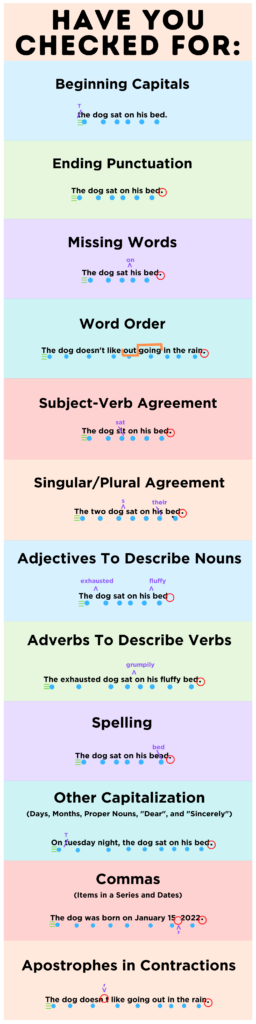
Speaking of editing marks, this is an oldie, but it’s my favorite list for editing. Depending on the grade level standards you teach, you can adjust the list and determine which marks you’ll introduce and which marks you won’t.
Preparing for Online STAAR Testing
Since the STAAR test will be online for everyone in Texas in 2022, and writing will be incorporated for grades 3-8, I explored the available annotation tools. There will not be a pencil tool available for students to use for annotating text on the STAAR. Students will have access to a highlighter tool that enables them to highlight selected text, a note pad for note-taking, and an answer eliminator (strikethrough). You can look at training and practice tests to get familiarized with the online test and how these tools will work. But due to the limited annotation features in the online STAAR, transferring some strategies from paper to online will require some creativity.
How to Use This Strategy for Online STAAR Testing
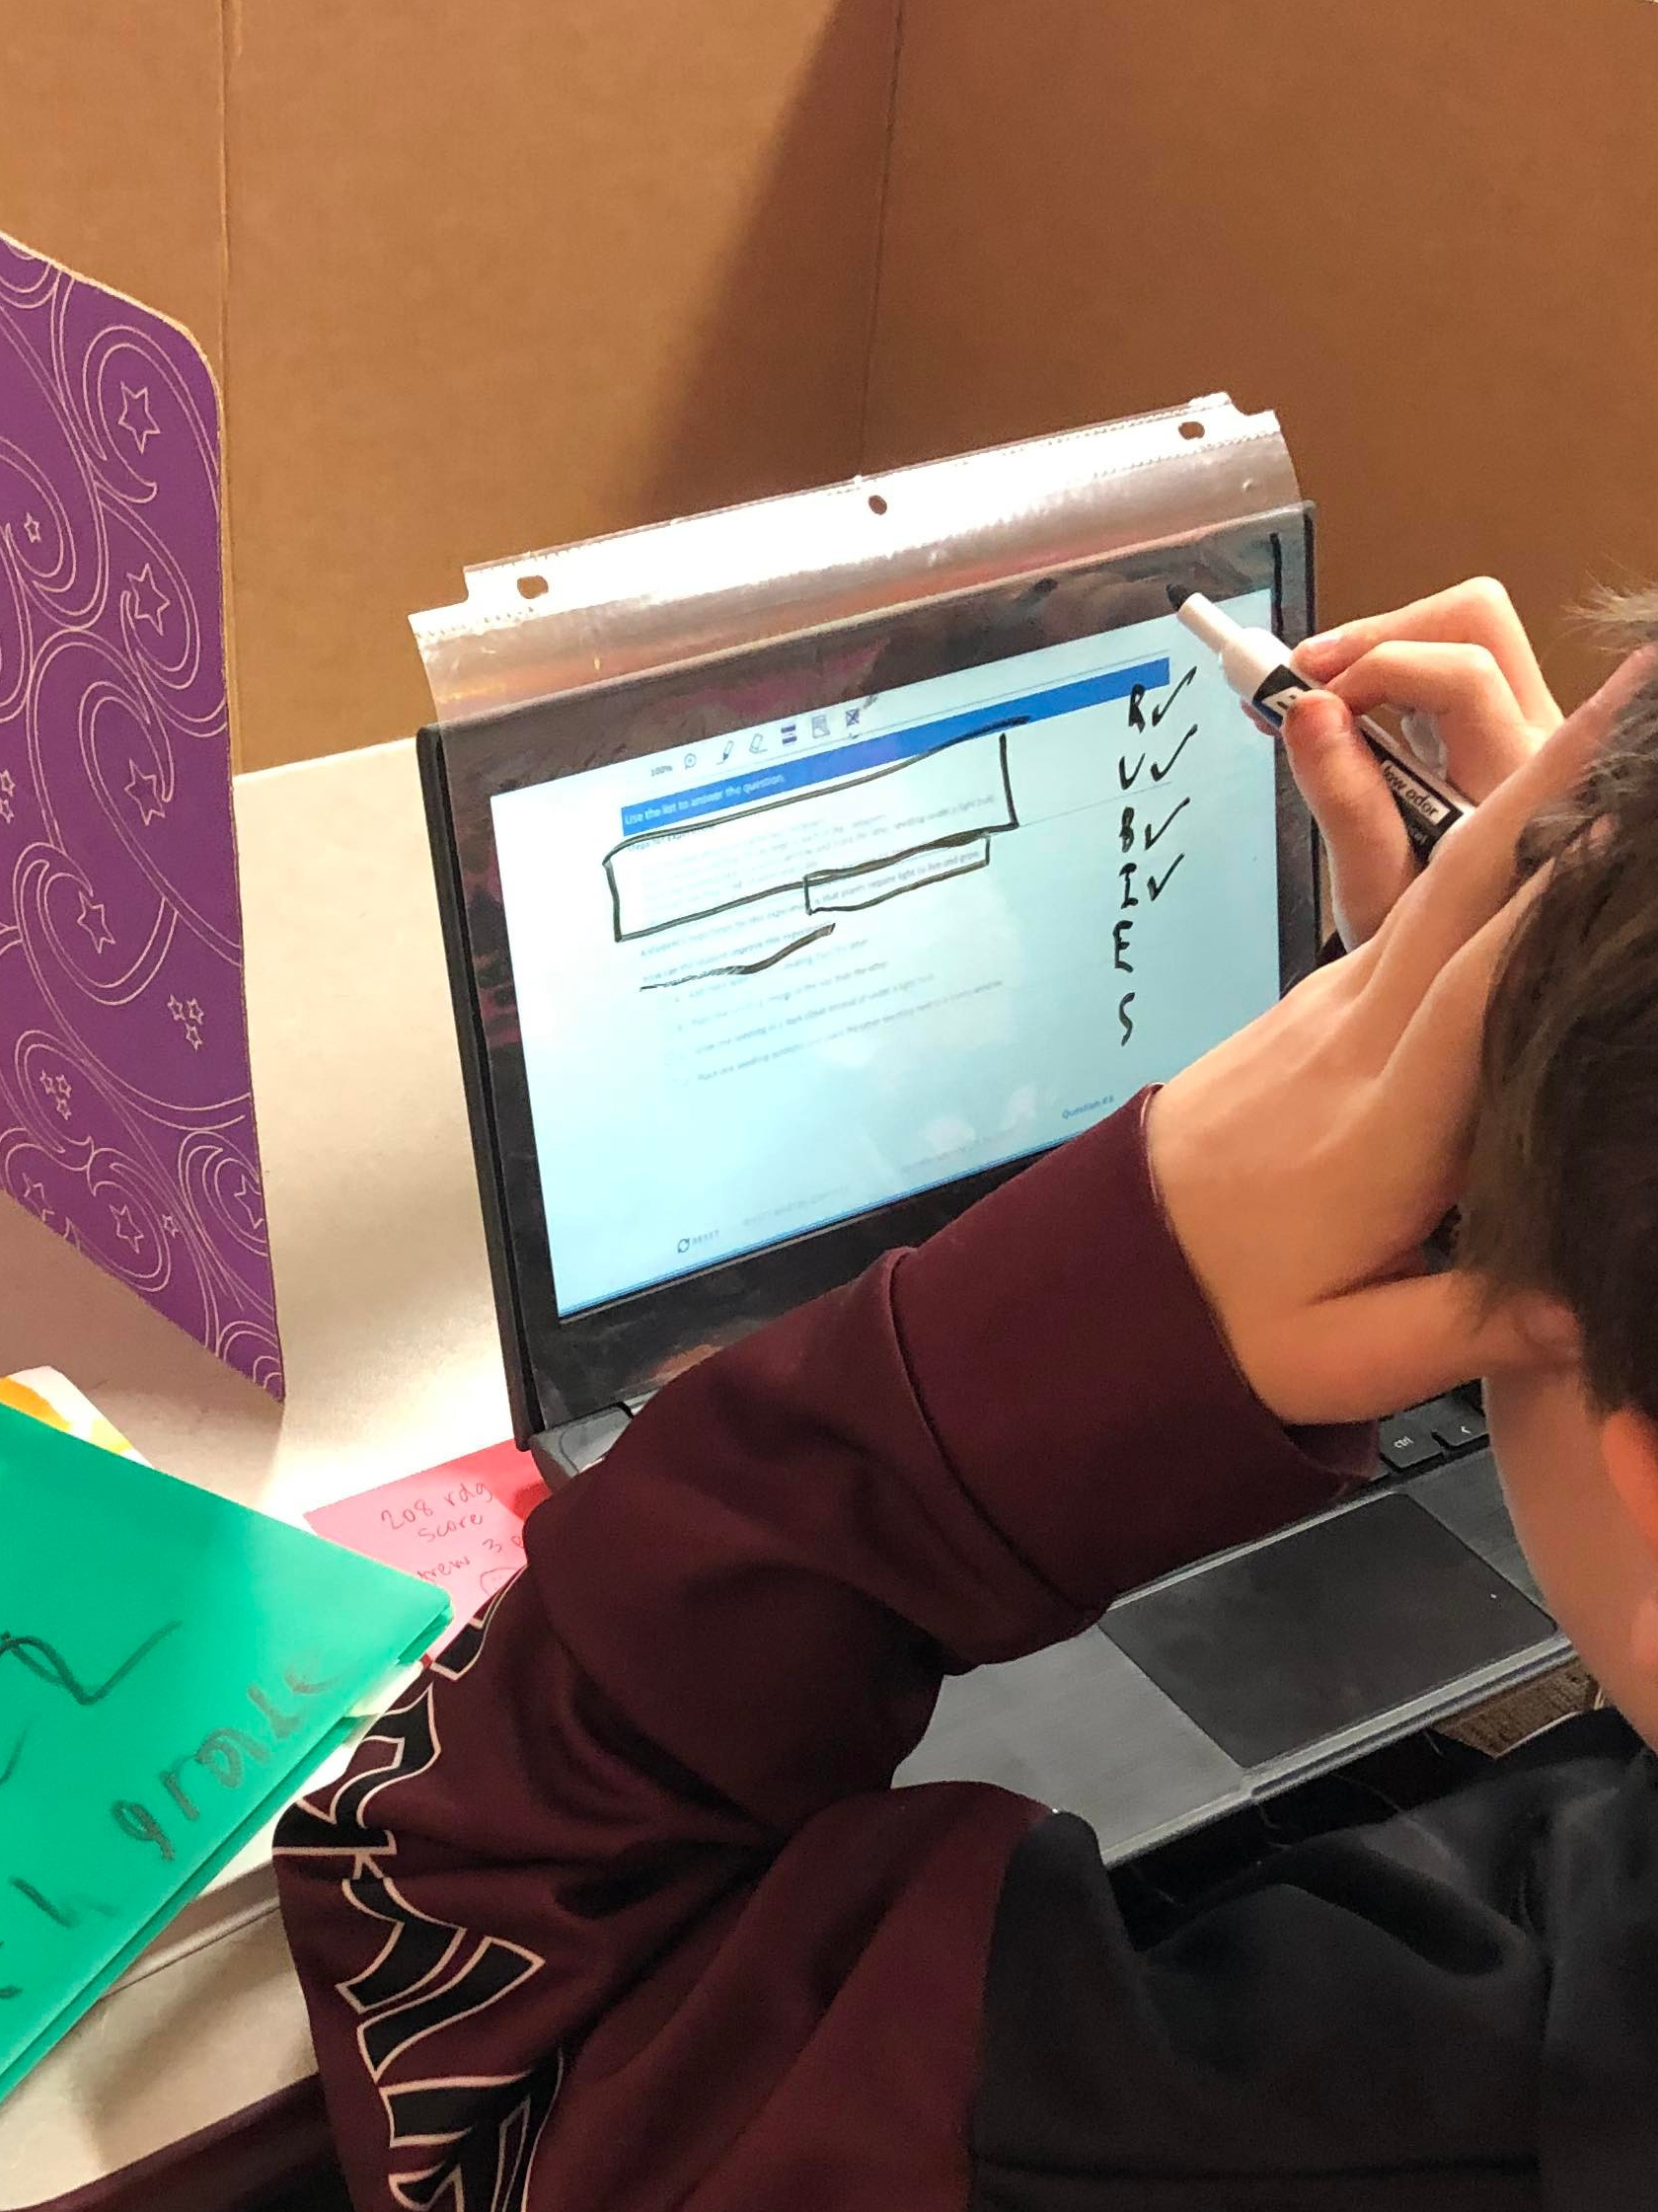
I recently had my eyes on a thread in the Texas ELA Teachers Facebook group. Teachers were discussing strategies for the online STAAR test. In the thread, Lorin Roberts, a fifth grade teacher, proposed an idea that she and her grade level team came up with while brainstorming ways to help students with upcoming online testing. It’s simple! They cut sheet protectors to slide over the students’ Chromebook screens. Then, students annotate “on top of” the text using skinny dry erase markers. “It doesn’t work for everything, but for those students who need to physically work through the text, it is helpful. Then they erase their markings and move to the next question, “ Lorin said. She and her team have students practice with the sheet protectors during MAP testing and benchmark tests.
Do you have other strategies that work well for editing and proofreading in class and on the STAAR? Share them in the comments below, and thank you for reading.
Additional STAAR and TEKS Articles You May Find Useful
Reading Language Arts STAAR Test Resources
STAAR Prep: A K-5 Argumentative/Opinion Writing Strategy
STAAR Prep: Spelling Strategies, Resources, and Downloadable Posters
The K-5 ELAR TEKS and Free, Editable Spreadsheets
The K-5 Math TEKS and Free, Editable Spreadsheets
A Powerful and Easy Strategy for Teaching Text Evidence
3 comments
I’d love to know if the sheet protector method is allowable for actual STAAR testing? If you could direct me to where it is found on TEA, I’d love to be able to incorporate this into my class. Thanks!
Hi there, Erin! This isn’t from the TEA website and was given as a practice suggection by an educator. However, here is the updated “Allowable Supplemental Aids” document for 22-23 that goes over tools that don’t need TEA approval. I would talk with your administrator/administrative team about the sheet protector method for STAAR to see if it falls within the scope of allowable aids!
Erin, I dug deeper! Apparently, it is allowed according to TEA. Check out this link, and look under “Blank Scratch Paper”: https://txassessmentdocs.atlassian.net/wiki/spaces/ODCCM/pages/2793210063/2022+2023+Accessibility+Features I would still talk with admin about it, but it does seem to fall under this category!