Has Google Drive become your backup solution of choice? Instead of multiple, external USB hard drives stashed around your home or office, do you just save everything to Google Drive now? You’re not alone. In spite of relying on just one backup, Google Drive has become the safest place to store original copies of your prized photos, videos, even your MP3 music collection. I keep encrypted copies of critical documents in Google Drive, as well as many other documents. There’s a problem with that, though. This blog entry focuses on one key Google Drive tip you will find you can’t live without. It is the answer to a question you may be even be paying for. The question we’ll explore the answer to is How do you get rid of duplicate files?
Benefits of Removing Duplicate Files
Wondering what the benefits are of removing duplicate files? If using Google Drive for Home/Personal use, you may be paying a fee for additional storage. If so, then eliminating duplicate files may save you some money. If you are synchronizing files to your computer, duplicate files also take up space on your hard drive.
If you are on Google Suites for Education, you have unlimited storage, so why worry about space? When you’re conducting a search on Google Drive for a file, you may end up working on several versions of a slide show. In fact, that situation happened to me earlier this year. I found myself making adjustments to one file, while my colleague worked on a duplicate. Both files had the same filename but were saved in different locations. How do duplicate copies of files get made?
How Duplicate Copies Get Made
Avoiding duplication with single files has gotten easier. You might save a file from Google, make changes, and then save it back to Drive. In the past, you might have ended up with an additional copy (a duplicate). But now Google Drive has implemented deduplication protocols that help minimize that. However, that may not work when you have multiple duplicate files scattered everywhere in your Google Drive.
Let’s say you’re working on a critical folder of essential files (e.g. photos, songs, documents for home and work). Most of these files appear in two places, maybe even more. You would like to consolidate everything into one place and then make a backup of the “pristine” set. This enables you to back everything up to one place, organize and remove duplicate files, and then, once you have everything perfect, make a backup of everything. Several ways exist to make backups of what’s on your computer, but there is one problem.
When you try to combine your multiple backups into one, you realize that you’re creating duplicates. Duplicates appear to multiply, both online and on your USB external storage devices. Soon, you end up with so many duplicates, cleaning them out is a big hassle. How do you do that?
Removing Duplicate Copies on Your Computer
If you’re on a Mac or Windows computer dealing with files and folders stored on your hard drive (or external USB drive), then the process can be easy. There are various utilities that can make the process easier. Here’s a short list of programs you can install on your computer:
- Glary Duplicate Cleaner (Free): The makers of my favorite Windows utilities, Glary Utilities, offer a free tool.
- DupeGuru (Free, Open Source): It is “a cross-platform (Linux, OS X, Windows) GUI tool to find duplicate files in a system.” The website states that you are able to “find duplicate files on your computer. It can scan either filenames or contents. The filename scan features a fuzzy matching algorithm that can find duplicate filenames even when they are not exactly the same.”
- Free Duplicate File Finder (Ashisoft): The description from their website says, “Duplicate File Finder is a FREE tool designed to find and delete duplicate files over home and corporate network while no software is installed on another computer. Fast byte-to-byte comparison gives you the accurate results and it searches duplicate file contents regardless of filename. A list of duplicate files can be removed, moved, or copied.” Alternate download link.
There are many other tools (e.g. Clones File Checker, Google Drive Duplicate Finder, CCleaner, Duplicate Sweeper, or Dr. Duplicator for Mac OS X) that you can use to identify duplicate copies of files on your device. Running these programs on your Windows or Mac computer before combining your backups of critical files in the cloud is recommended. The process to locate duplicates can be time-consuming; these programs make the job easier and faster.
Removing Duplicate Copies with Google Drive Cleaner
If you’re using a Chromebook, however, you may not have the option of installing one of these programs. Or you may find yourself a bit befuddled with all the options these programs offer. Why not rely on a Google Drive app I have used often with success? The app, which works with Google Drive, is Drive Cleaner. After adding it and giving Drive Cleaner access to your Google Drive account with a long code, you can begin to use it.

You can see how it helped me find duplicate photos and videos in the screenshots below:
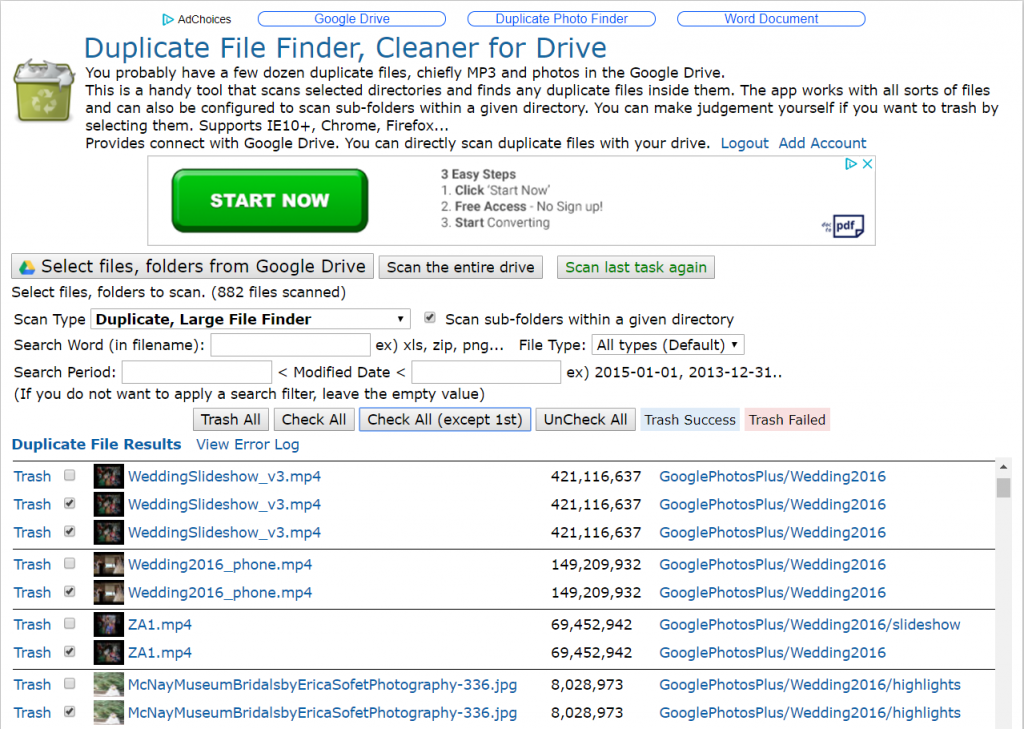
Screenshot #1: As you can see in the screenshot, I’ve added the app to my device, and told it to scan a select folder. Drive Cleaner has pulled up a list. One of the options that you will find helpful is that you have the option of “Check All (except 1st).” The benefit of this option is that if you have two, three or more duplicates of a file, you can select all but the first one that appears with a single-click. After doing a quick visual check, you can then click the “Trash All” button. What a time-saver!

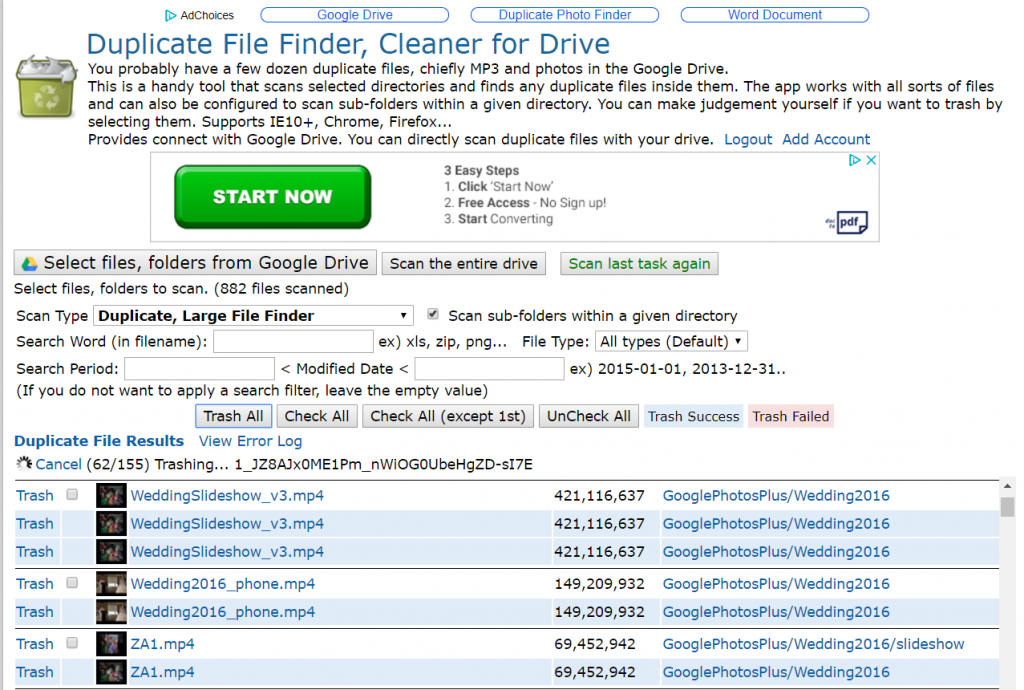
Screenshot #2: In this image below, you can see the “Trashing” of duplicate files has begun.

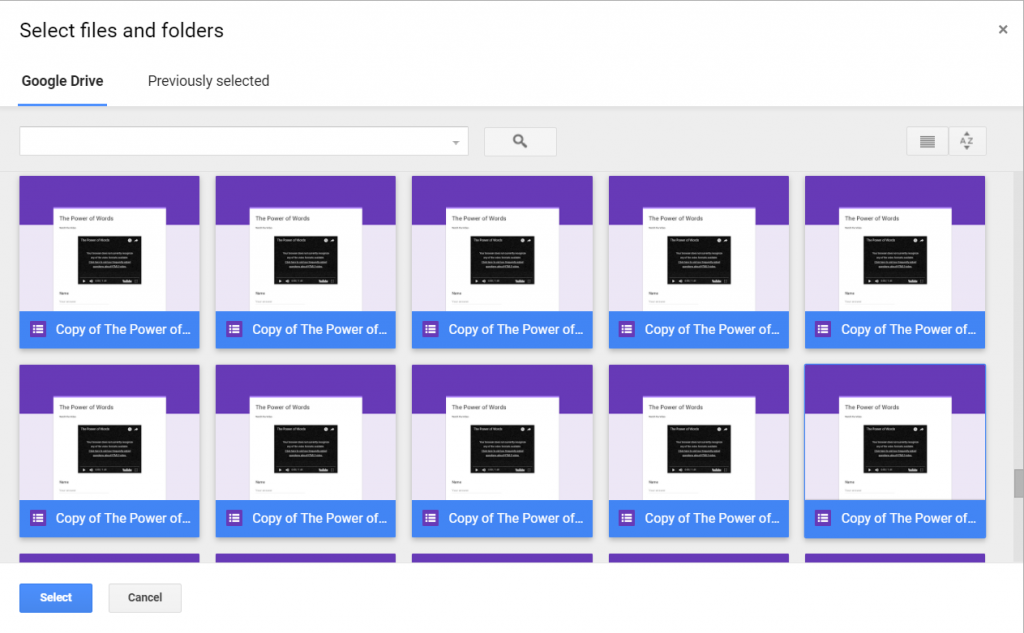
Screenshot #3: In this final shot, you can see the selection screen that allows you to select files/folders.

One limit encountered was the total number of files Drive Cleaner can process at any one time. I recommend moving folders of files, including duplicates, into one folder, then pointing Drive Cleaner at that folder.
Wait, Wait, You’re Not Done!
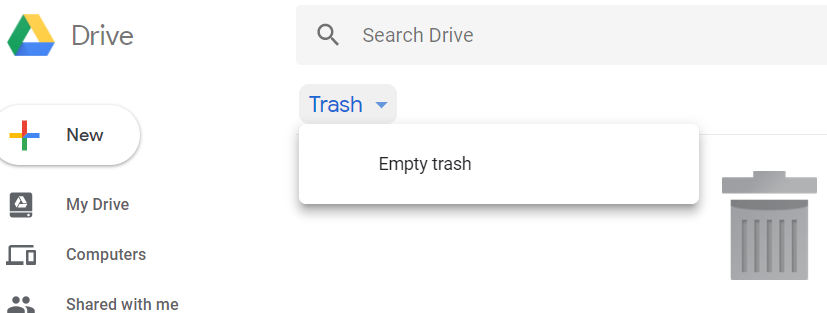
If you need to recapture space quick, you will need to take one more step after deleting duplicates in Drive Cleaner. Go to your Google Drive Trash folder. Click on the Trash drop-down menu and choose “Empty Trash.” This will start a process that can take a few hours (you need only select it once). In no time, you will have recovered critical space in Google Drive. For example, I recovered over twenty gigabytes of space due to removal of duplicate files (e.g. videos, photos, copy of Google Documents). Wow!

A Final Tip
If you have a multitude of files and folders in your Google Drive, consider getting the Google Drive for Desktop application. This will allow you to run the duplicate file finder programs on your Windows/Mac computer. Chromebook users are encouraged to use the Drive Cleaner app.

