

Can you believe that Chromebooks have been around for so long? The first Chromebook shipped in June 2011. And in 2020, Chromebooks outsold Apple’s Macbooks for the first time. Last year, they accounted for almost 20% of the market share. With more functionality, a stable OS, and plenty of features for the average user, it isn’t a surprise that Chromebooks continue to grow in popularity. But even if you and your students use Chromebooks, are you making the most of them? Here are some tips and tricks to help you enjoy them even more.
How Can I Decorate My Chromebook?
Who doesn’t enjoy decorating their Chromebook to make it more personalized? But if your Chromebook belongs to the school district, they may frown on decorating with stickers. This tip may let you personalize without reprimands or damaging it. In 6 Ways Your Make Your School Chromebook Stand Out!, Dave Carty shares that you can cover the Chromebook lid with clear contact paper. If the Chromebook has to be turned in at the end of the year, the contact paper can be peeled off without any harsh sticky residue. Just be sure to add your stickers on top of the contact paper, not underneath it!
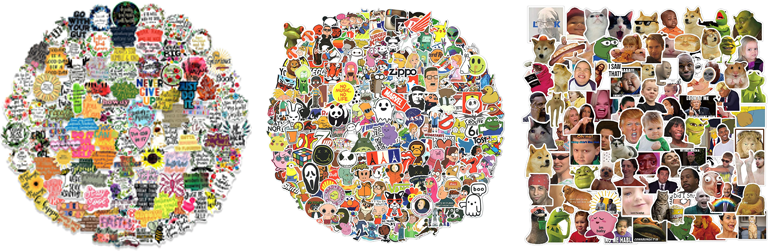
If you do this, then why not use stickers as a method to motivate your students? Kind of like earning badges, they can pick a sticker for achieving or completing certain activities in your class. While you can create your own stickers using sites such as Sticker Mule, why not get a variety of stickers that are a lot cheaper and more fun. Amazon offers several options, such as these 300 stickers for $14, 100 funny meme stickers for $7, or a set of 100 inspirational words stickers for $8. Note that the links for these stickers use Amazon Smile. When you designate TCEA as your charity of choice, Amazon will share a small percentage of its profit with TCEA without charging you extra. You get stickers, and TCEA receives a tap on the shoulder that says you love us. It’s a win-win!
How Can I Split Screens on My Chromebook?
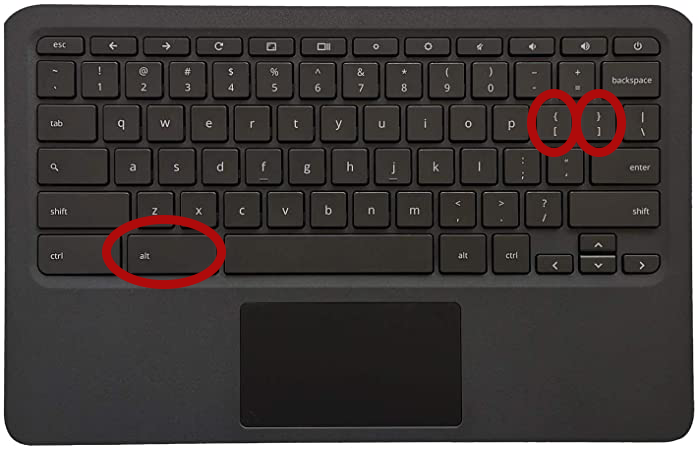
If you are fortunate enough to have multiple monitors, you know the luxury (and improved productivity) that comes with having more than one screen. Did you know you can split screens on your Chromebook monitor? Why yes, you can! You can easily split the screen in two so that you have one browser tab showing on the left-hand side and a different tab displaying on the right-hand side. This works great if you are doing research and need to take notes or write. Toggling between windows, which you can do by pressing the ALT key and tapping the TAB key, only brings one window to the front. Sometimes that is what you want. But splitting your screen allows you to see two windows simultaneously, side-by-side. To split your screen, open up two tabs in the browser. Detach one tab by pulling it off the Chrome browser window and making it its own window. With one window in view, hit the ALT key and the [ or ]. The ALT and left square bracket will send the window to the left side of the screen, while the ALT and right square bracket will send the window to the right side.
How Can I Customize My Chromebook Wallpaper?
Finding an Image
Forget the “old school” images you can add as a background. Ask artificial intelligence for some help in livening up a photo by remaking it based on a particular artist’s or painting’s style. Begin by going to Pixabay. You’ll find tons of free photos here that you can edit without copyright issues. If you haven’t used Pixabay before, then follow these steps to find an excellent base photo to use.
- Go to http://pixabay.com.
- Enter a search word in the search box in the middle of the screen.
- Hit Enter to search.
- Near the top, click on Images and select Photos. This will remove all clipart and illustrations from your search query.
- To get a photo that is similar to the dimensions of your Chromebook screen, click on Orientation and select Horizontal.
- Scroll through the results to locate the one that interests you and click on it.
- Click the green Free Download button.
- Choose a larger image from the options provided, and then click the green Download button.
Editing a Photo
Now that we have a photo that we like let’s get some artificial artistry going on. For our purposes, we’ll use NightCafe. You will need to create a login, but it is free. They make it possible to purchase additional credits to access their AI engine, but you can get five free credits per day. Credits can accumulate, so you can build up as you need. Plus, you get additional credits when you publish your work and make it available to others.
Instead of using the text prompt to create an AI-generated art piece, we’ll use the Style Transfer method. Complete the following to create your AI-assisted masterpiece.
- Choose the image you want to use as the foundation piece.
- In the Input Image section, click the Choose An Image button and locate the image you downloaded from the Pixabay search above.
- Identify the style you want to be used as it reimagines your photo. Click on the Choose a Style button.
- Scroll through the style options and click on the one you want. There are more than 64 choices, so it may take a few credits to play around with different styles before you find the one(s) you rely on most.
- For two credits, you can have it generate a 10-20 second video of your creation being made. I’ve done a few and don’t think it is as exciting as it sounds, so I usually save my credits.
- Click Create. Notice that it lets you know how many credits it will cost you.
- The AI engine will go right to work. You can leave the page alone and wait for it to refresh when done or, if you are logged in, it will email you a notification when your artwork is complete.
- Download the new image to your Chromebook.
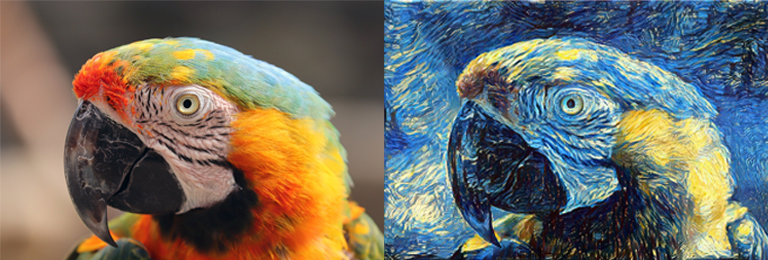
I downloaded a parrot image from Pixabay and used that as the base. I told the AI artist to recreate it in the style of Van Gogh’s “Starry Night.” Here is a “before and after” of what was created for me.
Setting Your Chromebook Wallpaper
If you completed this process using your Chromebook, locate the image in the Files folder. If you were not using your Chromebook, then you will need to log in to NightCafe using your Chromebook, go to My Creations, and download the artwork to your Files. Once you’ve located the image in your Files folder, right-click and select Set Wallpaper. This will apply your work to the background of your Chromebook.
How Can I Move My Chromebook Shelf?
If you are like me, I sometimes don’t like the shelf (the Chromebook taskbar) at the bottom of the screen. Having it on the left-hand side is more convenient when I’m doing certain tasks. Google makes it easy to move the shelf to three different spots: the left side, bottom, or right side. Just right-click on the shelf and choose Shelf Position. Then, select where you want the shelf to appear. Voilà!
How Can I Pin a Website to My Shelf?
While we are talking about the shelf, why not pin a website to it and make getting there more convenient? To do so, open the webpage in Chrome, and:
- Select the More icon (the three dots on top of each other) –> More Tools –> Create Shortcut.
- Click on the Launcher icon (in the corner of your screen).
- Right-click the shortcut you want to add to the shelf. If you are unable to right-click the shortcut, click in the Launcher’s search field and search for it. Once located, you should be able to right-click it.
- Select Pin to Shelf.
If it doesn’t pin the site in the order that you’d like, just click and drag it to your preferred spot on the shelf. And, yes, you can also set Chrome to open with a specific set of pages if you want to keep your shelf tidy.
How Can I Screencast with My Chromebook?

There are definitely times when students can demonstrate mastery by creating a screencast video. Or it may be that you want your students to create tutorials that their peers can use. Whatever the assignment, if you need students to make screencast recordings but don’t want them to have to log in to a third-party site, then consider using Scrcast screen recorder. Scrcast is completely free and unlimited. You will also enjoy that features they offer are similar to ones that we love and are “freemium” tools. You’ll notice that it can record the desktop, a particular tab, or focus on the webcam. And you can set the resolution size before recording. When done, just download the video to your device and share it as you normally would.
Plus, this is a GREAT tool that respects student privacy. As a matter of fact, the publisher declares that student information is not:
- Sold to third parties, outside of the approved use cases.
- Used or transferred for purposes that are unrelated to the item’s core functionality.
- Used or transferred to determine creditworthiness or for lending purposes.
What Would You Add?
There are so many other tips to be shared. What is one that you would like to add to the conversation? Share with us in the comments below. We look forward to hearing from you!
2 comments
Bruce, these are great tips for Chromebook users. I would also ask the perpetual question: When sharing internet resources for creation tools that students would use, might TCEA content include information about Privacy/Terms? It’s one thing to say that NightCafe is free, but for the TCEA readers, to mention that Privacy states ‘not for users under 18 yrs’ would be a nice service to provide. Not only does it provide the research for me, but it is also a glorious model provided by TCEA for educators who may still be somewhat unaware that Free doesn’t mean allowed for students.
This also illuminates my personal bias towards ‘Chromebook’ tips being aimed at students. I know what the E in TCEA stands for, but your work does affect many classrooms. Thank you for continuing the efforts.
Good point, Howard. I believe what you are addressing is the Children’s Online Privacy Protection Rule (COPPA). Looking at their terms, I don’t see that they sell or make inappropriate use of user information; THAT would definitely be a red flag.
I will try to incorporate that in future blog posts. But even with those statements included, TCEA is unable to keep track of all agreements of sites/apps/tools that we may suggest. Unfortunately, at some point, it really does fall back on the user to be responsible. And, in most cases, that would be the teacher if they are using it for their classrooms. Plus, we have readership that goes beyond K-12 and that are not limited to traditional public school. But, I can definitely be aware and make steps toward what you are asking.
The actual portion that you cite contains more information. It says, “By accessing and/or using our Platform, you; each person, entity or organization using our Platform (referred to as you): warrant to us that you have reviewed these terms and conditions, including our Privacy Policy (available on the Platform) (Terms), with your parent or legal guardian (if you are under 18 years of age); warrant to us that you have the legal capacity to enter into a legally binding agreement with us or (if you are under 18 years of age) you have your parent’s or legal guardian’s permission to access and use the Platform and they have agreed to the Terms on your behalf;” These terms are necessary for them to be COPPA compliant. It’s not a red flag that their site is adult-content but that they have to legally make sure that they have expressed that parent/adult permission is given for people under 18 to use their site. That should be true for all websites whether they make it clear or not.
And, maybe a blog post on classroom teacher responsibilities is in order. Just like teachers should be vetting reading content that is suitable for their students (instead of just taking blind recommendations), they should apply that same scrutiny to any content. Hopefully districts are providing training to their teachers about COPPA, CIPA, etc., as they should. Even so, it is a continual conversation that needs to be brought to the front. Thank you, Howard, for helping to highlight this issue.