

 You have probably already heard of Flipgrid and perhaps even started using it, at least to some degree. It definitely seems to be the perfect tool to support students in many ways, not to mention using it as a way to provide peer- and content-support to teachers.
As I have worked with teachers and administrators, though, it seems that most folks using Flipgrid aren’t making the most of some great features it offers. I usually hear from educators, after sharing Flipgrid as part of a larger training, that they wish they knew about the features sooner and are stoked to start using it in even more engaging ways. You could say that they caught #flipgridFever!
Update Your Profile
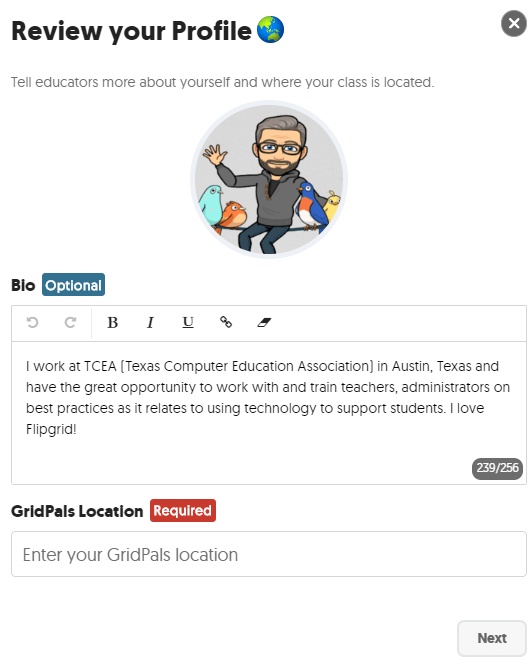
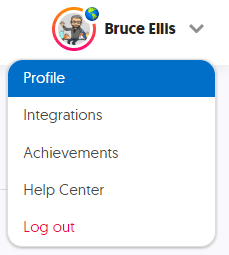 Begin by making sure that your profile is updated. Don’t be shy. This will allow others to better connect with you. Click on your image in the top right and select Profile. Select a photo or avatar for your profile picture. If you have a picture that has a busy background or you want to use a quick editing tool to remove the background (as I did on my bitmoji image), go to remove.bg, upload, and edit your image as needed.
Once done editing, download your image and upload it for your profile by clicking on your current Flipgrid profile image. For your account information, be sure to choose all the grades and subjects that you have experience with. Complete the most current bio description of who you are and what you do within the 256-character limit. Lastly, share how you would like to connect by providing any social media information or links. When done, click the Update Profile button. Now, let’s jump into some useful tools.
1. GridPals
 GridPals is, as you may have deduced, Flipgrid’s version of pen pals. It’s a super easy way to connect with other educators and enthusiasts to further learning and improve education.
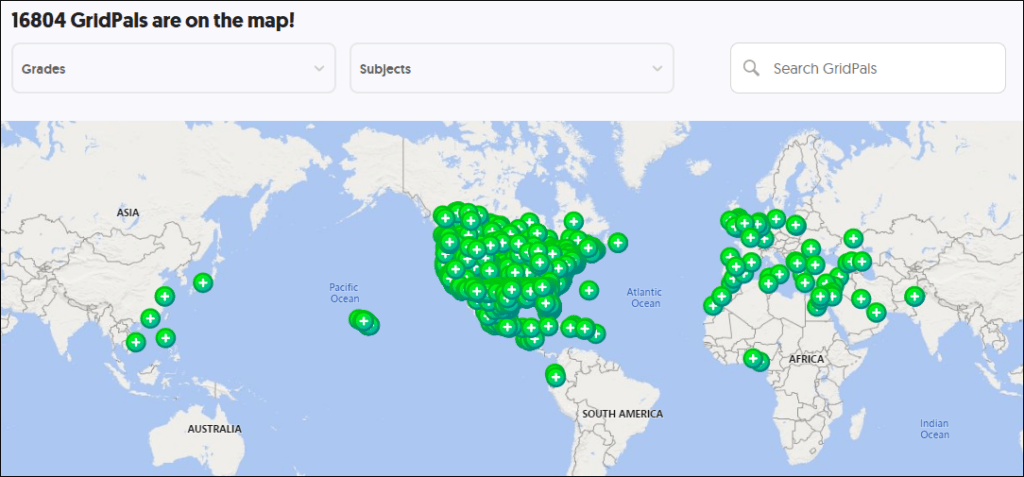
Begin by clicking on the #GridPals link at the top of your Flipgrid screen (assuming you are on a computer). Change your status from Hidden to Active so that you and others can find each other and connect. A window will pop up allowing you to edit your profile and add the location where you are. For mine, I entered Austin, Texas, United States. Click the Next button to continue. You are now able to give permission for other GridPals to contact you. Plus, Flipgrid never shares your contact email with them until you reply, so you have complete control. Edit/add any social connections if you would like and then click the Join GridPals! button. Woohoo! You are now in the GridPals group!
So, what do you do if you don’t have students? Why would you want to be a part of GridPals? Even if you don’t have students, you might be asked to share with a group of students because of your job or area of expertise. It also helps you stay up-to-date on how others are using Flipgrid in the classroom, from early childhood up through college!
2. Disco Library
Yep, Flipgrid has a disco library. Well, in layman’s terms, it might better be called a template gallery, but “disco library” is so much more hip and exciting!
In the Disco Library, you can access templates that other educators have created to spark new ideas of interacting with your students, as well as jump start your process. No need to start a topic from scratch if someone else has already created it for you. Flipgrid also lets you know the following when you enter the Disco Library:
- No student videos will be shared when a Topic is added to the Disco Library.
- You can edit Topic information before or after you share. Topics can be removed at any time.
- Other Flipgrid educators will not see that you’ve added their Topic template and vice versa.
Using Weekly Hits
The #FlipgridWeeklyHits shares 50 topic templates that you might be interested in. You can scroll (left-to-right) through the list of thumbnails or click on the View All link to jump down to the list as a set of search results. Scrolling through the list, I have found several that spark creative ideas of how I can support students that I haven’t thought of before using a specific student standard, or support teachers with a unique area to share on a particular topic that is meaningful to those like-minded teachers. It’s almost like a PLN (professional leaning network) in Flipgrid!
After clicking on the View All link, you will drop down to the list and be able to see who the topic template creator identified as the audience, the subject area, how many times it has been used, and how many favorites it has. Just click on the topic template to get more information about the topic. If you want to use it, just select which of your grids you want to add it to.
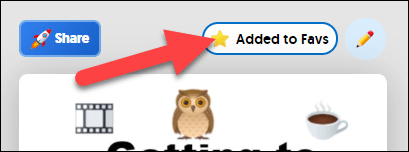 Featured Disco Playlists are sets of topic templates provided by various organizations such as code.org, Wonderopolis, Hacking for STEM, and more. When you find topic templates that you like, either as part of a playlist, a weekly hit, or ones that you find by using the search feature, click the Add to Favs at the top of the descriptive window about the template. This will allow you to begin creating your own playlist of favorites to share with others.
Using the Disco Library
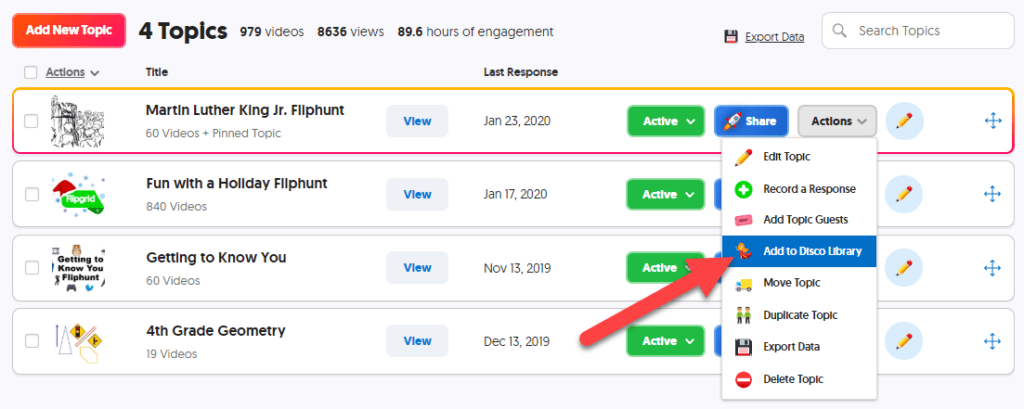
The easiest way to add one of your topics to the Disco Library is to go to the list of topics within the grid you want to share. If you want to share multiple topics to the Disco Library, you’ll need to share each one individually. And remember, no student videos currently in your topic will be included in the template.
Right-click on the Actions button of the topic you want to share and select Add to Disco Library. Your topic will be submitted to the Flipgrid team to review for appropriateness and value. You will notice your stats near the top letting you know how many topics you’ve added (once they are accepted and added), how many times they have been used, and how much video engagement (hours/minutes/seconds) has been generated.
3. MixTapes
 No, this isn’t creating mixtapes on cassettes like we might have done back in the ’80s and ’90s to give to someone special. This is a whole new way of sharing — but based on the same principle.
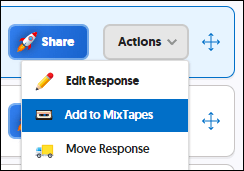
A mixtape is a compilation of any videos that are in any of your topics, in any of your grids. Begin by adding a new mixtape, which really means creating a folder for the videos you want to add.
Once a mixtape is created, go into the various topics and locate the videos you want to add. Right-click on the Actions button of the video to add and select Add to MixTapes. Select the specific mixtape to add it to and click the Add button. Voilà! You are now on the way to being a mixtape master. Now all you need to do is go to the specific mixtape and click on the blue Share button. You can easily share you a specific mixtape via url, QR code, embed code, Google Classroom, and via Remind.
Using MixTapes
Consider making a mixtape as a study aid or glossary for your students as they review information for a major test. If you work with teachers, then consider creating a mixtape of them sharing ideas of how they are making a difference in their classroom or how they are implementing a particular strategy in their classroom that the whole campus (or district) is working on.
For example, if I’m working with ELA teachers across the district, I may create a topic in which they share how they are implementing the new ELA standards, tips or tricks they have to share for other teachers, or ways they are implementing something they learned while in our district professional development time. I could then make a mixtape of several of the videos to create a synopsis of great things that are going on, and I might share this mixtape with principals so they can get an idea of how ELA teachers at other campuses are setting an example.
4. Shorts
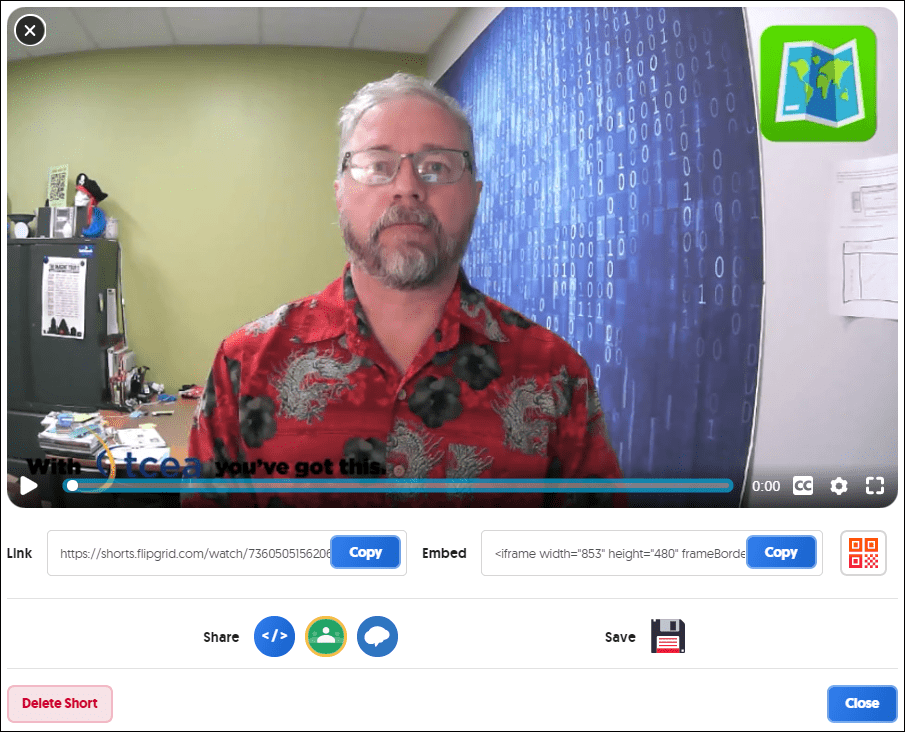 Shorts are brief videos, no longer than three minutes, that you (as the teacher) can create to share how-to’s, introduce a lesson, provide a video note to parents, or just share an update.
Once created, you can share in a variety of ways: by url, embed code, QR code, Google Classroom, via Remind, or download and share via Google Drive or YouTube as you might normally share a video. As when students are creating a video, you can add a filter, stickers, text, draw on the video, and even make use of Live Inking on a whiteboard or blackboard.
Live Inking is great when you have a digital pen or slate (so your writing is more legible) to use and need to create a quick tutorial video on something such as how to solve a binomial equation, explain in a simple manner what cloud computing is, or some other situation where it is helpful for the person to see you illustrate the concept or skill while hearing you talk; in this instance the video isn’t on you but just the white/blackboard is being recorded. And if you right-click on the More icon (the three dots just to the right of the record icon), you can upload a sticker, which could signal to the students the topic or subject area or could be used as simple branding of your videos.
How Do You Use Flipgrid?
 So how do you use Flipgrid? Which feature(s) have you found to be the most impactful? Even if you haven’t had a chance to use Flipgrid, have you come across an innovative way to incorporate it in the teaching and learning process or in professional development? We’d love to hear from you!