

Love legos? Check out our upcoming robotics training and workshops:
Intro to Lego EV3 Robotics
Mission Possible Summer Camp: Lego EV3 Robotics in the Classroom
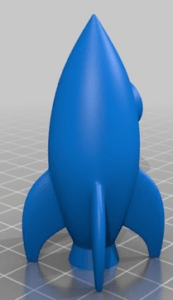
Who doesn’t enjoy playing with LEGOs? There are more choices with LEGO today than when we were kids. There are also more choices as to making designs. If you don’t have an engineer or architect in the family, then consider using one of t
he following tools to convert 3D objects to ones made of LEGO bricks. For easy comparison purposes, we’ll use the same file, Cartoon Rocket by frankvb, with each tool so you can compare the quality and results.
Tinkercad
Tinkercad has to be one of the easiest CAD programs for kids. Students as young as kindergarten and first grade can start creating after learning just two or three simple skills. Plus, the new Brick feature makes it easy to convert your creations to LEGO designs. You have three resolution choices (1x, 2x, or 3x design size) with each increasing resolution making the final design larger. Though you’ll use the most LEGO bricks when using the 3x resolution, others will appreciate your work all the more. To “brickify” your object, just follow these steps:
- Load (or create) your 3D object in Tinkercad.
- Click on the brick icon in the top right menu area. Tinkercad will render your object. Larger and more complex objects may take a little longer to render.
- Select the preferred resolution (1x, 2x, or 3x).
- Click on the Layers button to review the design layer by layer. The indicator at the bottom of the design will indicate which layer you are viewing and how many total layers.
Tinkercad does not identify how many bricks you’ll need, so you’ll have to make an educated guess. Review the online design and construct your piece, scrolling through each layer as you complete it.
Online Voxelizer
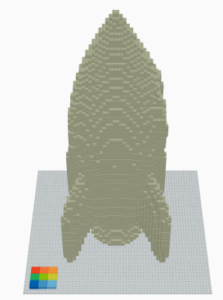
Dutch coder and designer Arjan Westerdiep has created Online Voxelizer to help you convert 3D objects to voxels; think of voxels as three-dimensional pixels. One advantage to using Online Voxelizer is that it will identify how many voxels (or 1 x 1 blocks) are used. Begin by opening a .obj or .stl file (remember, the larger the file size, the longer it may take to render/construct your object). Adjust the slider bar (from 1 to 128) to identify the resolution desired. A small slider bar below the resolution slider also allows you to adjust the transparency, which is helpful when identifying internal construction. At the highest resolution (128), the cartoon rocket object was 55 x 55 x 128 bricks and consisted of 18,358 voxels (151,735 voxels if the object was solid and not hollow). Click on the 2D icon to open the layer inspector which will slice the rendering for you; you’ll be able to scroll through each layer and refer to it during construction. There is not a way to download individual layers.
NOTE: I was not successful with Chrome or Firefox and Online Voxelizer. Microsoft Edge browser had no problems running the cloud-based application.
Brickr
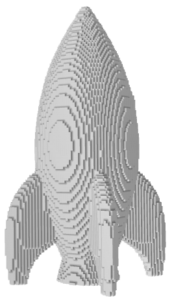
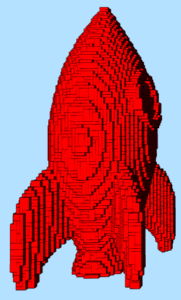
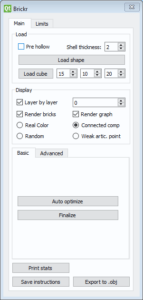 Though you may feel like you are having to jump through a few hoops for your final product, Brickr does provide a nice conversion. To begin with, you’ll need an .obj file to upload. Since my original one was .stl, I went to meshconvert.com, uploaded the .stl file, and chose the Wavefront Object .obj format as the output. You are now ready to load your shape into Brickr. You will be prompted to specify the resolution; 30 appears to be the default, but was not acceptable to me. So I reloaded my shape and increased the resolution to 96. The resulting construction was decent. For a layer-by-layer map of how to assemble the bricks, click the “Save Instructions” button (bottom left of dashboard), give it a file name, and select whether you prefer the image layers as png, jpg, or svg format (I recommend png). It may make it easier, prior to saving instructions, to select Random as the brick color as this will help you distinguish different size bricks (and possible postpone getting cross-eyed in the process). You will now have one image for each layer; in my case, I ended up with 33 layers (instead of assembling from bottom-to-top, it sliced the construction from side-to-side.
|
Tinkercad |
Online Voxelizer |
Brickr |
Recommendation for LEGOs
If you are wanting to convert a 3D object that the students will work together to construct, I recommend using Brickr. Once you render to brickified model, save the instructions as .png files and then print each of those files. Label each page with the layer (and possibly hole punch to keep in a binder for storing). Divvy out the pages to various groups of students and have them each construct their portion, which will combine with other groups’ work to create the final amazing LEGO construction.
Prior to beginning your project, you might have students measure a LEGO brick and then have them estimate how many bricks it will take to complete the rendering. After they get started, they will definitely want to modify their guess, which is good since that shows they are editing the calculations in their mind and becoming better at spacial reasoning.
Once you convert your object, share a screenshot of it with us. Better yet, share your final LEGO construction (along with how many bricks it took) with #TCEA and #brickify!