

I have to say it. I like power tools. Maybe this fascination started because I spent my childhood with a father who could fix anything and everything. Whether it is a glue gun, drill, lawnmower, or a 3D printer, I’m all in. In writing this blog, I came to the realization that perhaps this is why leading the charge for makerspaces at TCEA is a perfect fit for me.

Last summer, TCEA was invited to set up a booth at the ISTE conference held in San Antonio. My colleagues and I decided we should definitely use some of the space for a maker activity. It needed to meet the following guidelines:
- Not too time consuming (conference attendees have lots to do)
- Could not be too expensive as we would have hundreds of people taking part
- Allow for choices to be made in the project
So off to the internet I went to search for a project that met the above criteria. I happened upon duct tape luggage tags. The BONUS part: a tool would polish off the project. If you have never set a grommet, you need to! As you press down on the handle with just the right amount of muscle, it gives this delightful feeling when the top and bottom pieces slide into place. It is similar to achieving just the right flakiness in a pie crust or parallel parking within 12 inches of the curb!
Guidelines Met
- You can make a luggage tag in about 20 minutes (That time increases if you can’t make a decision on the color of the duct tape!)
- Materials will not break the budget.
- Allows choice in the design
Which patterns and colors will give you just the right color combination for your luggage tag? Will you leave the tag flexible or make it sturdier with a cardboard insert? Will you have the tag as a square or triangular shape?
Materials and Equipment
Materials
- Duct tape (Amazon, Walmart, and Target are great places to purchase duct tape.)
- 6” clear and colored plastic loop straps from ID Wholesaler (pack of 100 for $6.00)
- Grommet machine and grommets (Plan on spending approximately $65.00. I selected this one off of Amazon.
- Cardboard inserts (no cost as I reused cardboard from our certification frames) The cardboard is thin. A great place to find this type is on the back of a notepad.
Equipment
- Cutting boards
- X-acto knives
- Hole punchers
- Rulers
Extra Hints
- I do not use scissors with duct tape as it just gunks up the blades.
- Regardless of the age, teach your children safety guidelines before using X-acto knives.
- Using an X-acto knife with a ruler is a great way to make a crisp, clean cut
- Walk to the back sales section of Michaels or Hobby Lobby; a high percentage of the time, you can pick up discontinued patterns of duct tape for just a little cash.
- Don’t worry if your plastic cutting boards get several cuts; it just makes it easier to lift off the duct tape.
The luggage tag project at ISTE was a big hit. In the short time we had the makerspace up, about 747 luggage tags were made. I talked to many educators who were either going to incorporate this idea into their makerspace or take it back to kick off the school year. Click here to find the directions.
Ideas for Education
- Lunch sack tags
- Backpack decorations
- Bookmarks
- Mother’s Day or Father’s Day gift
- The One Word or mission statement tags for principals and teachers
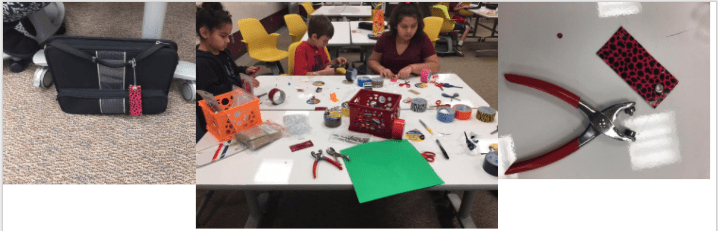
My go-to maker-librarian, Michelle Cooper, kicked off the 2017-18 school year with this particular project. You can see that Michelle used a Grommet Eyelet Setting Pliers instead of a press. From the pictures, her students had great success.
Please leave a comment if you have another genius way to use grommets. I will also have the grommet press available at the next TCEA Makers on May 21 and/or 22. Make plans to experience the joy of setting a grommet.
Featured Image: Photo by author.