Update – January 8, 2020: Google changed Canned Responses to Templates. This was edited to reflect that change.
Recently, Google launched the G Suite Learning Center to help users quickly find answers to their “googley” questions. As in the typical Google fashion, there are multiple ways you can access their help. You can search by product, by task, by job, or even search for things new users need to know. I decided to look through their materials by product and, more specifically, for Gmail.
I first spent some time reviewing a page that listed the top six things we need to know about the new Gmail. I  wanted to see if there was something I didn’t know. The only new tip I picked up was that if you put a + or an @ in front of someone’s name in the body of your email, it will automatically insert their email address into the To: field. I tried it out and it worked like a charm, although I’m not sure when I would use that new feature. I then clicked on a page that listed ten ways you can use G Suite to optimize your inbox since I’m notorious for a messy inbox. I hardly ever delete an email unless it is junk or spam. Instead, I use the search features in Gmail to help me find what I need. But knowing I’d learn something new, I checked out the list. Sure enough, I did. Number six showed me how to easily switch between multiple signatures.
Education Application
 I think this could be very useful for a teacher who wears many different hats and communicates with different audiences. For instance, if she were emailing her students, she probably would not include her first name in her signature. She might want to include her class website, the best way to contact her, and other links that might be helpful for her students. When she is emailing her student’s parents, she might want to include her first and last name, her conference period so they know when she might be available, and other information she thinks could be useful for parents. If she was a cheerleader sponsor or a coach, then information that pertains to those activities might be included in her signature. There are endless possibilities.
In order to set this up, you will need to know how to create an email template. Google also has instructions for making a template.”
Below are some instructions on how to make multiple signatures.
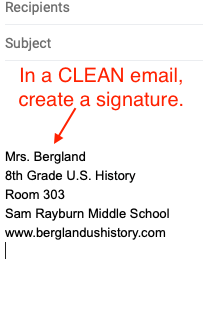
Step 1 – Create the Canned Responses or Templates
Open up an email and delete anything in the email. You may have a signature file that you set up in your general settings. If you do, delete it before you create your canned response. You are deleting it inside the email, not in your general settings. That signature file would be the one you typically use. The signatures you are creating as canned responses or templates are the ones you would use when you are emailing information to a specific audience.
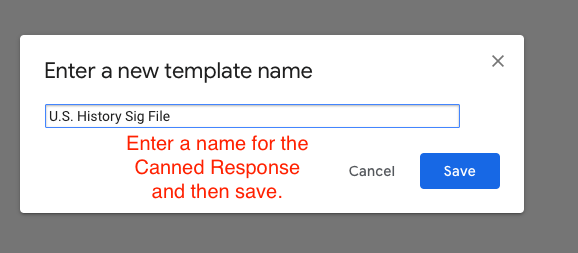
Step 2 – Name the Canned Response or Template.
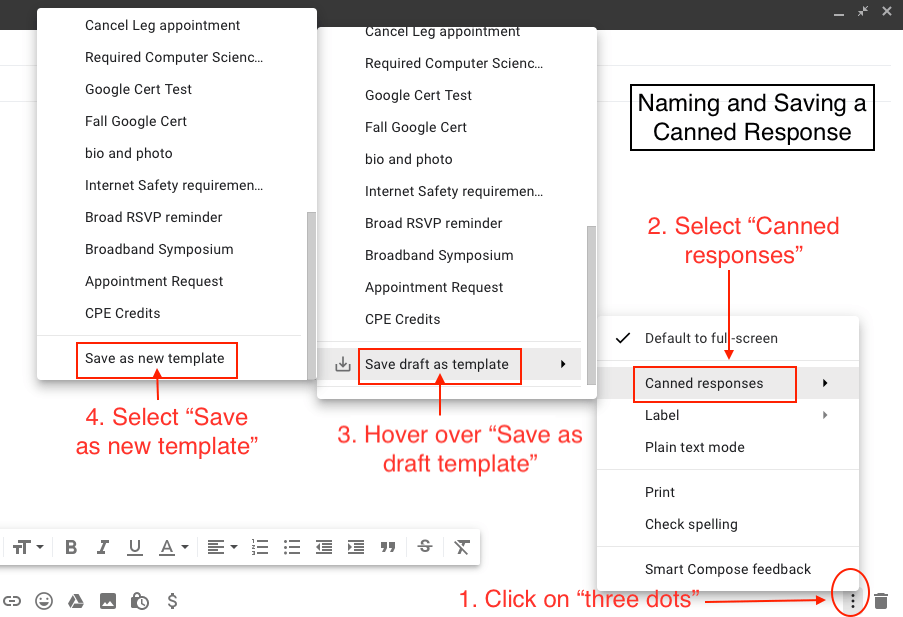
Step 3 – Repeat as Needed
You will now need to repeat these steps until you have all the canned responses or templates you need. This can be done at any time.
Step 4- Insert Signature File
Open up an email, and if you have a signature file that is set up in your settings, delete it.
Then follow these steps.
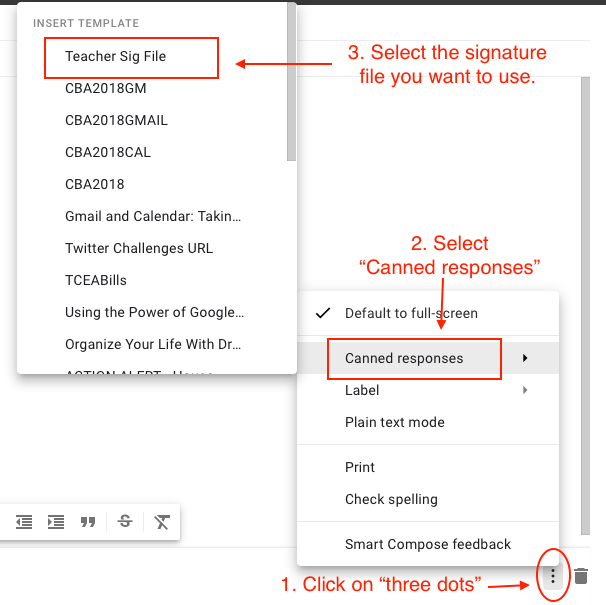
That’s it. It’s pretty simple. Remember, you can insert images and embed links and or Google Drive documents. Decide what information you want this particular audience to have. Also, remember that these can be updated throughout the year, so you can change the information as the year progresses.
Google M&M photo by lalo Hernandez for hostreviews.co.uk on Unsplash.
Gmail photo by Web Hosting on Unsplash.
Children and teacher photo by Web Hosting on Unsplash.

