

Google Drive might be your daily go-to, but if you’ve only been using it to store and share files, you’re missing out on some seriously slick features. From organizing your digital life to finding files faster, collaborating smarter, and avoiding unnecessary clicks, Drive has a whole toolbox of tricks hidden just beneath the surface. So, let’s take a look at some hidden Drive features to help you make sense of your Google Drive.
Whether you’re a classroom teacher with a tab problem (guilty), an instructional coach juggling shared folders, or a campus leader trying to find that one doc someone swears they shared last week—there’s a tip in here for you.
Let’s start with one of Drive’s most underrated superpowers: Google Workspace.
Take Control of Your Google Life with Google Drive Workspace
Google Drive can feel like a digital junk drawer, complete with hidden Drive features galore. You know that one file is in there somewhere, but first you have to open three folders, scroll past seventeen untitled documents, and maybe offer a small sacrifice to the search bar gods. But what if you could skip the scavenger hunt entirely?
Enter: Google Workspaces within your Google Drive.
Also, can we take a moment to question Google’s naming choices? They called the whole suite Google Workspace… and then tucked a feature inside Drive also called Workspaces. I mean, what are we doing here, Google? But I digress. (Also thank you, truly, for your magical productivity tools. I just like things a little less confusing. IDK maybe it’s just me.)
Okay, let’s get back on track. Google Drive’s Workspace feature is one of the most low-key powerful tools in your Google ecosystem—and it’s just sitting there waiting to make your life easier. Whether you’re lesson planning, prepping for PD, or tracking student progress, Workspace lets you keep your most important files front and center without creating more folders (or chaos).
What Is a Workspace, Anyway?
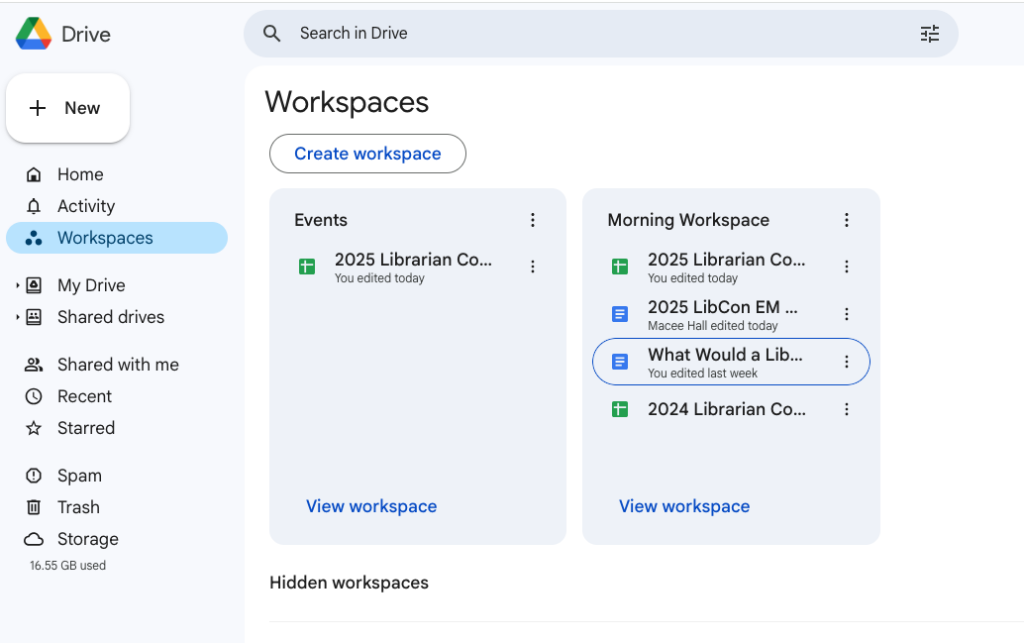
A Workspace in Google Drive is like a custom dashboard. It lets you pull together up to 25 files—from anywhere in Drive into a tidy little list that lives at the top of your Google Drive homepage. It doesn’t move or duplicate the files. It just gives you fast access, like creating a shortcut playlist for your most-used docs.
Think:
Not another folder.
Not another shared drive.
Just your VIP files, front and center.
Why Educators Should Be Using Workspaces
Whether you’re in the classroom, coaching, or leading a district team, here’s why this feature is your new BFF:
- No more tab overload.
If you’re anything like me, you’ve got at least 18 tabs open at any given time—including that random article you swear you’re going to read. Workspace lets you keep all your current project files in one spot so you can close the tabs and still stay on track. It’s like digital deep breathing. - Skip the scavenger hunt.
Don’t remember where you saved that file? Me either. It doesn’t matter. If it’s in your Workspace, it’s two clicks away. - Perfect for projects.
Keep everything for that lesson plan, PD session, or school event in one view—regardless of which folder (or account) it lives in. - Better than starring.
Stars are great, but once you’ve starred 50 files, it’s just another pile. Workspace lets you group by context, not just favorites.
How to Create a Workspace
- Go to drive.google.com
- In the left-hand menu, click “Home”
(If you still see “Priority,” it may still be rolling out the new view—hang tight!) - Scroll to the “Workspace” section and click “Create Workspace”
- Give it a name (like “Spring Semester Planning” or “Tech Coach Files”)
- Click “Add files” and select from your Drive—up to 25 files
- Boom. Instant sanity.
Add Files to Workspace from Anywhere in Drive
Scrolling through Google Drive and see a file you want to add to your Workspace?
Click three dots (⋮) > Organize > Add to Workspace.
No need to dig around in your Workspace settings. This is the shortcut for getting that file where you need it right now.
Sidenote: While you’re in that three-dot menu, you may notice another option: Add shortcut. Get familiar with that one too—it’s your best friend for keeping files accessible without cluttering your Drive. (More on that next.)
Google Workspace Quick Tips
- Make Workspace your morning home base.
Instead of diving straight into “My Drive” or “Shared with me,” get in the habit of clicking into your Workspace when you start your day. - Create a Workspace for meetings.
Add your meeting agendas, notes, slide decks, and action item checklists so you’re never flipping between tabs during a call. - Don’t overthink it.
This isn’t about organizing everything—it’s about giving yourself a daily “launchpad” with the files that matter right now.
Add Shortcut Might Be a Game-Changer

Gone are the days of dragging the same file into five different folders like you’re playing Drive Jenga (please tell me I am not the only one who did that). In today’s Google Drive world, files live in one place—and shortcuts are how you make them show up elsewhere.
Here’s how it works:
Click the three dots (⋮) > Organize > Add Shortcut.
Now you can pick another folder (or three) where you want that file to appear—without moving it or duplicating anything.
Okay, so you might be thinking, So what, Sara? Well, if you’re anything like me, you’ve probably made a duplicate file before just so someone else could have their own copy while you held on to the original. But guess what? You don’t have to do that anymore.
Shortcuts let you access the same file from multiple folders. No versions to juggle. No confusion.
Let’s say you’re planning a cross-curricular project with the ELA and Science teams. You’ve got your unit folder with lesson plans, rubrics, and student docs. But your principal also wants the rubrics in a shared “Assessment Templates” folder.
Instead of uploading copies or dragging files back and forth, just right-click the rubric file and choose Add Shortcut to the shared folder.
Voilà! Now it lives in both places—without duplication, confusion, or someone accidentally editing the wrong version. Everyone wins.
Color-Code Your Folders (Yes, It’s Still Worth It)

Listen, is color-coding going to solve all your problems? No. But will it make your Drive feel a little less like digital spaghetti? Absolutely.
Click the three dots (⋮) next to a folder > Organize > Choose the color from options.
It’s a quick visual trick that helps you spot what you need faster and it is surprisingly satisfying.
Use Advanced Search to Find That One File

Sure, Google Drive has a search bar. And sure, you’ve probably used it to type in “lesson plan” or “rubric” and hoped for the best. But if your Drive is overflowing with docs that have similar names (been there), it’s time to level up with Advanced Search.
Click the little icon in the search bar that looks like three horizontal sliders. You’ll unlock a panel of filters that lets you search with precision.
You can filter by:
- File type
- Owne
- Words in the file name vs. anywhere in the content
- Folder or location
- Starred files
- Last modified date
- Shared with specific people
- Trash status, encryption, or approval status
You don’t even need to enter a keyword—just use the filters to surface what you’re looking for. It’s perfect for when you’re staring at your Drive and your mind goes blank.
Rewind Time with File Versions (Not to Be Confused with Version History)
Google Drive has your back when it comes to accidental edits or Wait, who changed that? moments. When you upload a file like a PDF, Word doc, or other non-Google format, Drive keeps past versions quietly tucked away.
(Because of course they do—they’re Google. All-knowing, always watching, quietly tracking our every digital move. Bless them.)
Google stores up to 100 versions for 30 days, and you can even make a version permanent if you want to keep it around for the long haul. To access it:
Click the three dots (⋮) > File information > Manage Versions.
You’ll see a list of previous versions and can even resolve version conflicts if multiple people upload changes.
Heads up: This is not the same as the Version History you’ll find inside a Google Doc, Sheet, or Slide (that one tracks who typed what, and when, inside the file). Think of Manage Versions as tracking file uploads, while Version History is for tracking in-file edits.
Don’t Sleep on the Details Panel
When you’re collaborating with a team—or even just juggling multiple versions of similarly named files—it can get confusing really fast. Is Event_Flyer_Final_Version_4.pdf the final version? The work in progress? The one with or without the updates? Who knows.
Here’s the fix: Add a description using the Details panel in Google Drive.
Click the three dots (⋮) > File information > Details > Scroll to the bottom
You’ll find a handy little description box just waiting to save your sanity. It’s simple, searchable, and visible to anyone who has access to the file. So instead of sending five clarification emails, you can just tag your file with:
“This is the final version with feedback from the science department.” or “Use this for Friday’s PD—don’t touch the slides!” You get up to 25,000 characters in that description field. That’s… a lot. Like, write-a-short-novel-if-you-want a lot. Not saying you should but you could.
And yes—you can throw in hashtags.
#FinalVersion #UseThisOneNotTheOtherOne #SeriouslyThisOne
Descriptions are searchable in Drive, so it’s just another way to make your digital life a little easier.
Save to Google Drive Without the Download-Upload Circus

If you ever find yourself downloading a file just to re-upload it into Google Drive… there’s a better way. Add this to your digital toolbox: the Save to Google Drive browser extension.
With this free little tool, you can save documents, images, videos, and even full web pages directly to your Drive. No desktop detour required.
Need a New File Fast? There’s a Shortcut for That

And just in case you’ve been living under a rock (I mean that in the nicest, most supportive way possible), here’s a little trick: you can create a brand-new Google file just by typing a URL into your browser.
- drive.google.com – Opens Google Drive
- doc.new – New Google Doc
- sheets.new – New Google Sheet
- slides.new – New Google Slides
- site.new – New Google Site
- form.new – New Google Form
No Drive menu. No waffle. No clicking around. Just go straight to work. Honestly, it feels a little like cheating. But the good kind. Speaking of waffles…just in case you didn’t know this next one, I would be remiss not mentioning this oldie but goodie.
No Drive menu. No waffle. No clicking around. Just go straight to work. Honestly, it feels a little like cheating. But the good kind. Speaking of waffles…just in case you didn’t know this next one, I would be remiss not mentioning this oldie but goodie.
Give Your Google Waffle a Makeover
If your Google waffle (a.k.a. the app launcher grid) looks like total chaos, you can drag and drop your most-used tools to the top. Just click the waffle, then rearrange the icons to fit your workflow. Put Drive, Docs, Calendar, and Classroom right where you want them—no more scrolling past random apps you haven’t touched since 2017.
It’s quick, it’s easy, and it might just make you waffle a little less in the morning.
Final Thoughts
Google Drive isn’t just for storing stuff—it’s packed with hidden gems that can make your day smoother, faster, and far less chaotic. Whether you’re deep into curriculum writing or just trying to stay afloat in a sea of shared docs, these Google Workspace tips and Google Drive tricks are here to help. Pick one or two to try out this week—and hey, if something saves you even five minutes, that’s a win in educator time.
More Google Greatness
Google Smarter, Not Harder: 10 Google Doc Hacks
Google Smarter, Not Harder: Building Blocks for Project Management