

Many teachers may have students in their classrooms that have a different home language than English. While this can be an advantage to the student in many ways, it can also provide some challenges. One challenge that can happen is the lack of parental support that may be given. Also, if the student speaks little English but is fluent in another language, it may be hard for you to build on prior knowledge, especially if you do not know the academic vocabulary in the target language of the student. This is a perfect time to use the Google Translate function in Google Sheets!
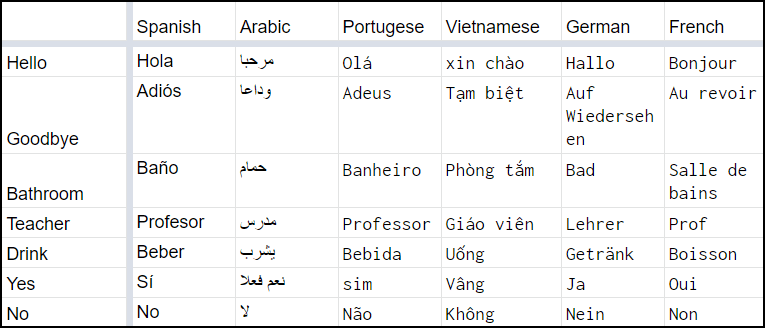
I originally came across this Google sheet online while reading through various forums. The initial sheet allows you to enter your vocabulary words in the first column (far left). The words will be translated into the other languages using the function: GOOGLETRANSLATE(text, [source_language, target_language]). You can obtain and modify the original page at http://bit.ly/2EBD9p0.
Create Your Own Translation Spreadsheet
If we tweak the spreadsheet some, though, we can make it into a great tool to help us differentiate vocabulary words for students. Follow along with me as I make the alterations to the file so that we can have a nicely tailored list of vocabulary words that can be shared, printed, or saved as a PDF. If you want to access the finished file that you can copy and alter, then go to http://bit.ly/2Ev13lY and make a copy. You can use the drop down cell (cell B2) to select any of the languages to which Google can translate. For this sample, we will be creating a seventh grade science vocabulary list.
- Name the blank sheet VocabularyList.
- Put a title in A1. A title is helpful if you plan to print this page or save it as a PDF.
- Select A1 and B1 and click the Merge Cells icon so that the title can span over both columns that we will use.
- Enter “Vocabulary Words” in cell A2.
- The cells below A2 will be used for vocabulary words. Enter as many as needed. As mentioned above, our list happens to have science vocabulary for seventh grade listed.
- Insert a New Sheet (SHIFT + F11 or INSERT→New Sheet). This sheet will contain the languages which you want to make available to your users.
- Name this new blank sheet LanguageCodes.
- Go to http://bit.ly/2Ev7zZP and transfer the languages into column A on the new sheet and the codes into column B. You are now ready to create the magic!
- Go back to the VocabularyList tab.
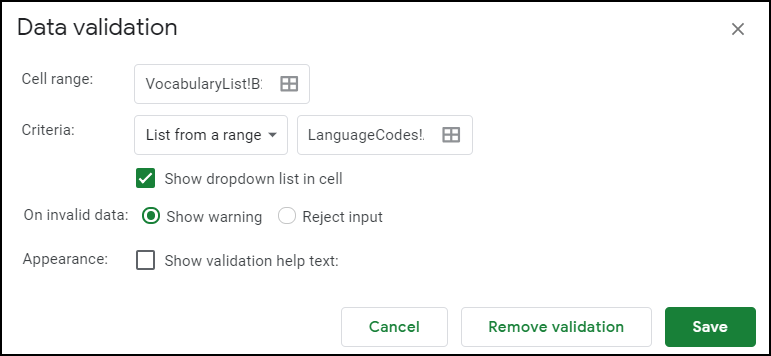
- Click in cell B2 and click DATA→Data Validation.
- For the criteria, “List from a range” should be selected. To select the area, click the “select data range” icon and then click on the LanguagesCode tab and click/drag to select column A cells that have languages identified. Your dialog box should look like the image below.
- In cell B3 enter the following formula: =GOOGLETRANSLATE(A3, “en”, VLOOKUP($B$2,LanguageCodes!$A$1:$B$64,2))
A3 refers to the vocabulary word in column A to the left of B3 where we currently are
“en” identifies that our starting language is in English
VLOOKUP is the function that will look up the contents of a given cell based on the criteria
$B$2 is language that we will be looking for in the formula
LanguageCodes!$A$1:$B$64 is the range of cells on the tab named LanguageCodes where the information is that we need
2 identifies that what we are looking for is in the second column and adjacent to the language as identified in $B$2 - You may now copy/paste the formula you entered in B3 to the remaining cells in the column where a translation is needed.
- If you want, change the color of the drop down cell so it is easier to see which cell to adjust.
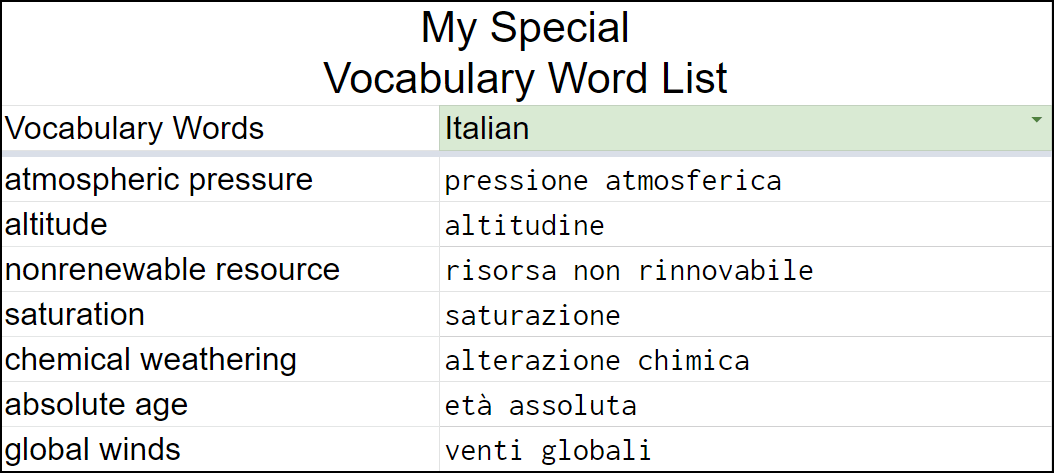
- Your vocabulary list is ready to be played with. Select a different language in the drop down cell and watch the translations update. You may see a brief error message while the function is looking up the language code in the other tab and translating each word; this is normal. Your final sheet should look something like the image below.
Finding Already-Created Vocabulary Lists
Dolch Word Lists – This set of words is the most commonly used set of sight words in the English language.
Fry Word List – This is the most commonly accepted list of 1,000 words that students will encounter in reading and writing. The main list is broken down into sets of 100 words and identified as to the grade level at which they are typically encountered.
Vocabulary Spelling City – Here you will find lists of words categorized by grade level or content area. Within the content area, words are then grouped by category (specific subject area).
Words by Theme – This site has over 100 lists identified, each with its own list of related words.
Comprehensive English Vocabulary Word Lists – This site has tons of lists that you can use and is great for expanding vocabulary beyond typical grade level words.
Inserting into Google Sites
If you want to make your word wall more available to your students when they are not in your classroom, consider inserting the spreadsheet in a Google Site. This will allow students the ability to access the words (and translations) anywhere they have Internet access.
Because the drop down box does not work when the spreadsheet is set to view only and embedded in a Google Site, you’ll need to decide how you want to tweak the spreadsheet and make it available. You have several options:
- Create a single Google Sheet document with each sheet having its own language. Be sure to name the associated tab with the language that is the target language.
- Create a single worksheet in which each column is a different targeted language. Students won’t have to go to a particular tab since all the translations will be on the single sheet.
Once you’ve decided how to best make your spreadsheet, it is time to insert it into Google Sites. Be sure that you set your share settings on the Google sheet so that anyone with the link can view. Then, you are ready to follow the steps below to insert your vocabulary translation spreadsheet:
- Create a new page in the Google Site for the vocabulary spreadsheet.
- On the right-hand side of the Site editor, click on INSERT→From Drive.
- Locate your vocabulary spreadsheet and click Insert (or double-click the file).
- If your spreadsheet has more than one tab, click on the gear icon that appears just above the inserted sheet (when it is selected) and select the desired sheet from the drop down list.
- If needed, you can extend the “window” of your spreadsheet by dragging the bottom handle down.
- Voila! You are done. Now all you need to do is publish your site.
NOTE: The user can click on the various tabs that are visible, so you may want to hide the tab with the language codes since it is irrelevant to the user. Also, remember that the drop down list does not work when set to view only and is inserted in Google Site. To make the drop down list work, it is recommended that you set the sharing to be able to edit and then users will need to have the sheet pop open in a new window to change the language choice.
So how will you use the Google Translate feature? This is just one way that you can use it to support students of different languages and students in foreign language classes. If you create your own translatable page, let us know and share it in the comments below!