

We should go ahead and anticipate that “Zoom fatigue” will soon be added to the Oxford English Dictionary. One way to help diminish the agony of staring into your computer screen for another meeting or class is to make your presentation more personalized and better connect with your audience. This is true whether we are using Zoom, Google Meet, Microsoft Teams, or any of the other alternatives video conferencing platforms. One of the newest ways to accomplish this is by using Prezi. Your initial response might be something like, “Wait. You mean the presentation that causes Prezilepsy (more commonly known as motion sickness)?” Yes, that’s the tool. But, they’ve added the Prezi Video app which makes all the difference. Here’s the lowdown.
Presenting Prezi, Again
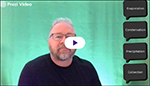
The Prezi Video app features you alongside your graphics. Instead of having the green screen behind you (as if using a virtual background feature), Prezi Video puts the presentation in front and to the side of you. This may be easier to understand if you see an example so click on the graphic to the right to view a brief demo video for the water cycle. Unfortunately, the Prezi Video doesn’t come with the free version of Prezi, so you do have to sign up for one of the other plans which start at $5/month. Also, if you want to download the video, you will need to either choose the Plus or Premiere subscription level or use a screencasting tool to capture the video you created.
Plan Ahead

Whenever you are creating a presentation, it is best if you plan ahead. Have your content already together (preferably in an organized format), what pictures or graphics you need to use, and any other resources that you may need referenced and/or handy. I find this especially true when I’m using Prezi. This will make creating your presentation much faster.
Getting Started
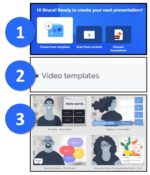
You should be able to follow this three-step process to get started.
Step 1: After creating your Prezi account, choose to create a new presentation from a template. After you create your first Prezi Video presentation, you should be good to choose either of the three options: create from template, start from scratch, or convert a PowerPoint.
Step 2: Select Video templates from the left-hand menu. This will filter out the traditional Prezi templates and give you templates that will show you as the background with the information predominantly on one side or the other.
Step 3: Select which template you want to use. You can add to and remove things from whichever template you choose, so you have a good bit of flexibility. Currently, you’ll find 49 different video templates available. For my water cycle example, I chose the Webinar template.
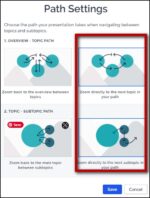
Drop your content into Prezi and create additional subtopics if needed. You will notice that, with the video templates, the topics and subtopics are not expanded to the full screen as when you normally present. Topics and subtopics will zoom in and out by default. If you want it to zoom from one topic to the next (as opposed to zooming from the topic to subtopic 1, back to the topic, and then to subtopic 2, etc.), click on the Path Settings button (bottom left of the editing screen and under the slide thumbnails.
Make It Simple by Recording
If you are recording your Prezi video, then you will find these steps rather simple – even though the first time or two you go through the steps may be awkward. Your time limit for recording is based on what plan you have. For the Basic (free) plan and the Standard ($5/month) plan, recordings are limited to 15 minutes. For the tiers above that (Plus and Premium), there is no time limit for recordings and you get HD videos. For the Basic plan, you can only have one recording at a time, while the Standard allows unlimited recordings.
There are several paths to create a video. I’ll share the one that I use.
- Click on the edit icon for your presentation that you created (using one of the video templates).
- Click on the Create video button above your presentation (just to the right of the blue Present button).
- Of the two options given, select the option to appear with your content for maximum audience engagement. Click the Continue button.
- Select the correct camera and click the blue Allow camera button.
- Click the Record video button. This will open a new tab, activate your webcam, and display you on the canvas with your presentation overlay. You are not recording yet.
- Use the right/left arrows (
 – bottom right of your video area) to practice going through your presentation. You may need to move over or change your position. You can also use the keyboard shortcut keys (1, 2, and 3 respectively) to toggle between the three views
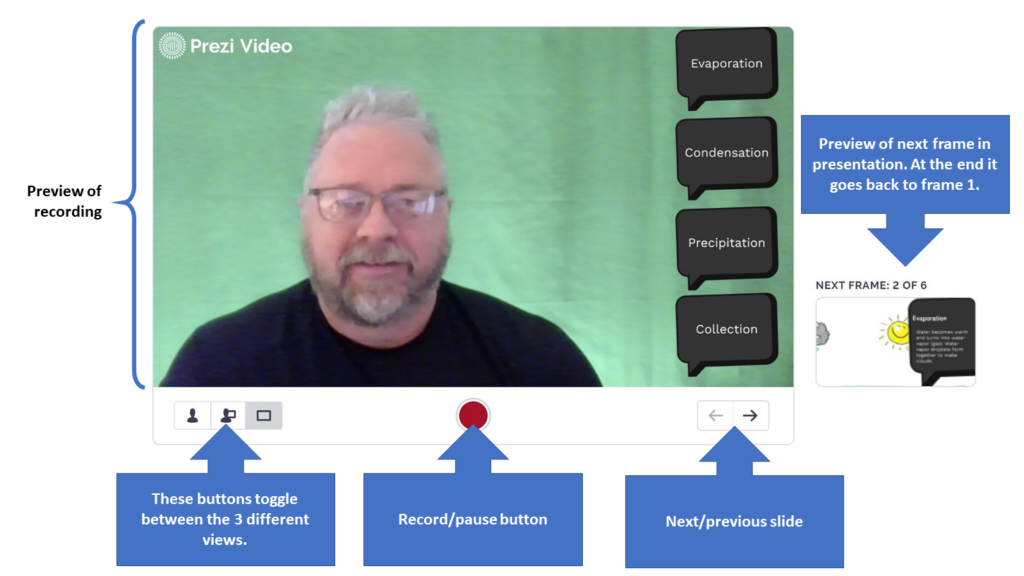
  : just you, you and the presentation, or the presentation with background. Notice that to the right of the video is a thumbnail of the next slide.
 - When you are ready to record, click the red record button (bottom center). You will have a three-second countdown before recording begins. Change the views and slides as needed while you record. You will see a counter keeping track of the video length. Notice that, while recording, the record button has changed to a pause button.
- Pause the video if needed by pressing the recording button again.

- When done, click the Done recording button (bottom right). If you messed up and want to record again, click the Discard and record again link (bottom left).
- When done recording, you can trim the video. Click on the Trim button
 This will allow you to move the purple “bookends” to trim off the beginning or ending portion(s) as needed. You are not able to remove sections within the video. Click the Done button when finished trimming.
 - Click the Save video button.
- Now edit the information about the video:
- Set the appropriate privacy setting (Public or Unlisted).
- Update the title if needed.
- Add tags to your video to make it easier to find.
- Add a description to your video.
- Now your video is ready to be shared! You can do the following to share it:
- Click on the Copy link button to get the link for your video.
- Download the video (if you have the appropriate license) by clicking on the Download button.
- Click on the share video icon to share on Facebook, LinkedIn, Twitter, or Google Classroom. You can also copy the link by clicking on the Copy button.
- Click on the embed Prezi video icon to apply dimensions and copy the code to embed your video.
Impress Your Friends by Going Live
Going live in Prezi isn’t for the faint of heart. Until you get the hang of creating a video, presenting live may be equivalent to learning to ride a unicorn while balancing a torch on your head. Okay, maybe not quite that difficult, but you will need to play with it to feel comfortable with going live.
With Prezi, you can stream live to a lot of tools including (click on the name to view a tutorial by Prezi on live streaming with the tool) Zoom, Webex, GoToWebinar, GoToMeeting, Google Meet, OBS, Microsoft Teams, Slack, Facebook, Skype, and YouTube! You will need to download the Prezi Video desktop application (PC or Mac) in order to live stream. Each of the tools listed above has an instructional page with a brief tutorial. Be aware that you when you livestream and video conference with Zoom, you will need to use the Prezi window to navigate your presentation, which will be fed to your tool of choice. For this, I recommend that you have two monitors and you practice with a friend to build your confidence and how to use it seamlessly.
Here are a few examples (but not necessarily exemplars) of Prezi videos to give you an idea of how you might want to use it.
Share Your Prezi Video

So what are you waiting for? Create and share your Prezi video with us. After creating your video, copy/paste the link in the comments below. If you aren’t ready to share your video with a wider audience, then drop a comment to us and let us know what you teach and how Prezi video or live streaming with Prezi will enhance the learning.
1 comment
I like the tips, but wish that you’d also include a comment about the accessibility or lack of accessibility for students with disabilities for each tool you review. Teachers should not be using a tool if it is not fully accessible.